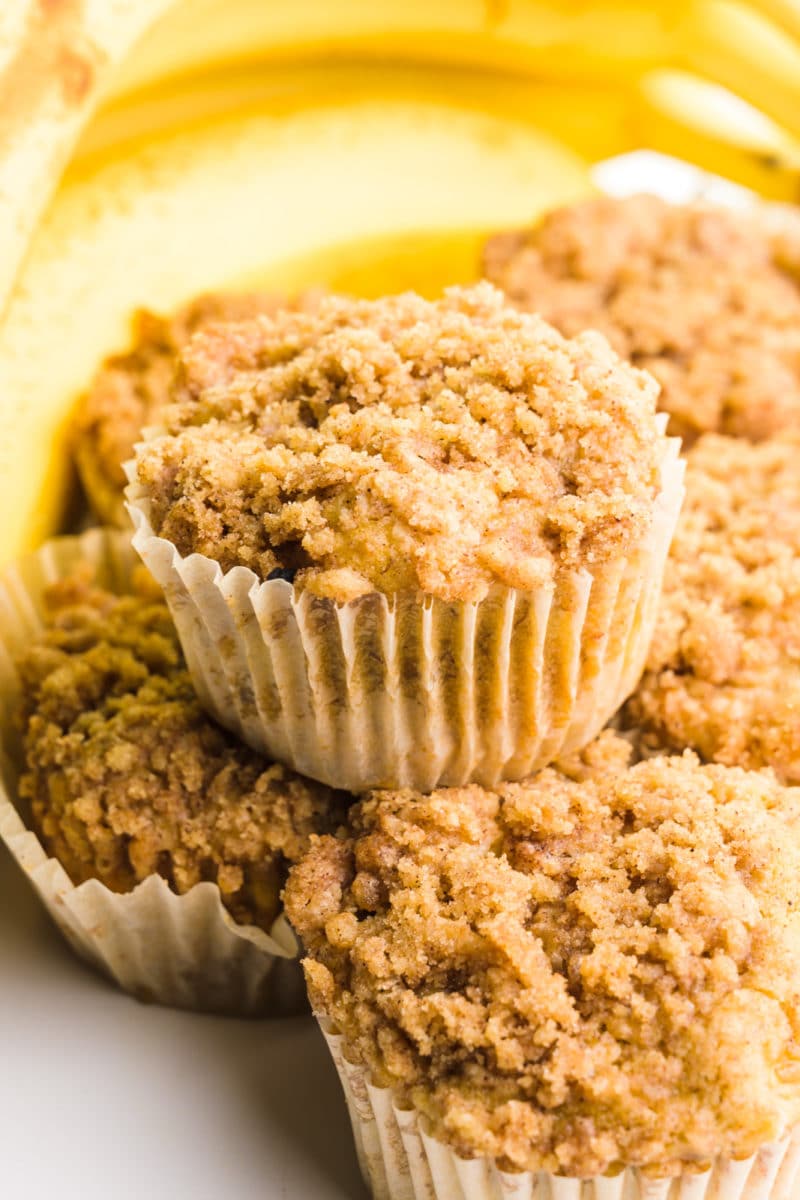
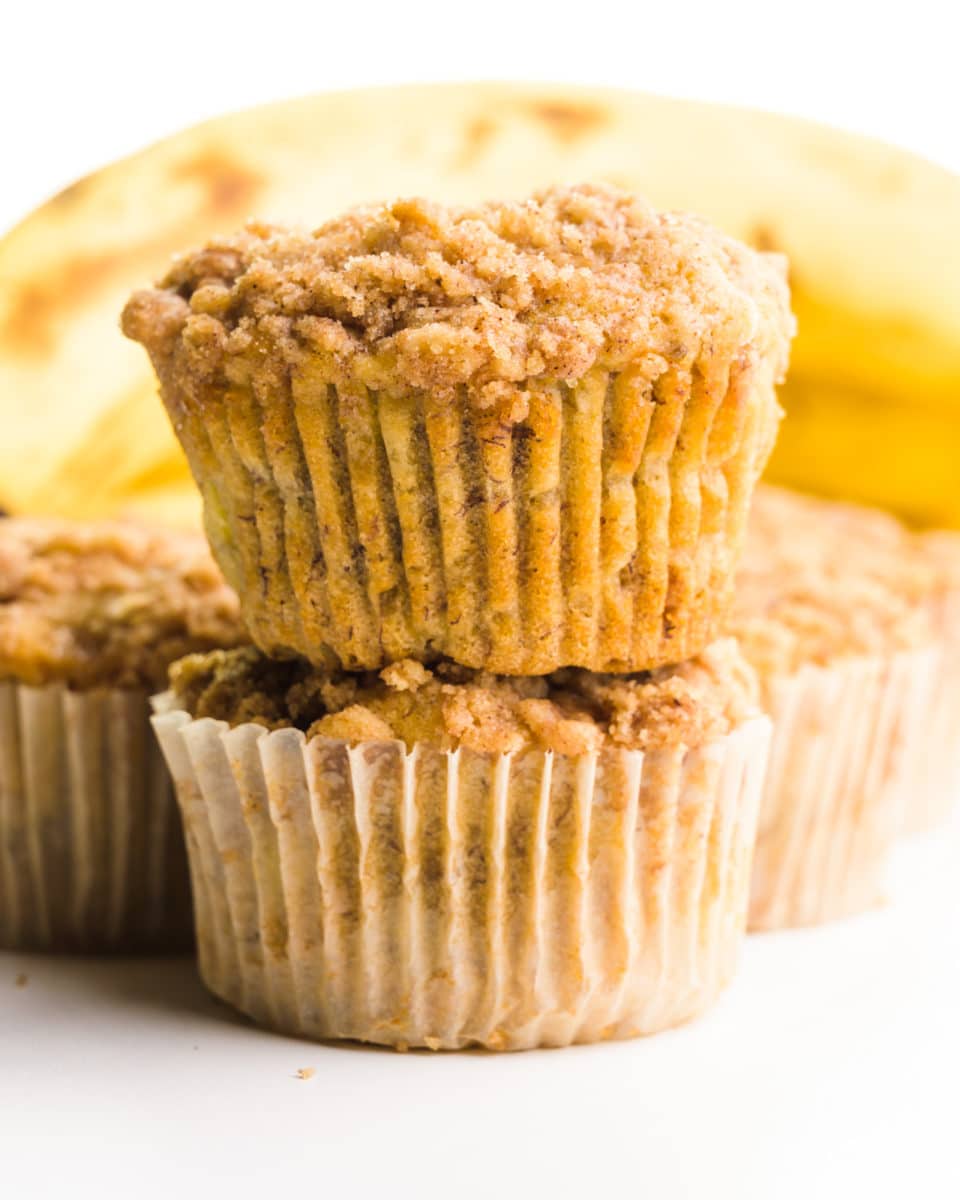
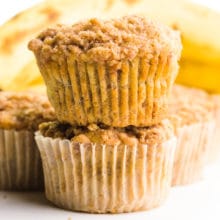
Let’s be honest, finding a crowd-pleasing breakfast muffin that’s also vegan and gluten-free can feel like a culinary treasure hunt. But not anymore! This vegan gluten-free banana muffin recipe needs just a few ingredients and comes together in a flash. Perfect for new vegans or anyone craving an easy, decadent dessert!
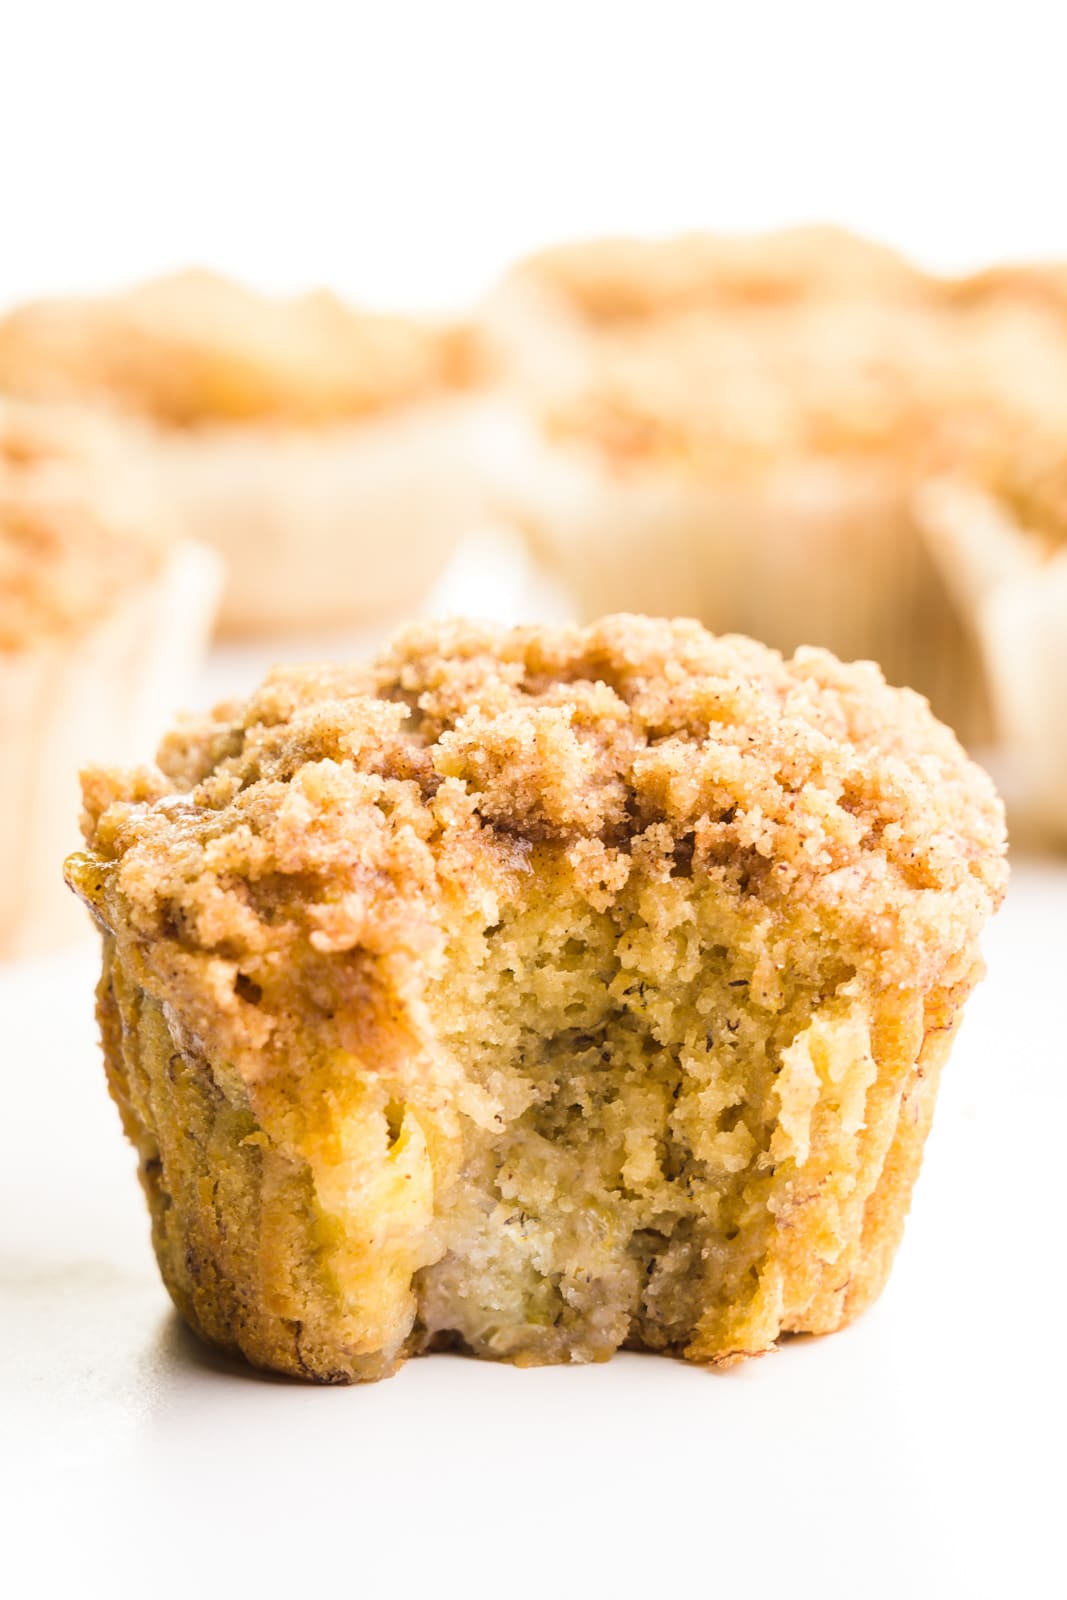
I love making muffins for breakfast, especially when we have guests in town. And I love these muffins because they’re also gluten-free, meaning I don’t have to call and find out everyone’s dietary preferences. Everyone can eat these…and they want to because they’re so good!
Ingredient Notes
You can find the full printable recipe, including ingredient quantities, below. But first, here are some explanations of ingredients and steps to help you make this recipe perfect every time.
- Buttermilk: If you don’t have vegan buttermilk, make your own! Mix 1 cup plant-based milk with 1 tablespoon lemon juice or apple cider vinegar, and let sit for 5 minutes.
- Brown Sugar: Light or dark works here, offering slightly different flavors.
- Flour: Your favorite gluten-free 1:1 baking blend will be perfect.
It’s so much easier to be gluten-free these days thanks to the wide range of gluten-free flour mixes available!
What Bananas are Best for Muffins?
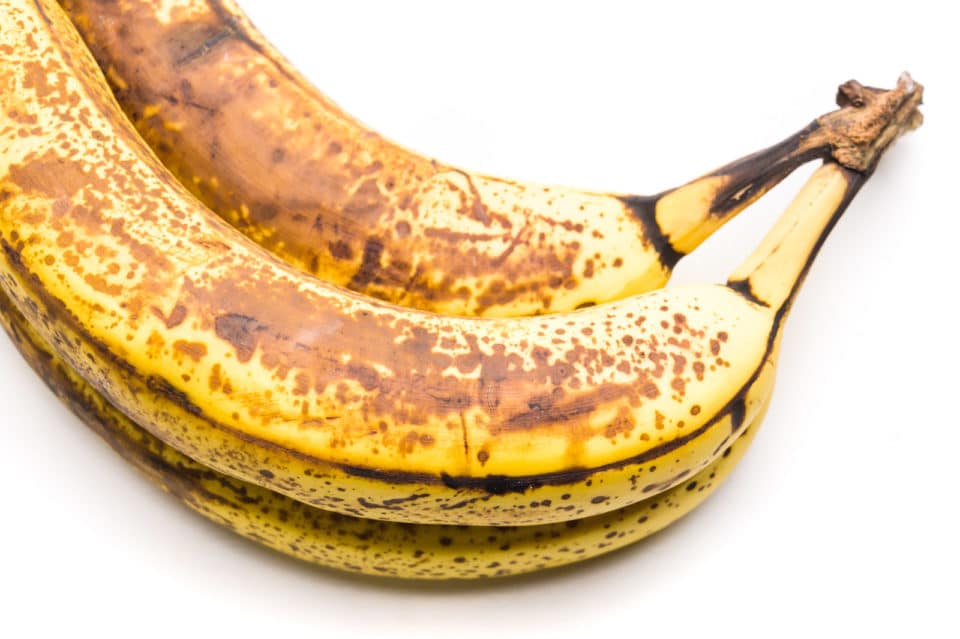
For these muffins, the riper the banana, the better! Look for bananas with plenty of brown spots – that’s when their sweetness shines. Avoid completely black bananas, and if yours aren’t quite ripe, pop them in the oven at 350°F/175°C for 10 minutes until softened. Let them cool, mash, and get ready for muffin magic!
How to Make Gluten-Free Banana Muffins
- Get Prepped: Preheat oven to 375°F/190°C and line your muffin tin.
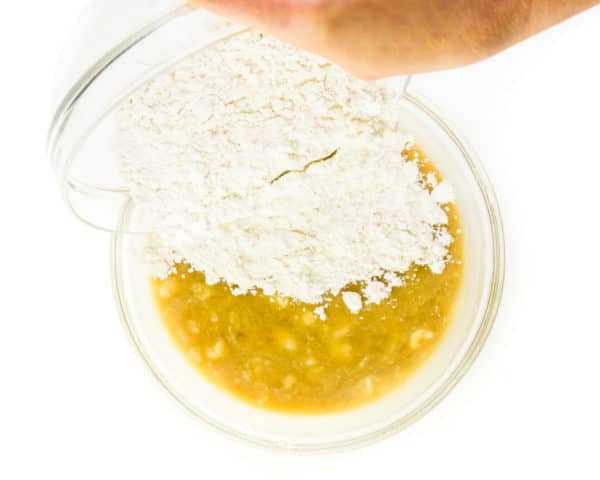
- Mash & Mix: Give those ripe bananas a good mash, then mix in buttermilk, sugar, and melted vegan butter.
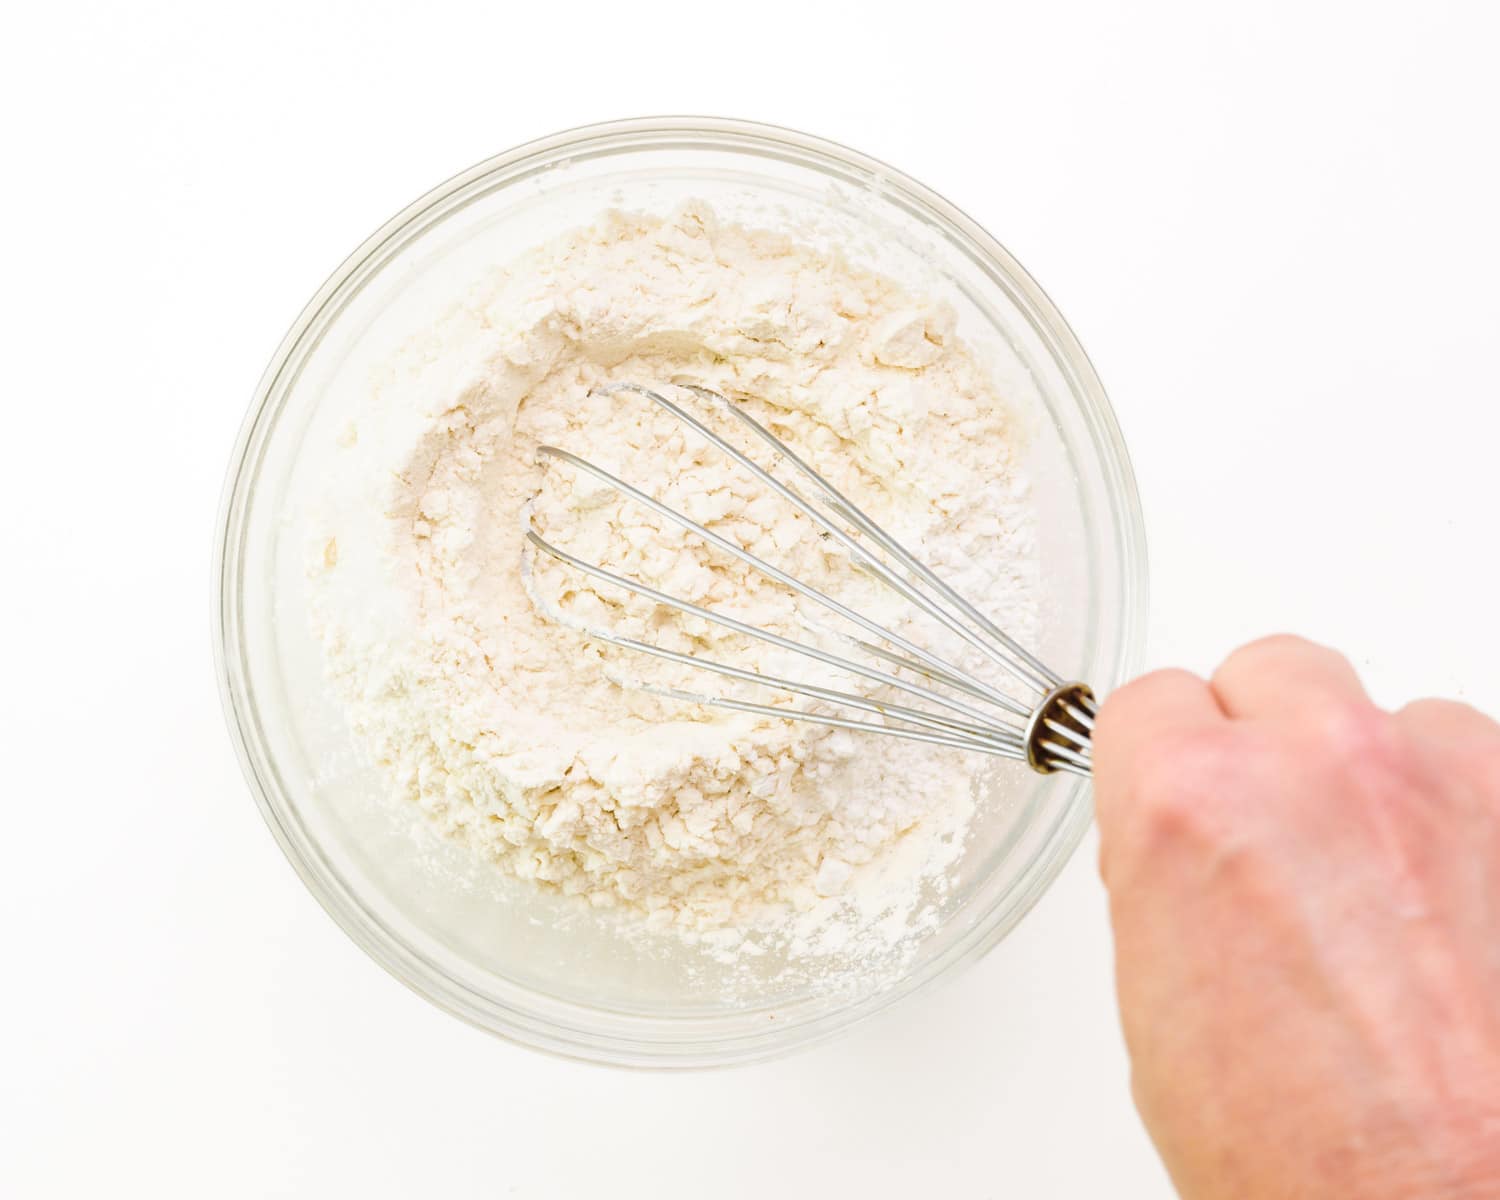
- Dry Ingredients: Combine your flour, baking powder/soda, and salt (and pecans, if you want!).
- Batter Up: Time to combine the wet and dry ingredients. A few gentle stirs are all you need!
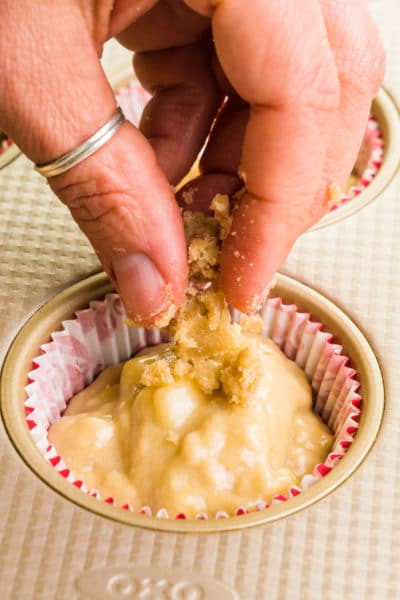
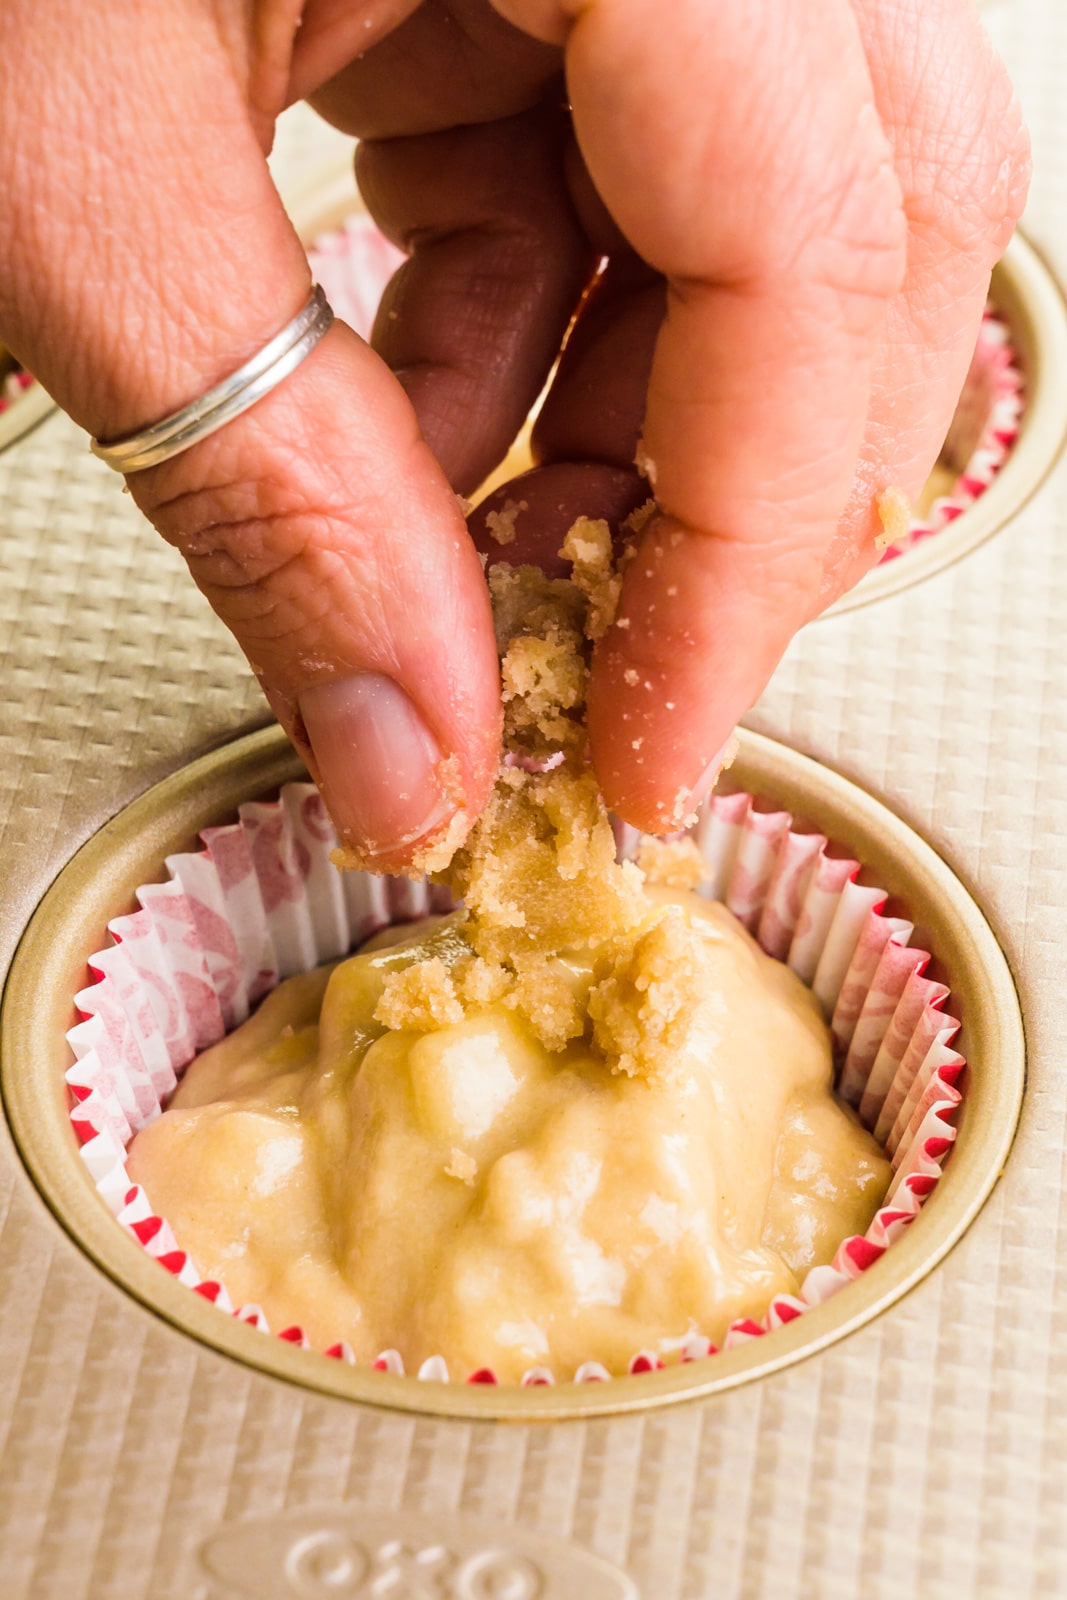
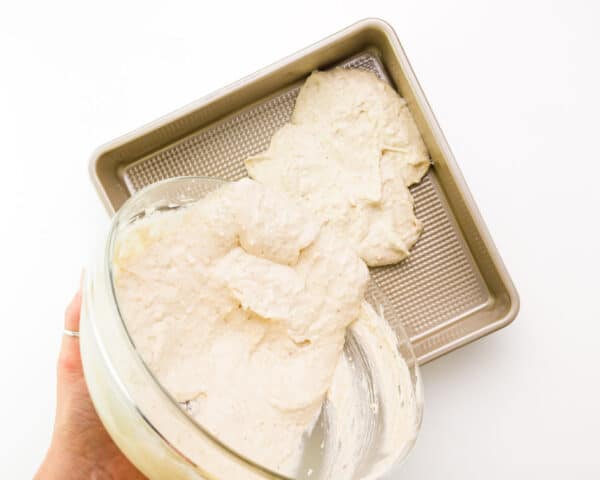
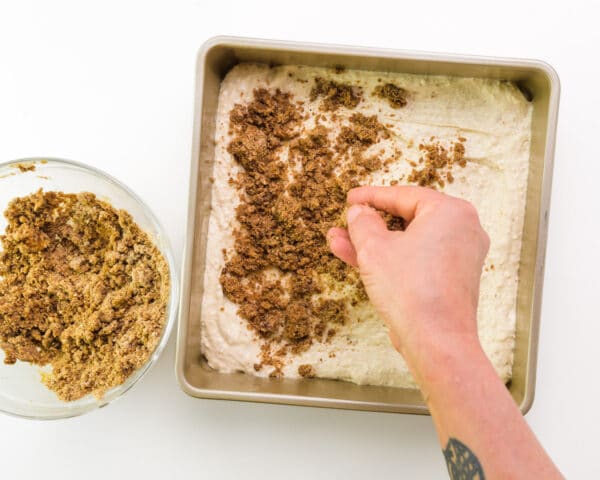
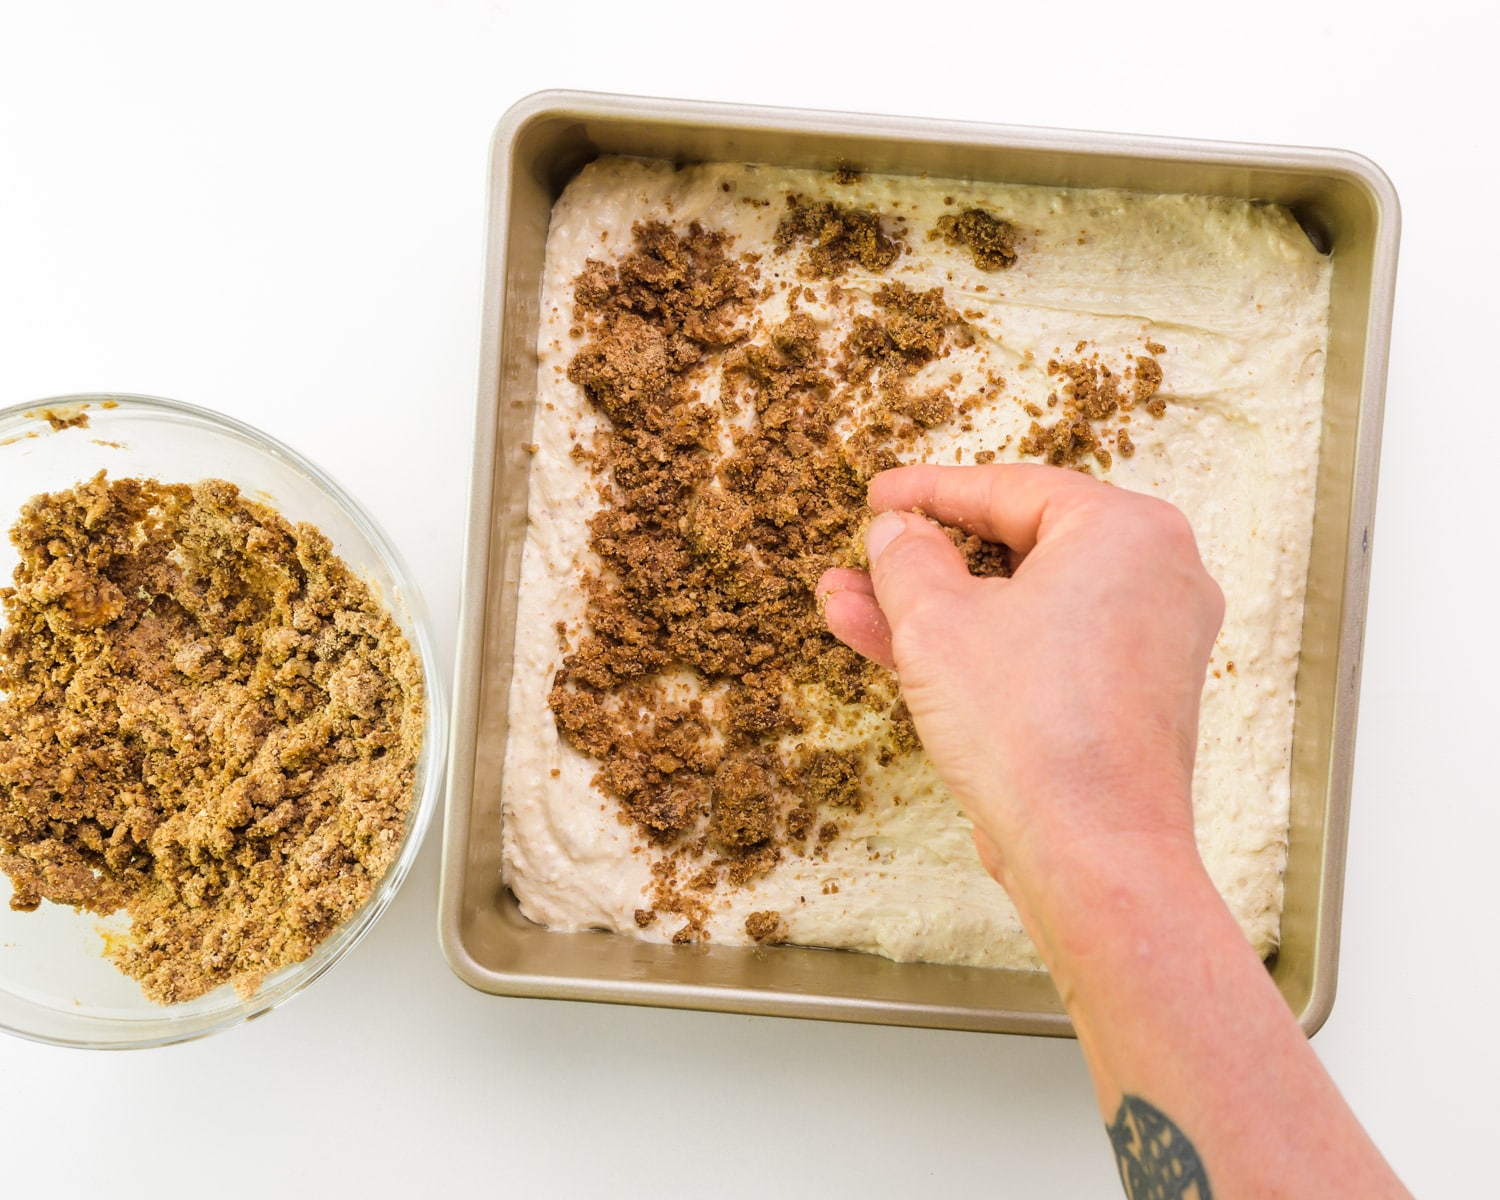
- Top It Off: Spoon that batter into your tin and sprinkle with the delicious crumble topping.
- Bake & Enjoy: 20-22 minutes in the oven, then cool slightly before indulging.

What Makes This Recipe Shine?
- Indulgent Treat: Rich banana flavor and tender crumb? Yes, please!
- Crowd Favorite: These muffins disappear faster than you can say “dessert!”
- Effortlessly Delicious: Simple recipe, incredible results.
Storage Tips
Store muffins in an airtight container at room temp for a few days or freeze for later enjoyment.
Marly’s Tips
Here are some of my favorite tips to make these vegan gluten-free banana muffins perfect every time:
- Chocolate: Add some dairy-free chocolate chips to make gluten-free banana chocolate chip muffins.
- Adding streusel: gently pressing the crumble topping into the batter helps it bake into the muffins.
- Gluten-free flour: keeps these muffins perfect for those minimizing gluten in their diet.
- Room Temp is Key: Ingredients mix better when they’re not fridge-cold.
- Don’t Overmix: A few lumps are okay – overmixing can lead to tough muffins.
- Frosting Fun: Top cooled muffins with a drizzle of vanilla frosting for an extra-special treat.
Serving Suggestions
- Breakfast Star: Serve muffins warm with a dollop of vegan soy yogurt.
- Dessert Delight: Enjoy muffins for dessert with a scoop of dairy-free vanilla ice cream.
- Giftable Goodness: These muffins make a thoughtful and delicious gift.
It really was fun to make these gluten-free banana muffins, and everyone loved them!
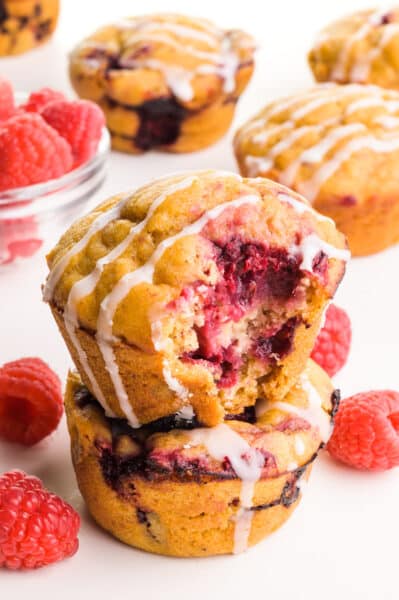
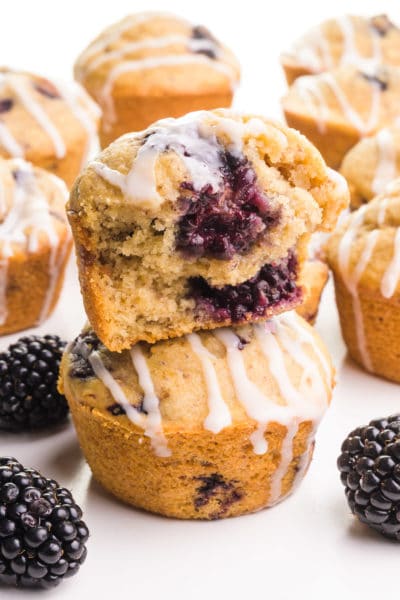
More Muffin Recipes
If you loved these gluten-free vegan banana muffins, here are even more tasty muffins you’ll want to try:

Whether gluten is an issue for you or not, these gluten-free vegan banana muffins are easy to make and tasty too. So, if you or someone in your life needs gluten-free, this recipe will make everyone happy!
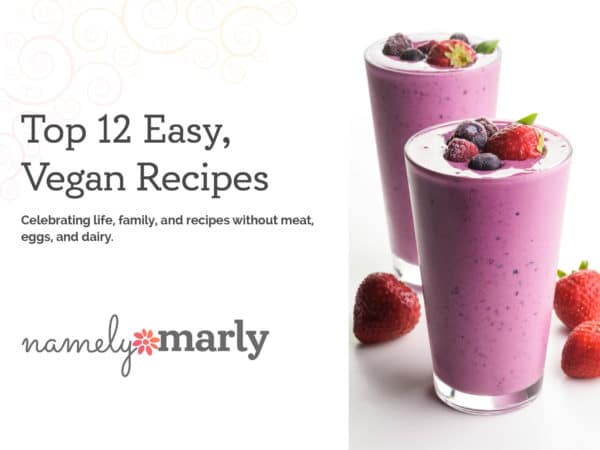
Subscribe and get a free Easy Vegan Recipes eBook
Plus our latest vegan recipes, delivered right to your inbox!
Gluten-Free Banana Muffins
Equipment
Ingredients
Crumble Topping
- 1 tablespoon vegan butter , softened
- 2 tablespoons gluten-free flour
- ¼ cup brown sugar
- ½ teaspoon ground cinnamon
Banana Muffins
- 3 ripe bananas mashed
- ⅓ cup vegan buttermilk (plant-based milk combined with a tablespoon of apple cider vinegar or lemon juice)
- ¾ cup brown sugar
- ⅓ cup vegan butter , melted
- 1⅔ cups gluten-free flour (see note)
- 2 teaspoon baking powder
- ½ teaspoon baking soda
- ½ teaspoon salt
- ½ cup optional: pecans , chopped
Instructions
- Preheat oven to 375°F/190°C. Prepare muffin pans by lining with papers or spraying with vegetable cooking spray.
For the Crumble Topping:
- Take a moment to mix the crumble topping ingredients – the vegan butter, gluten-free flour, brown sugar, and cinnamon. Stir well and set aside.
For the Banana Muffins:
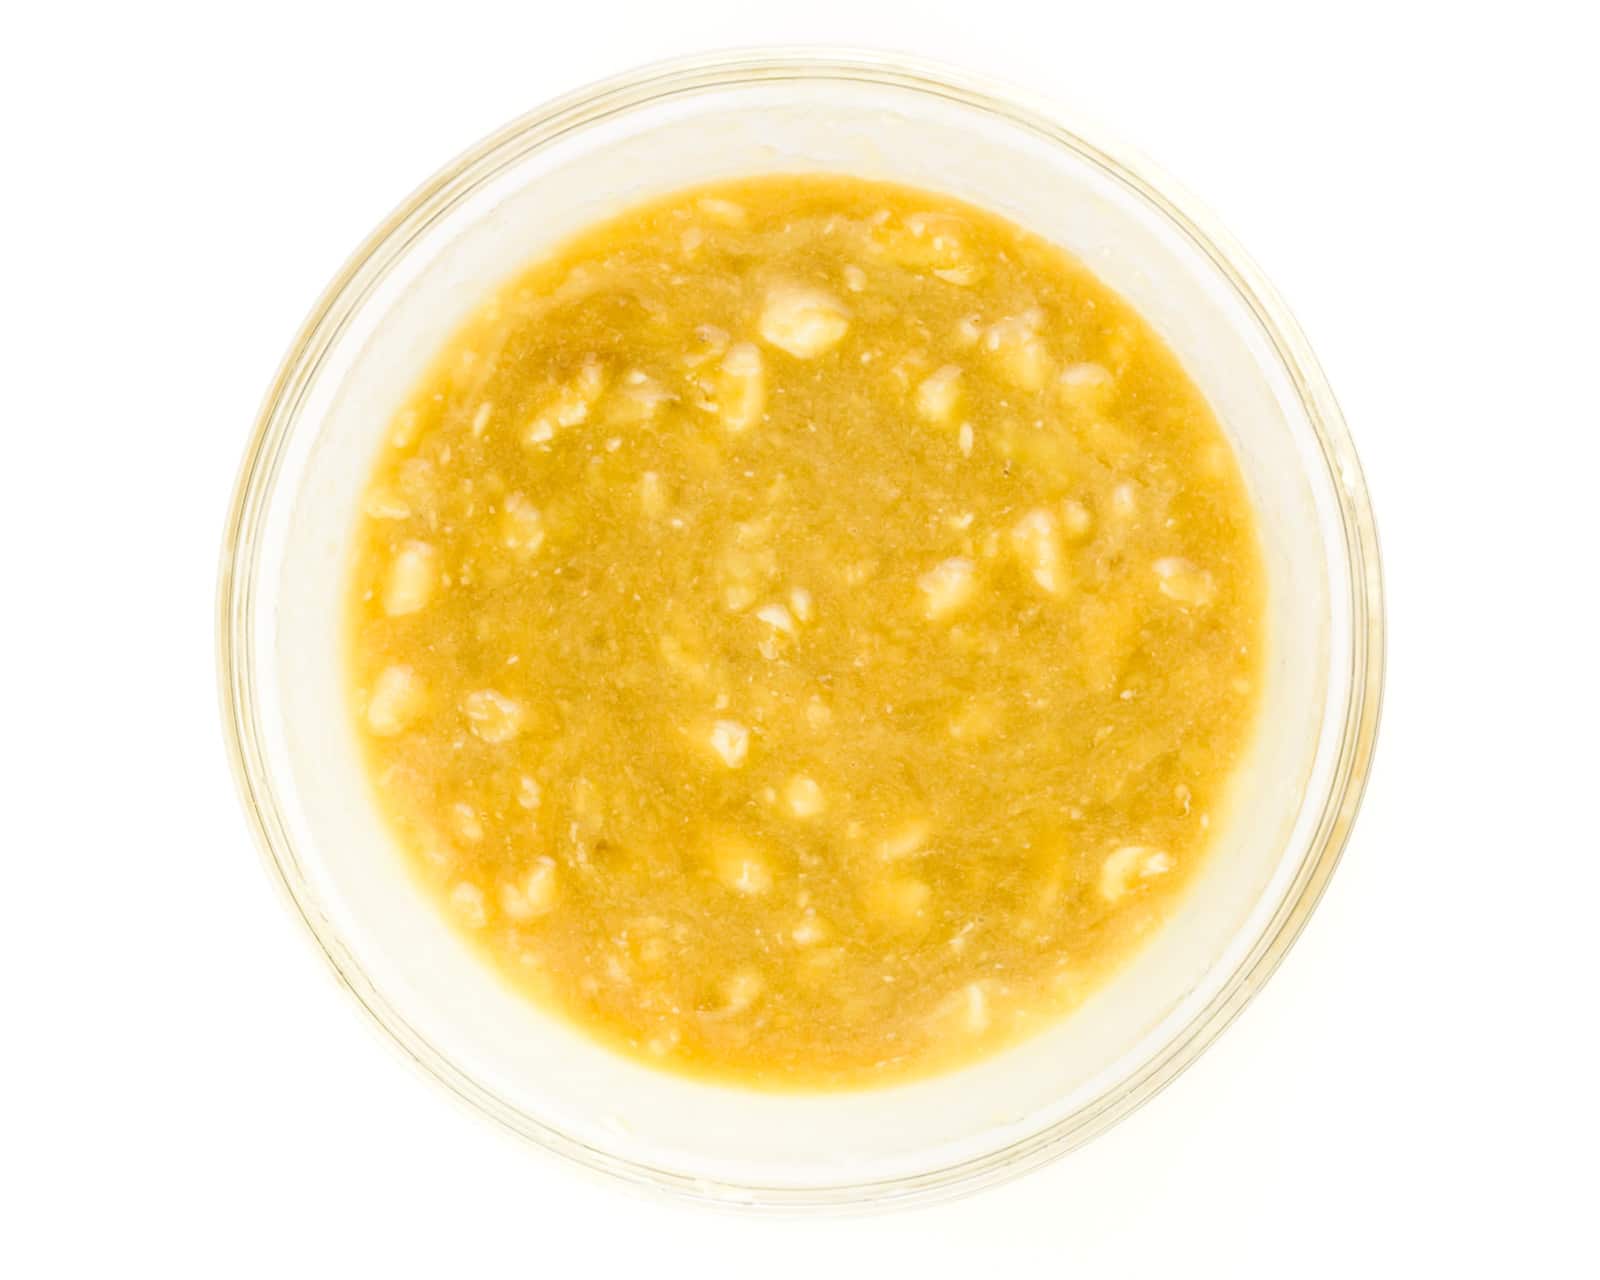
- Mash the bananas in a mixing bowl. Add the buttermilk, brown sugar and melted vegan butter. Stir until well combined and set aside.

- Now combine the gluten-free flour, baking powder, baking soda, and salt. Stir until well combined. If using, add the chopped nuts to the flour.
- Make the muffin batter by combining the wet and dry muffin ingredients. Stir until combined (some small lumps are ok).
- Distribute the muffins in prepared muffin compartments.
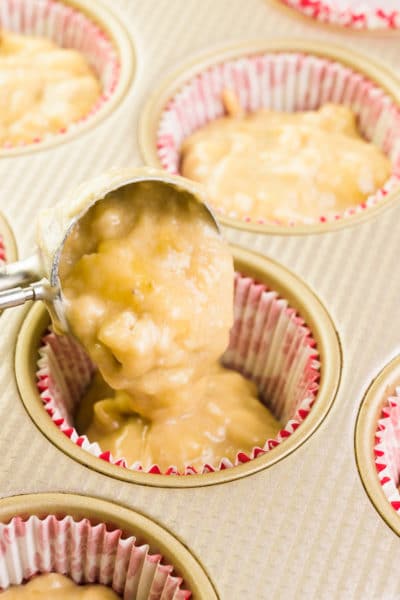
- Then equally sprinkle crumble topping over each muffin, using your hand to gently press it into the batter.
- Place the pan in heated oven and bake for 20 – 22 minutes. Once they're done, remove them from the oven and set aside to cool for a few minutes before devouring.
- For a dramatic flair, add a drizzle of vanilla frosting (1/2 cup powdered sugar combined with just enough soymilk to make it spreadable).


Nutrition
This post was originally published in 2012 and was updated to include new photos, new text, and an updated recipe in 2021.
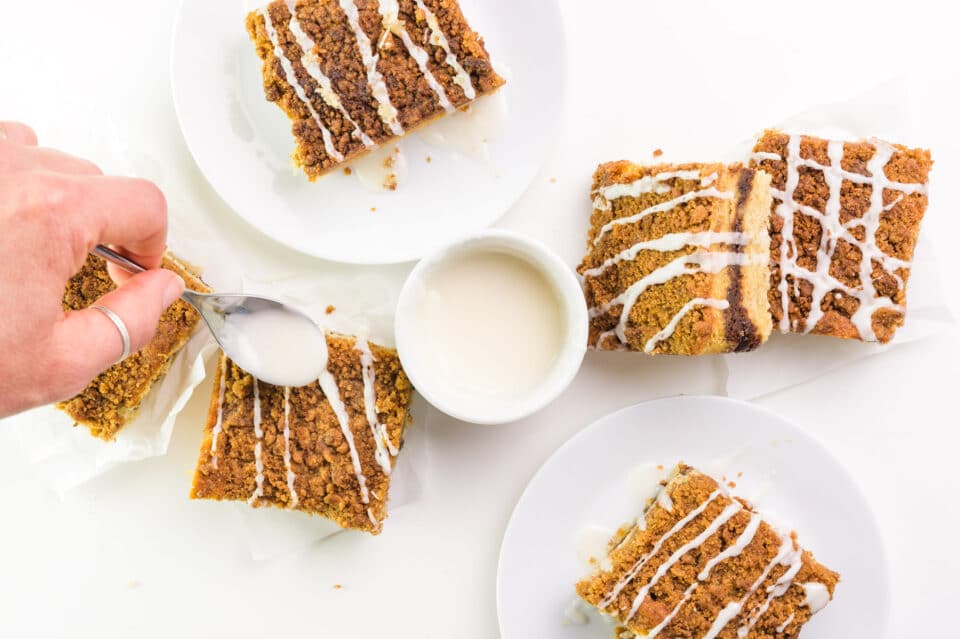
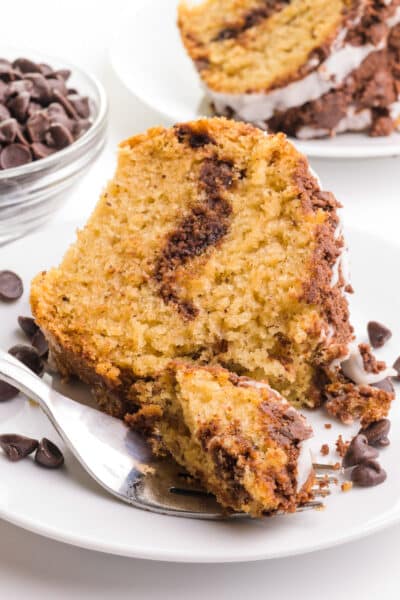
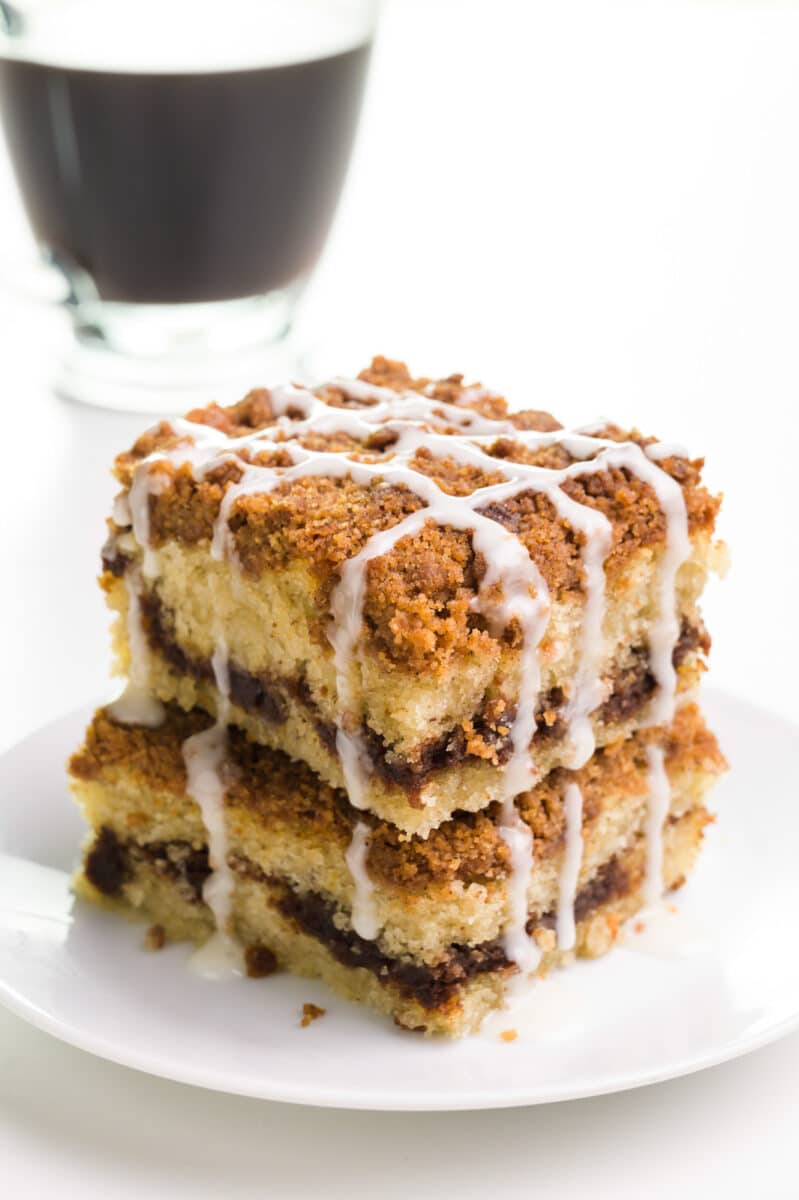
Indulge in the decadent delight of vegan coffee cake, a buttery treat infused with cinnamon and crowned with a delectable streusel topping. Perfect for breakfast, it pairs wonderfully with a steaming cup of coffee or a soothing mug of hot tea
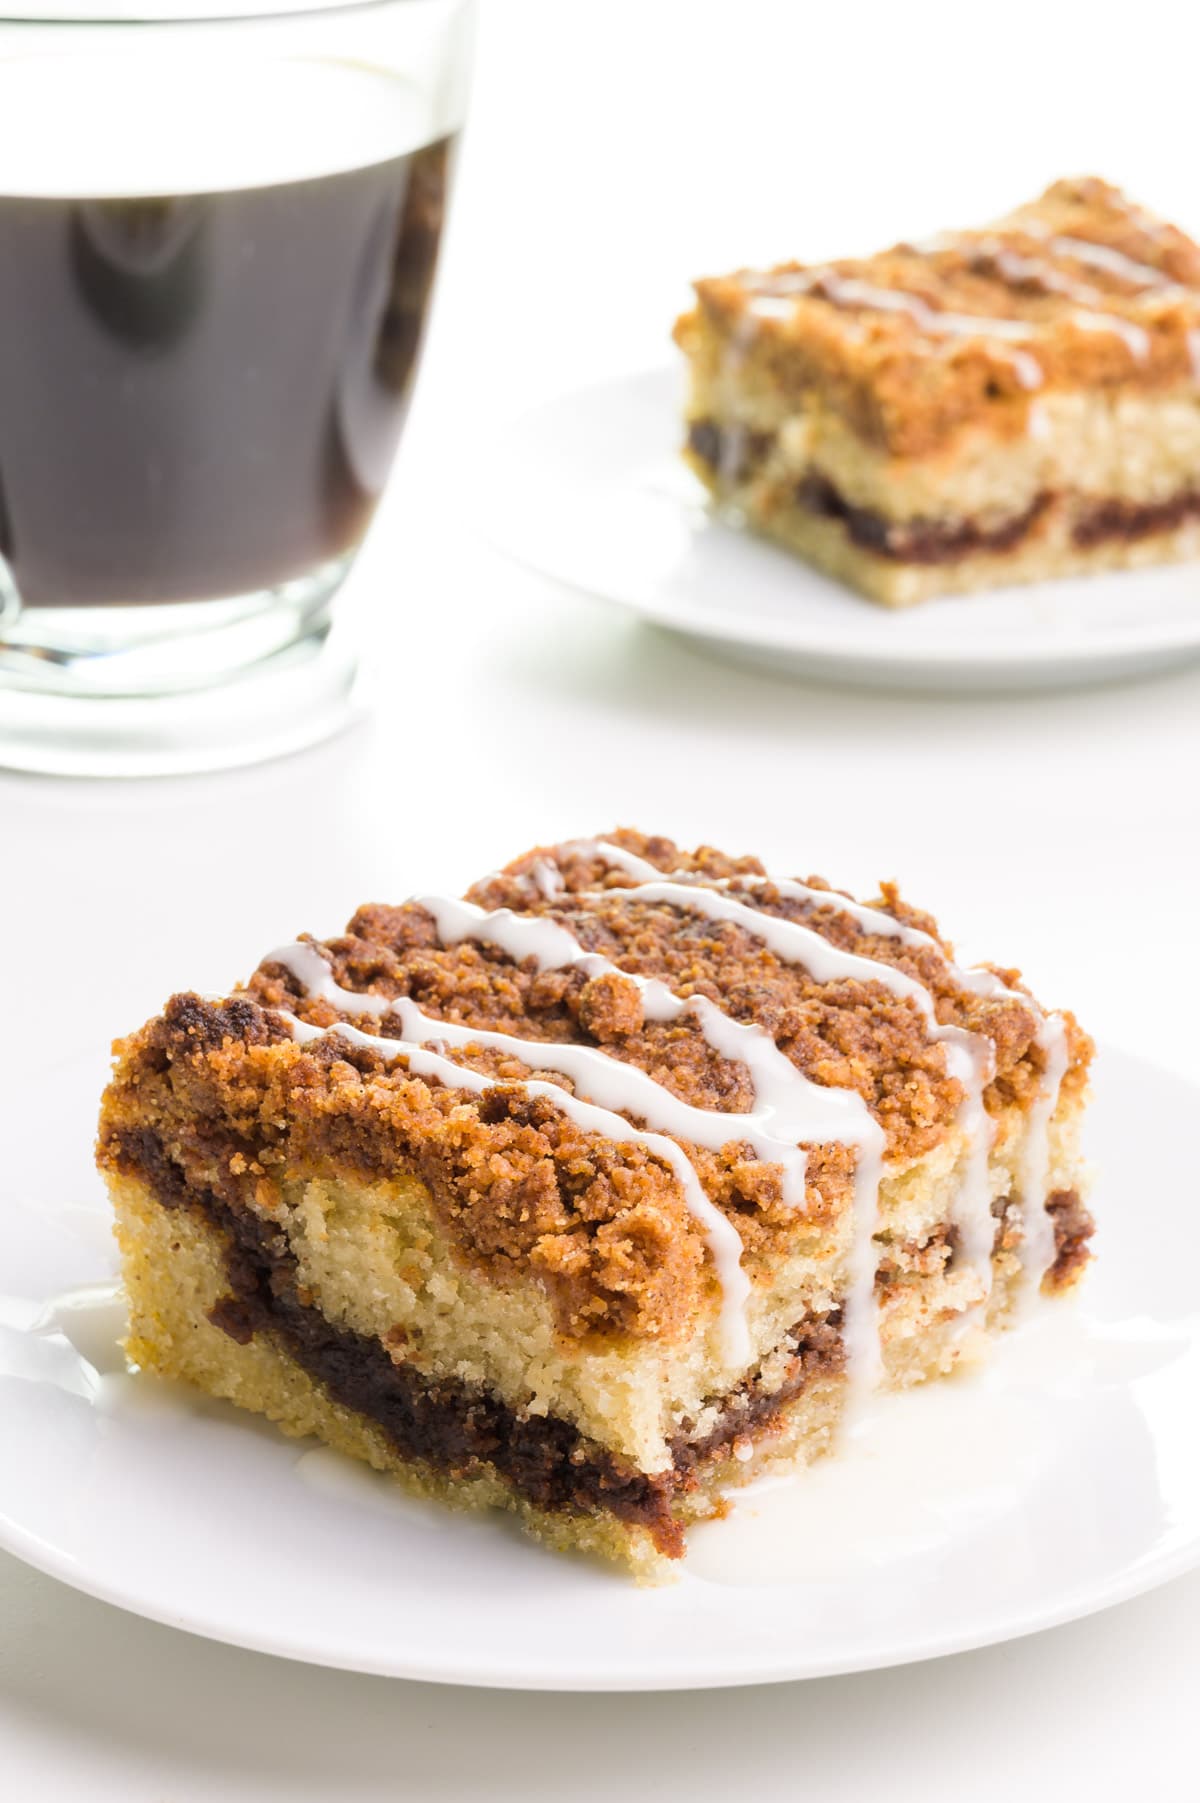
I absolutely adore treating myself to an indulgent weekend delight, and this vegan coffee cake is a true favorite in my household!
Whether it’s a lazy Sunday morning or a special occasion with guests, this scrumptious treat never fails to impress. It’s a wonderful way to showcase the delicious possibilities of vegan brunch and share a moment of joy with loved ones.
Ingredient Notes
You can find the full printable recipe, including ingredient quantities, below. But first, here are some explanations of ingredients and steps to help you make this recipe perfect every time.
Here are the ingredients you’ll need for this recipe, including substitution ideas:
- Sugar — You’ll need both brown sugar and granulated sugar for this recipe. Adding depth and caramel notes to both our crumble topping and filling, brown sugar is a must-have for that irresistible sweetness.
- Cinnamon — Infusing our cake with warm, aromatic flavor, cinnamon is the spice that ties everything together.
- Cocoa powder — I like adding cocoa powder to the filling to give it a darker color. It’s not enough to add flavor, but the drama it adds between layers of coffee cake is fantastic.
- Flour — The backbone of our cake’s structure, all-purpose flour ensures a tender crumb and fluffy texture.
- Vegan butter — It’s essential to use vegan butter rather than a tub of margarine, which has more water. The higher fat content of vegan butter is critical to getting the right texture.
- Vegan Buttermilk — We’ll make vegan buttermilk by combining plant-based milk (almond milk or soy milk are my go-to favorites, although oat milk is another great option) and apple cider vinegar.
- Vegan yogurt — We’ll use vegan yogurt to substitute the volume created from eggs. I like using plain vegan yogurt like Foragers Cashew Yogurt. You can substitute vegan sour cream.
- Egg Substitute — To substitute the binding power of eggs, we’ll use a combination of cornstarch and ground flaxseed. Ground flaxseed not only enhances texture but also adds a boost of omega-3s. You can usually find this superfood in the baking aisle or health food section of your local grocery store.
If you live in Australia or the UK, all-purpose flour may not mean much to you. Learn more about how all-purpose flour and plain flour are the same things.
How to Make Vegan Coffee Cake
The full recipe with step-by-step instructions and process shots is in the recipe card below. But here’s a quick synopsis of how to make this tasty treat:
- Prepare Toppings: Stir together the crumble topping and set it aside. Next, make the filling and set it aside.
- Prepare Batter: Start by creaming vegan butter and sugar until light and fluffy. Then, add plant-based buttermilk, ground flax meal, and cornstarch, and beat until well combined. In a separate bowl, stir together the dry ingredients, then incorporate them into the wet mixture to create the batter.
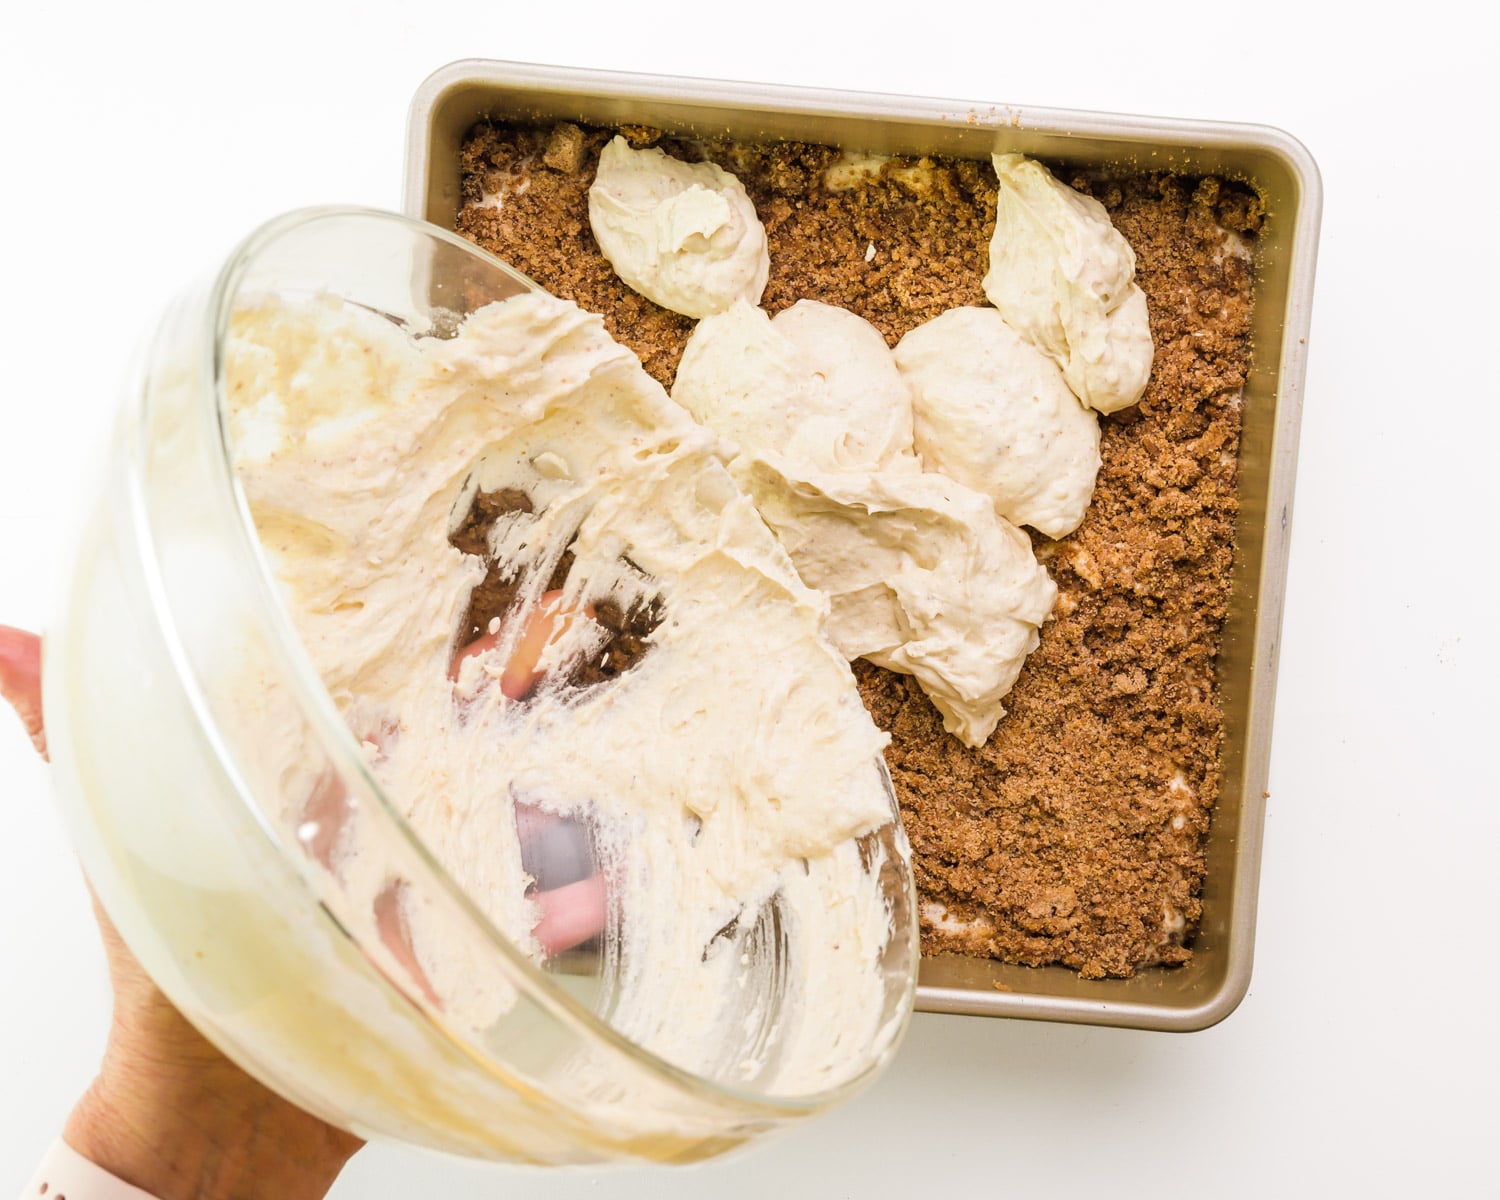
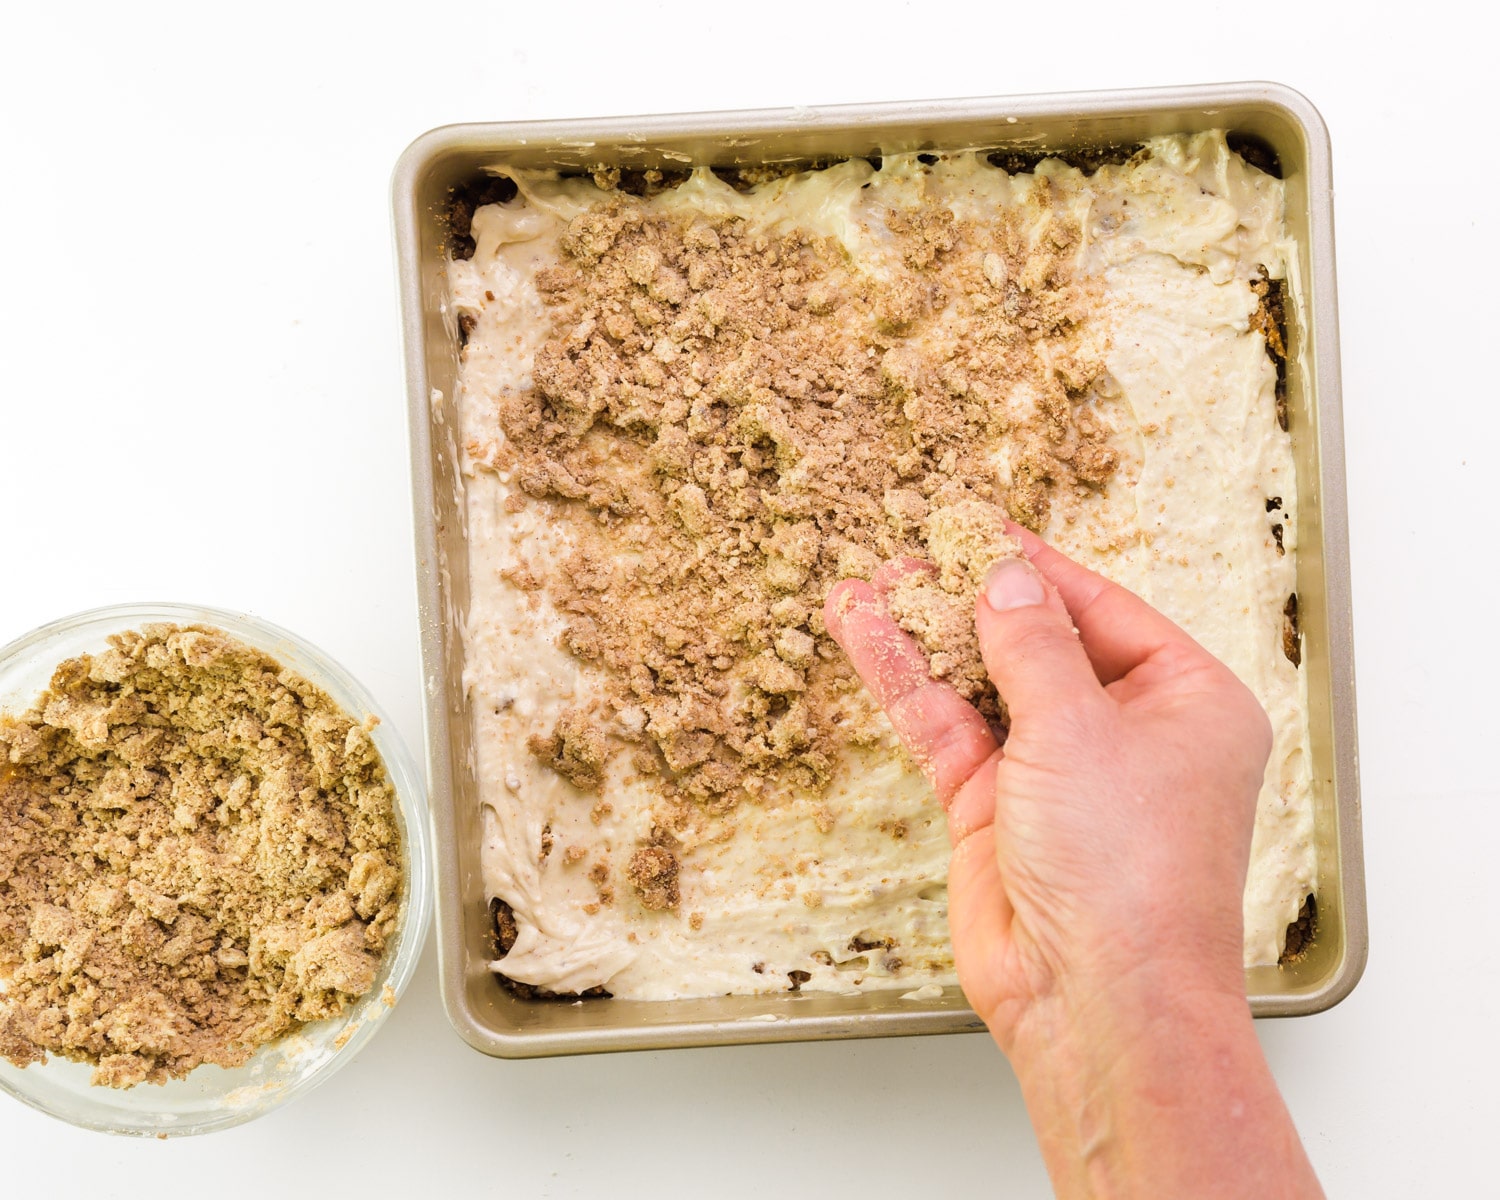
- Assembly: Begin by pouring half of the batter into the prepared pan and spreading it evenly. Next, add the filling over the batter, then pour the remaining batter over the filling. Finally, sprinkle the crumble topping evenly over the batter and gently press it down.
- Bake: Bake the assembled cake for 50-55 minutes, or until a toothpick inserted in the center comes out clean.
Storage Tips
Cover coffee cake or transfer slices to an airtight container. It will keep at room temperature for up to 3 days or in the fridge for up to 7 days. It can also be frozen for up to 2 months.
Marly’s Tips
- Make sure the butter is softened by leaving it out on the counter for about 30 minutes
- You can double the crumble topping if you like more streusel
- Add 1 cup of peeled, sliced apples to the batter to make vegan apple coffee cake
- To make vegan coffee cake muffins, pour the batter into greased or papered muffin tins and then distribute the crumble topping evenly over each muffin before baking.
- Make vegan blueberry coffee cake by adding 1/4 to 1/2 cup fresh or frozen blueberries on top of the filling.
- Make this into a sugar-free coffee cake by using Swerve sweetener. It bakes 1:1 like sugar.
New to Vegan Baking?
The idea of making cookies, cakes, or muffins without eggs or dairy can seem like a hill too tall to climb. But with the simple tips in my Guide to Vegan Baking, you’ll be baking like a vegan pro in no time!
Vegan Breakfast Cake
Indulge in the ultimate breakfast treat with this delightful vegan coffee cake recipe! I’m someone who is sensitive to caffeine, so I’ve oftentimes wondered, does coffee cake have caffeine?
Guess what? There’s no need to worry about caffeine, as this cake is all about the irresistible flavors of cinnamon, brown sugar, and crumbly goodness.
Serving Suggestions
Serve slices of this butter coffee cake with any of the following:
- A hot beverage of your choice, such as coffee or tea
- Vegan Hot Chocolate
- Hot Chocolate Tea
- Iced Golden Milk
- Vegan Chocolate Milk
- A tall glass of Pecan Milk with a touch of cinnamon is nice, too.
More Vegan Pastries
If you love this vegan coffee cake, you’ll want to try even more vegan breakfast pastries. Here are some favorites:


Subscribe and get a free Easy Vegan Recipes eBook
Plus our latest vegan recipes, delivered right to your inbox!

Vegan Coffee Cake
Ingredients
Crumble Topping/Filling
- ⅔ cup brown sugar, packed
- 3 teaspoons ground cinnamon
- 1 teaspoon cocoa powder (for color)
- 1 ¼ cups all-purpose flour
- ⅔ cup vegan butter , softened
Coffee Cake
- 1 cup plant-based milk
- 1 tablespoon apple cider vinegar
- ¾ cup vegan butter
- ¾ cup granulated sugar
- ½ cup vegan yogurt (see notes)
- 1 tablespoon cornstarch
- 1 tablespoon ground flaxseed
- 1 ¾ cups all-purpose flour
- 2 ½ teaspoons baking powder
- ½ teaspoon salt
Instructions
- Preheat oven to 350°F/175°C. Spray a 9×9 pan with vegetable spray.
For the Crumble Topping/Filling:
- In a bowl, combine the brown sugar, cinnamon, cocoa powder, flour, and softened vegan butter. Mix until crumbly. This mixture will serve as both the crumble topping and filling.
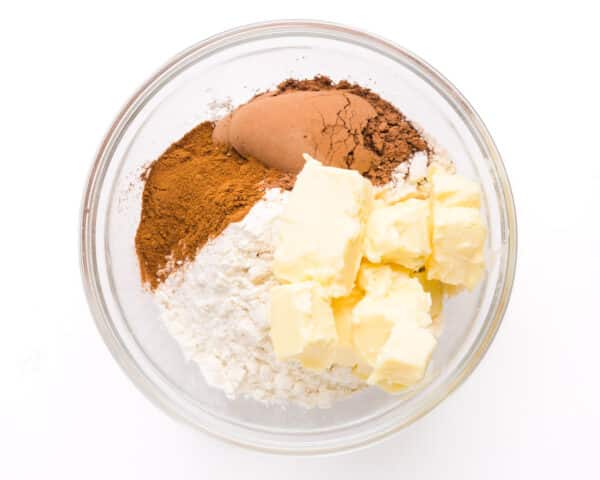

For the Coffee Cake:
- Combine the milk and vinegar to make buttermilk. Set aside.
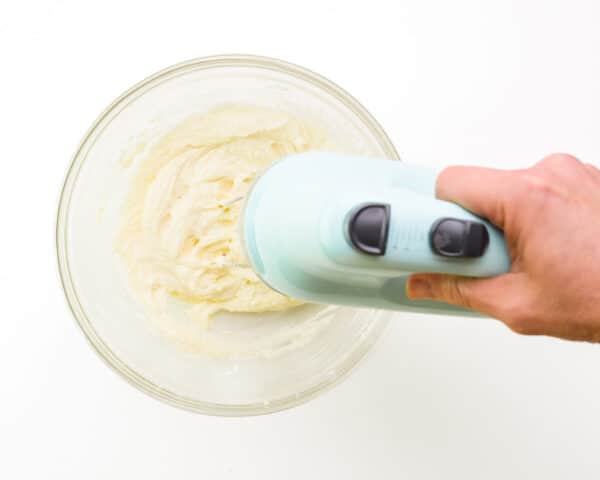
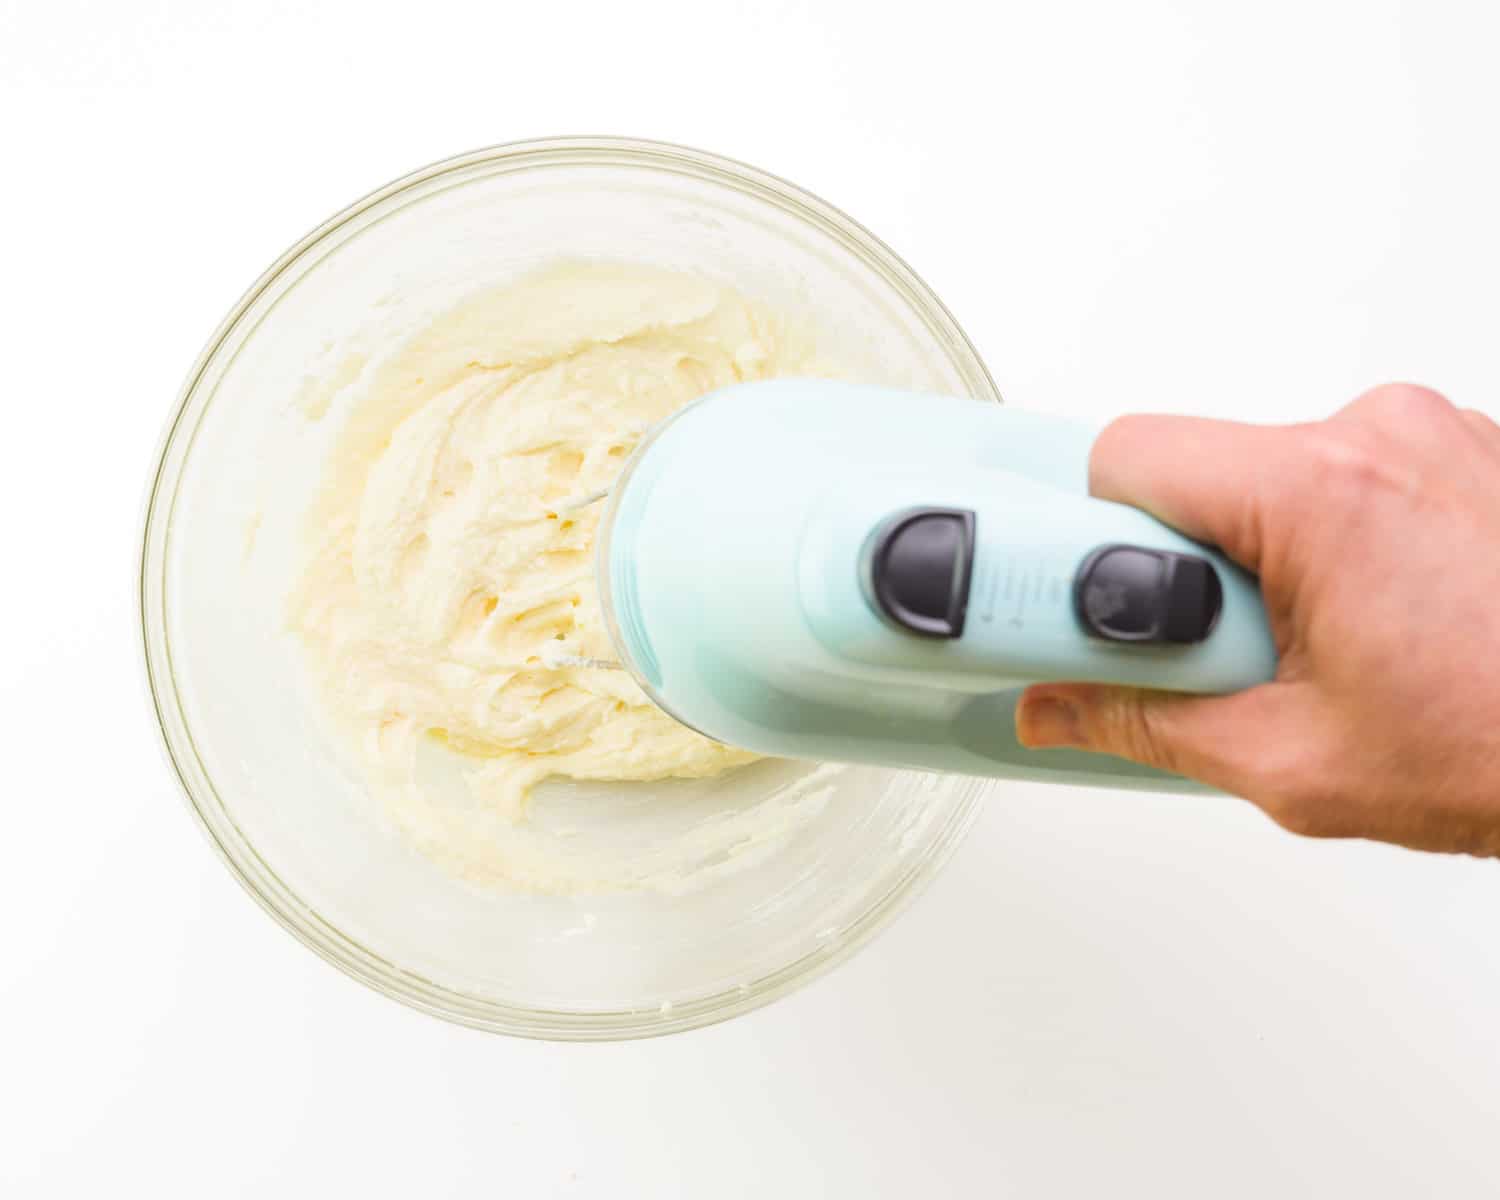
- In a large mixing bowl use an electric mixer to cream together the vegan butter and sugar. You can use a spoon but stir vigorously until light and fluffy. Beat in the buttermilk, ground flax meal, cornstarch, and vegan yogurt.
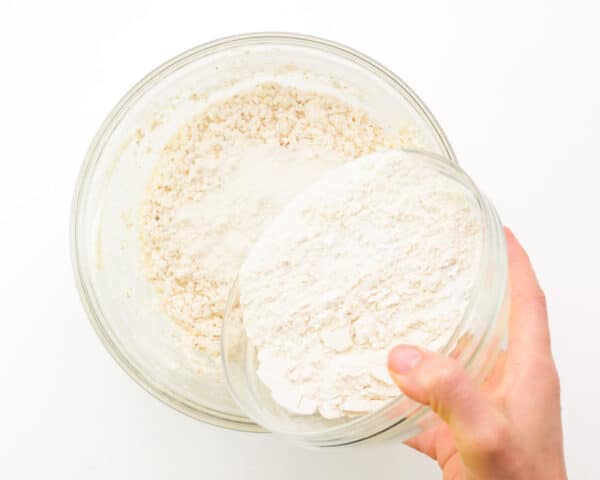
- In a medium-size bowl, combine the flour, baking powder, and salt. Stir to combine.

- Add the flour mixture to the milk mixture. Stir until just combined.

Coffee Cake Assembly:
- Pour half of the coffee cake batter into the prepared baking dish.
- Sprinkle a generous layer of the crumble topping/filling mixture over the batter.
- Pour the remaining coffee cake batter over the crumble mixture.
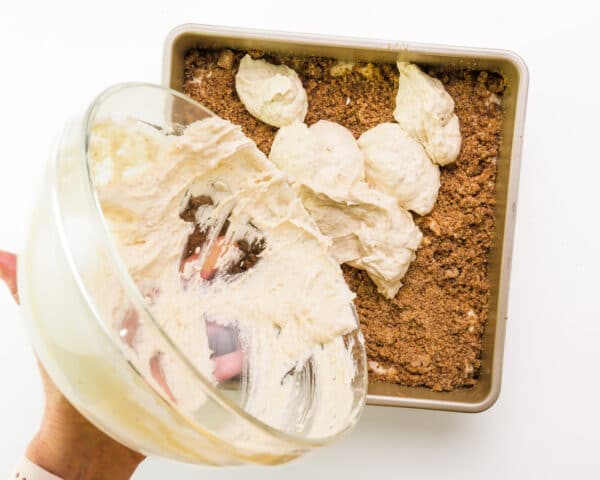
- Sprinkle the rest of the crumble topping/filling mixture evenly over the top of the cake batter and gently press it down.

- Bake for 50 to 55 minutes, until a toothpick inserted in the middle of the cake, comes out clean. The crumble topping should be golden brown.
- When done, remove from the oven and allow to cool slightly before serving.

Notes
Icing
Make it dramatic by adding a drizzle of icing on top. Combine 1/2 cup powdered sugar with 1 tablespoon of vanilla-flavored plant-based milk. Stir to combine and drizzle over the top.Cocoa Powder
We’ll add cocoa powder to the filling to give it a dramatic contrast between the filling and the cake. You can leave it out or substitute a tablespoon of molasses.Make-Ahead
You can make the batter the night before and assemble the cake in the pan, then cover and bake it in the morning. You’ll need to add about 5 minutes of bake time to make up for the chilliness of the dough.Vegan Yogurt
You can substitute vegan sour cream or whipped silken tofu.Nutrition
This post was originally published in 2015 and was updated to include new photos, new text, and an updated recipe in 2022.
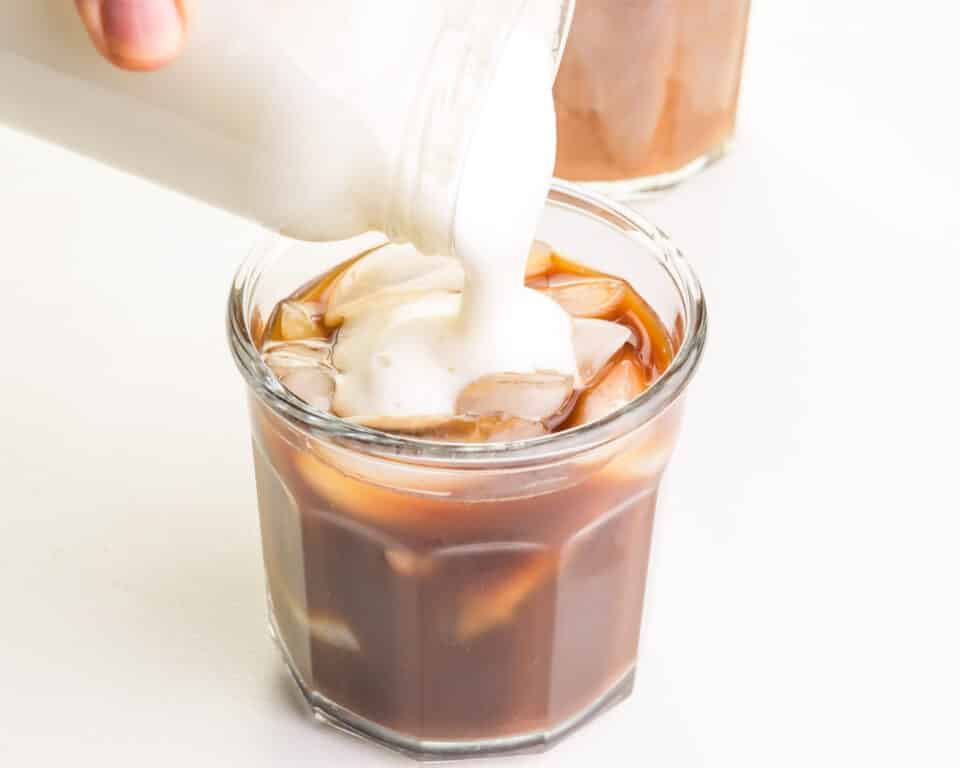
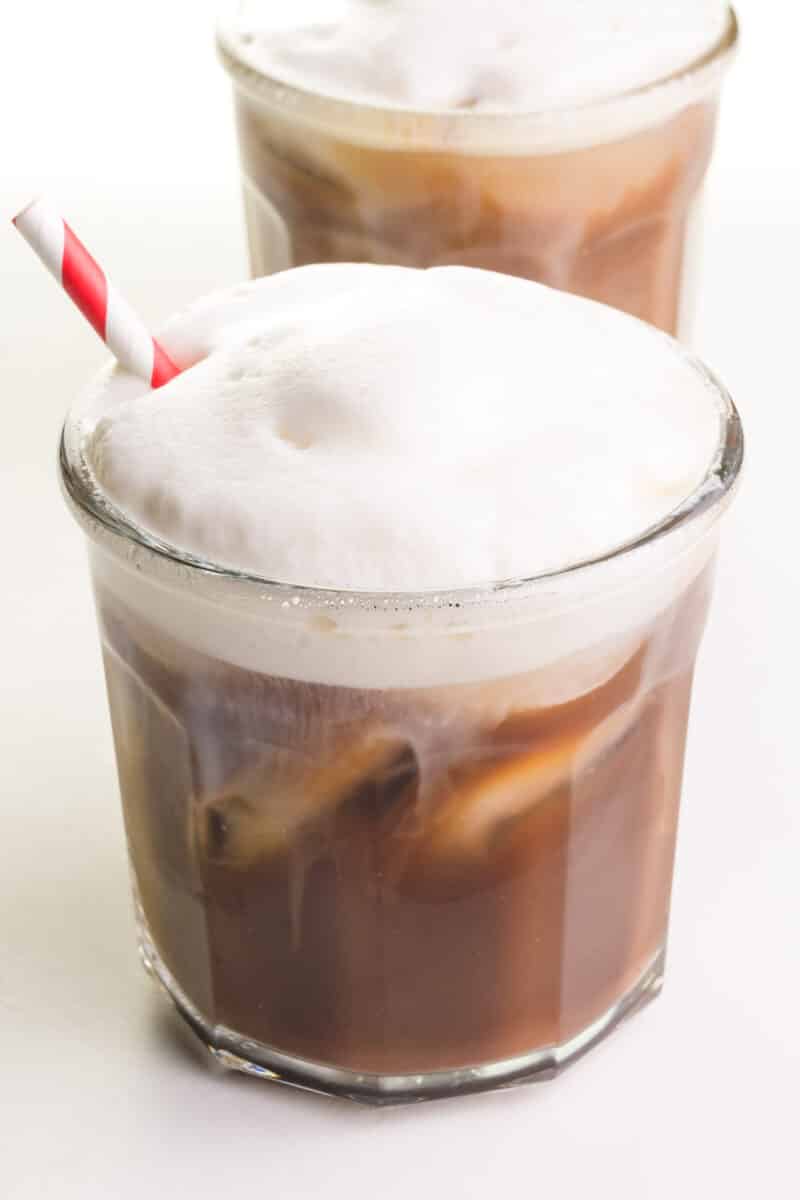
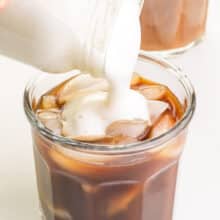
Craving that creamy, foamy topping on your iced drinks? This vegan cold foam recipe delivers just that – airy, luxurious, and completely dairy-free. Perfect for leveling up your iced coffee, tea, or any drink that deserves a decadent touch.
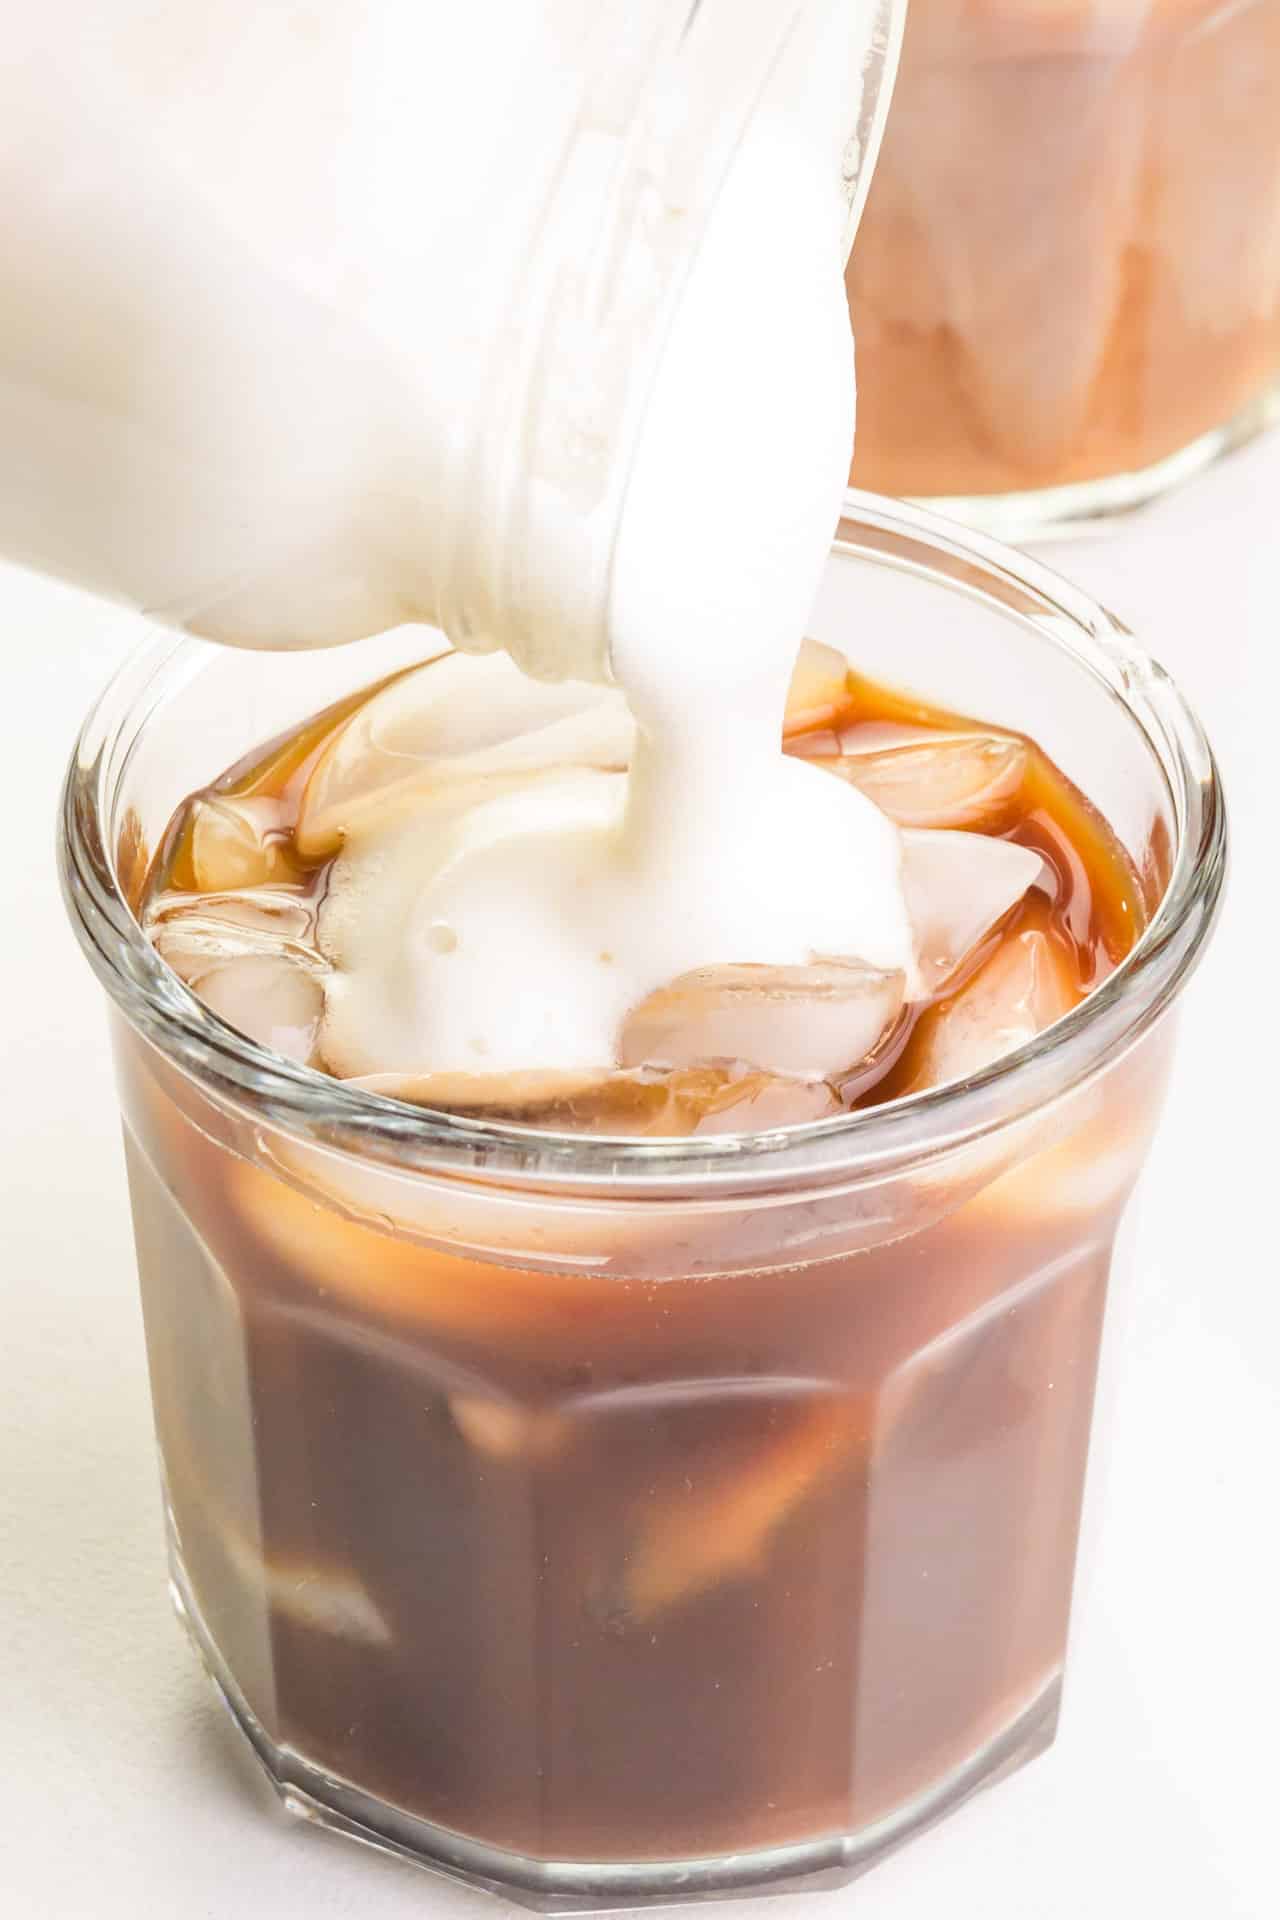
Y’all, I’m obsessed with foamed milk on my hot tea. This dairy-free cold foam is the summer version I always wanted. Now my iced teas get a creamy makeover too!
If you love a cup of iced coffee, why not add some dairy-free cold foam on top? Because who doesn’t like a cream cup of joe with some filling, and milky foam mixed in for good measure?
Trivia
Is Starbucks cold foam vegan? The answer might surprise you! (scroll for the answer)
Ingredients & Substitutions
You can find the full printable recipe, including ingredient quantities, below. But first, here are some explanations of ingredients and steps to help you make this recipe perfect every time.
- Plant-Based Milk: Any plant-based milk you love will work! My favorites are soy, oat, and almond.
- Syrup: Maple syrup has such a lovely flavor, but agave or simple syrup work too.
Ingredient Spotlight — Dairy-Free Milk: You’ll find plant-based milk in different sections of your grocery store. Check the refrigerated section near the dairy, the baking aisle, or with shelf-stable boxed milk.
What Makes This Recipe Shine?
- Magically Creamy: Rich texture that’s surprisingly light!
- Ultimate Crowd-Pleaser: The perfect “wow” topping for iced coffees and desserts.
- So Easy, It’s Yum-Tastic: Even kitchen newbies can master this!
How to Make Vegan Cold Foam
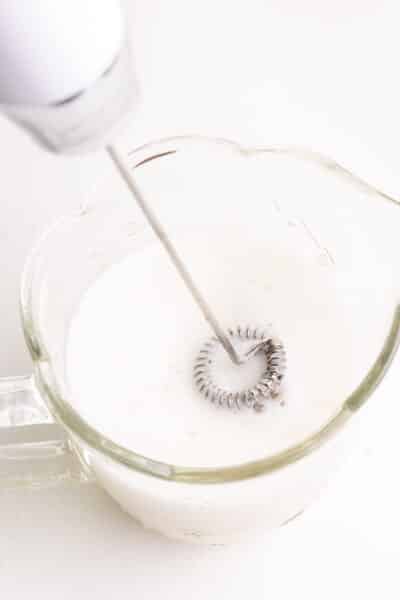
- Chill It: Make sure your plant-based milk is cold from the fridge.
- Sweeten: Mix in the maple syrup for a hint of sweetness.
- Whisk Like You Mean It: Whisk vigorously for about 1-2 minutes until you get a beautiful, airy foam.

Marly’s Tips
- Start Cold: Use chilled plant-based milk to create a thick, stable foam.
- Sweeten to Taste: Add a touch of syrup or use a sprinkle of stevia for a healthy zero calorie option. Experiment to find your desired level.
- Whip it Good: Aim for a thick, airy foam with a pourable consistency.
- Timing is Key: Make your cold foam right before serving for the fluffiest results. If you make it too far ahead of time, the foam will start to deflate.
Trivia Answer
Cold foam at Starbucks is not vegan, but you can ask for a custom cold foam using their oat milk, soy milk, or almond milk.
Level Up Your Drinks with Cold Foam
Forget plain iced coffee! Vegan cold foam is the perfect way to add creamy luxury to all sorts of drinks. Here are a few ideas to get you started:
- Iced Lattes and Beyond: Try it with unique flavors like lavender, vanilla, or even a hint of spice.
- Smoothie Upgrade: Add a dollop for an extra-indulgent treat.
- Mocktail Magic: Elevate sparkling water or fruit-based drinks for a special occasion.
Storage Tips
The foam will deflate quickly, so make this just before serving.
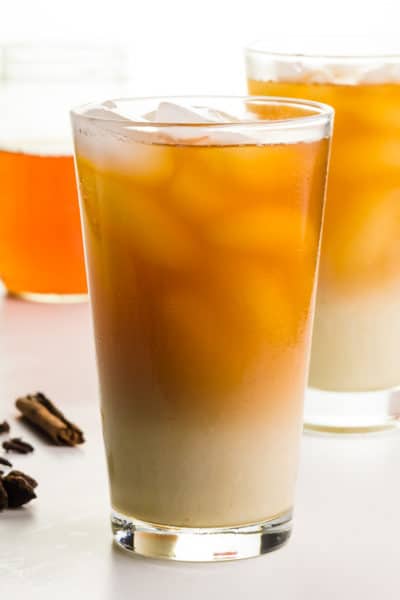
More Iced Beverages
If you love refreshing iced beverages, you can add some dairy-free cold foam to any of the these tasty drinks:


Subscribe and get a free Easy Vegan Recipes eBook
Plus our latest vegan recipes, delivered right to your inbox!
Dairy-Free Cold Foam
Equipment
Instructions
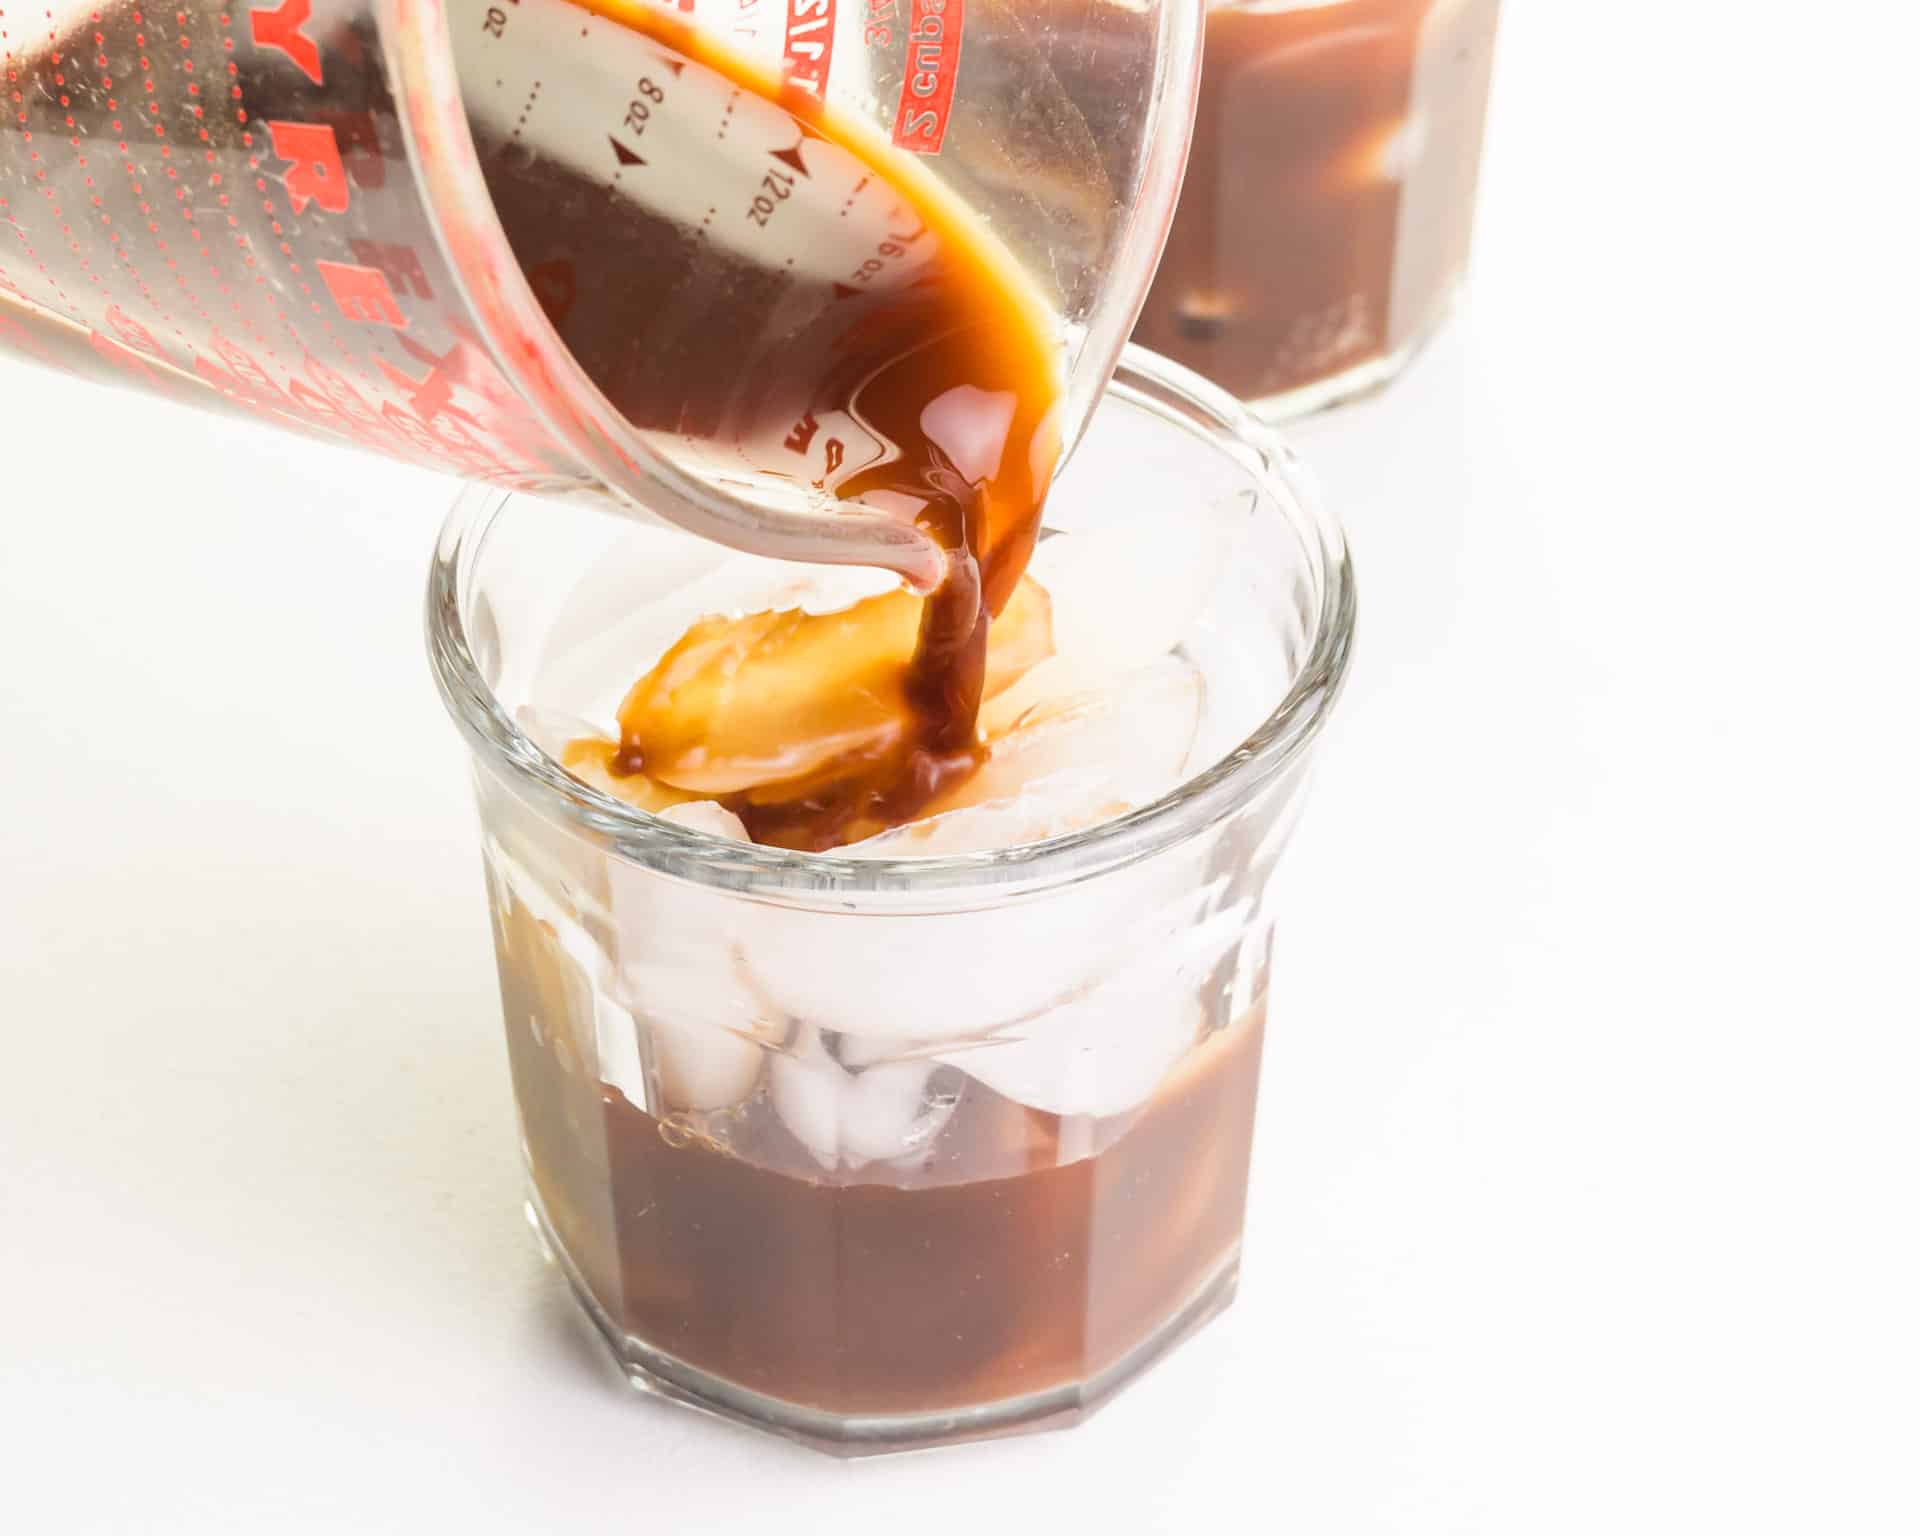
- Pour prepared coffee over ice in a glass.
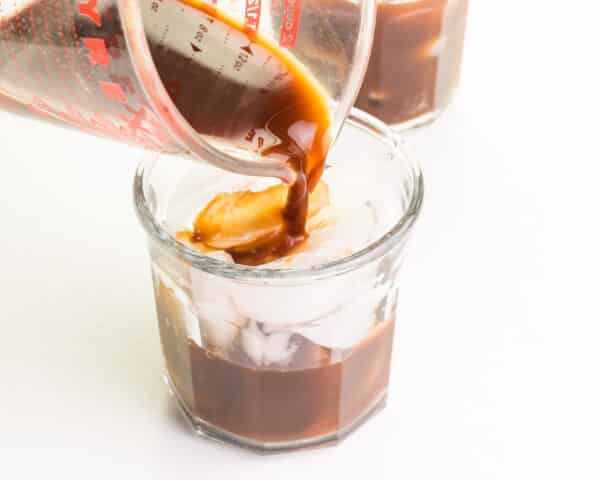
- Combine the soy milk and maple syrup in the frother. Froth for up to 1 to 2 minutes, until a foam develops.
- Pour frothed milk over iced beverages for the best results.


Notes
Nutrition
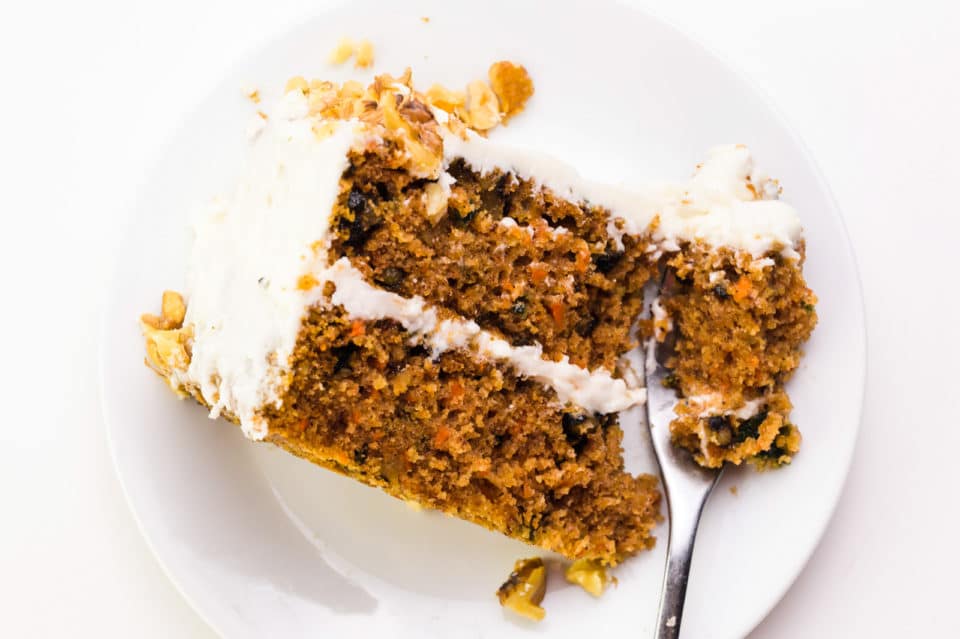
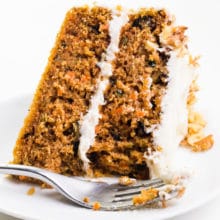
Craving the ultimate vegan carrot cake? Bursting with warm spices, this moist delightful cake is a flavor-packed sensation that’s surprisingly simple to whip up. Prepare to be amazed by this versatile dessert and fall in love with every heavenly bite!
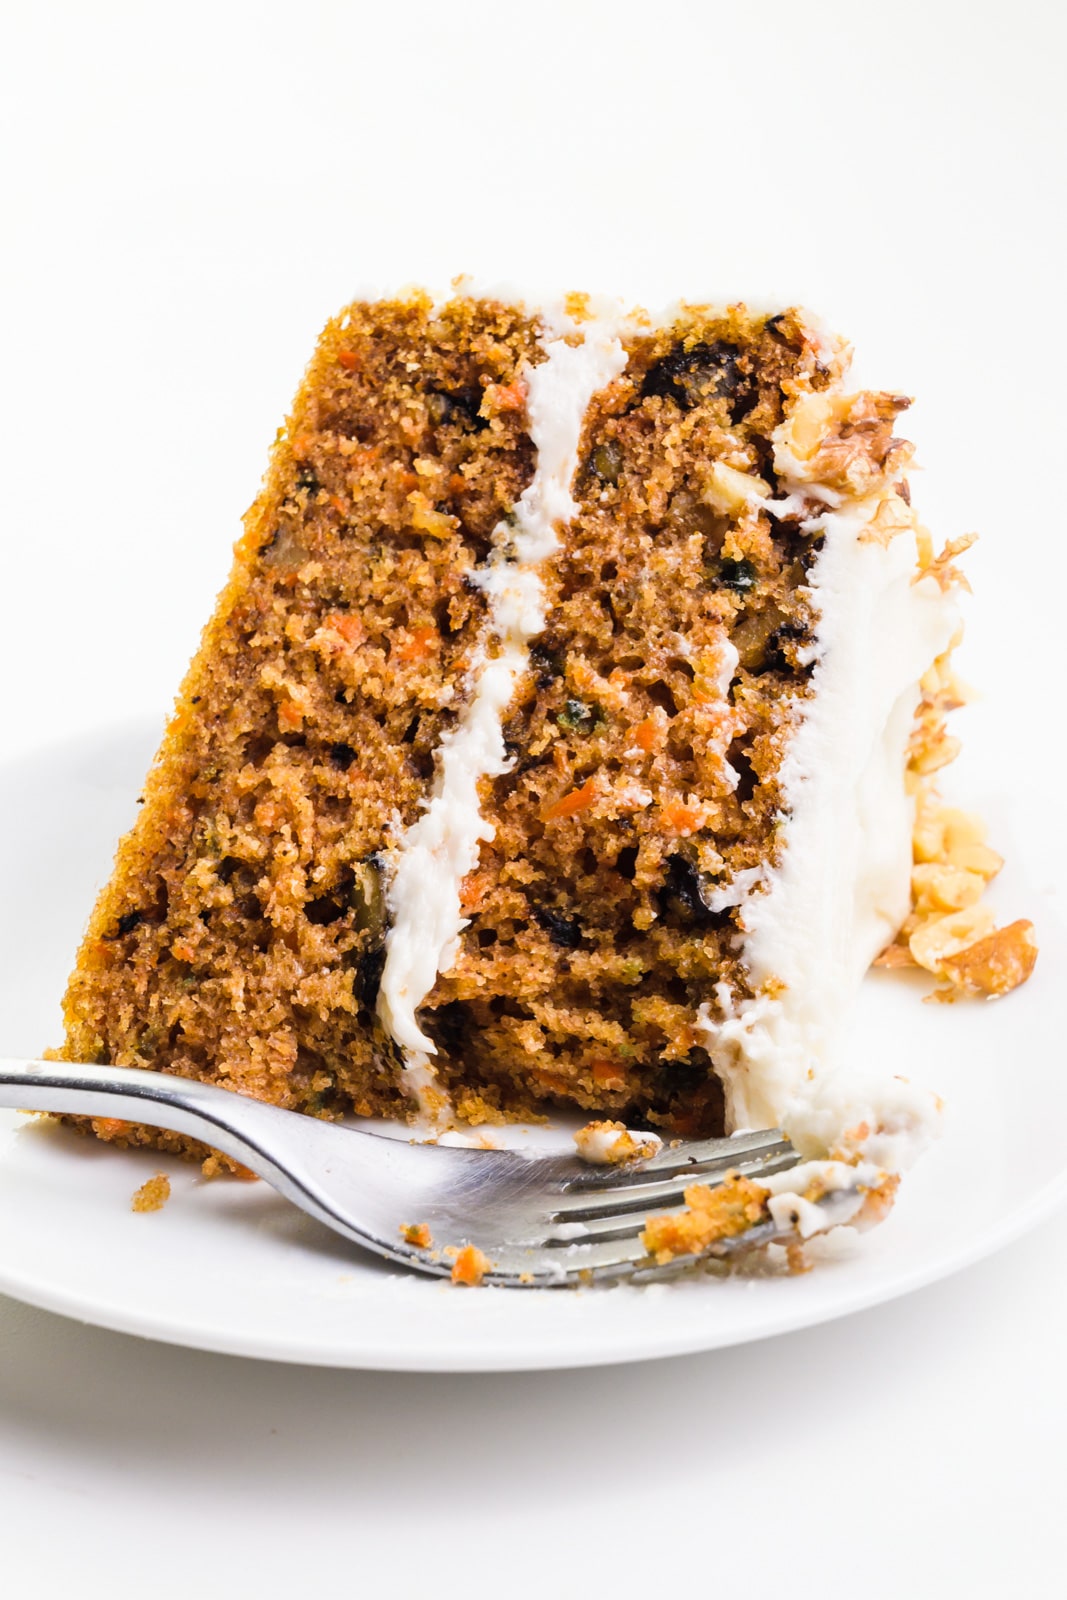
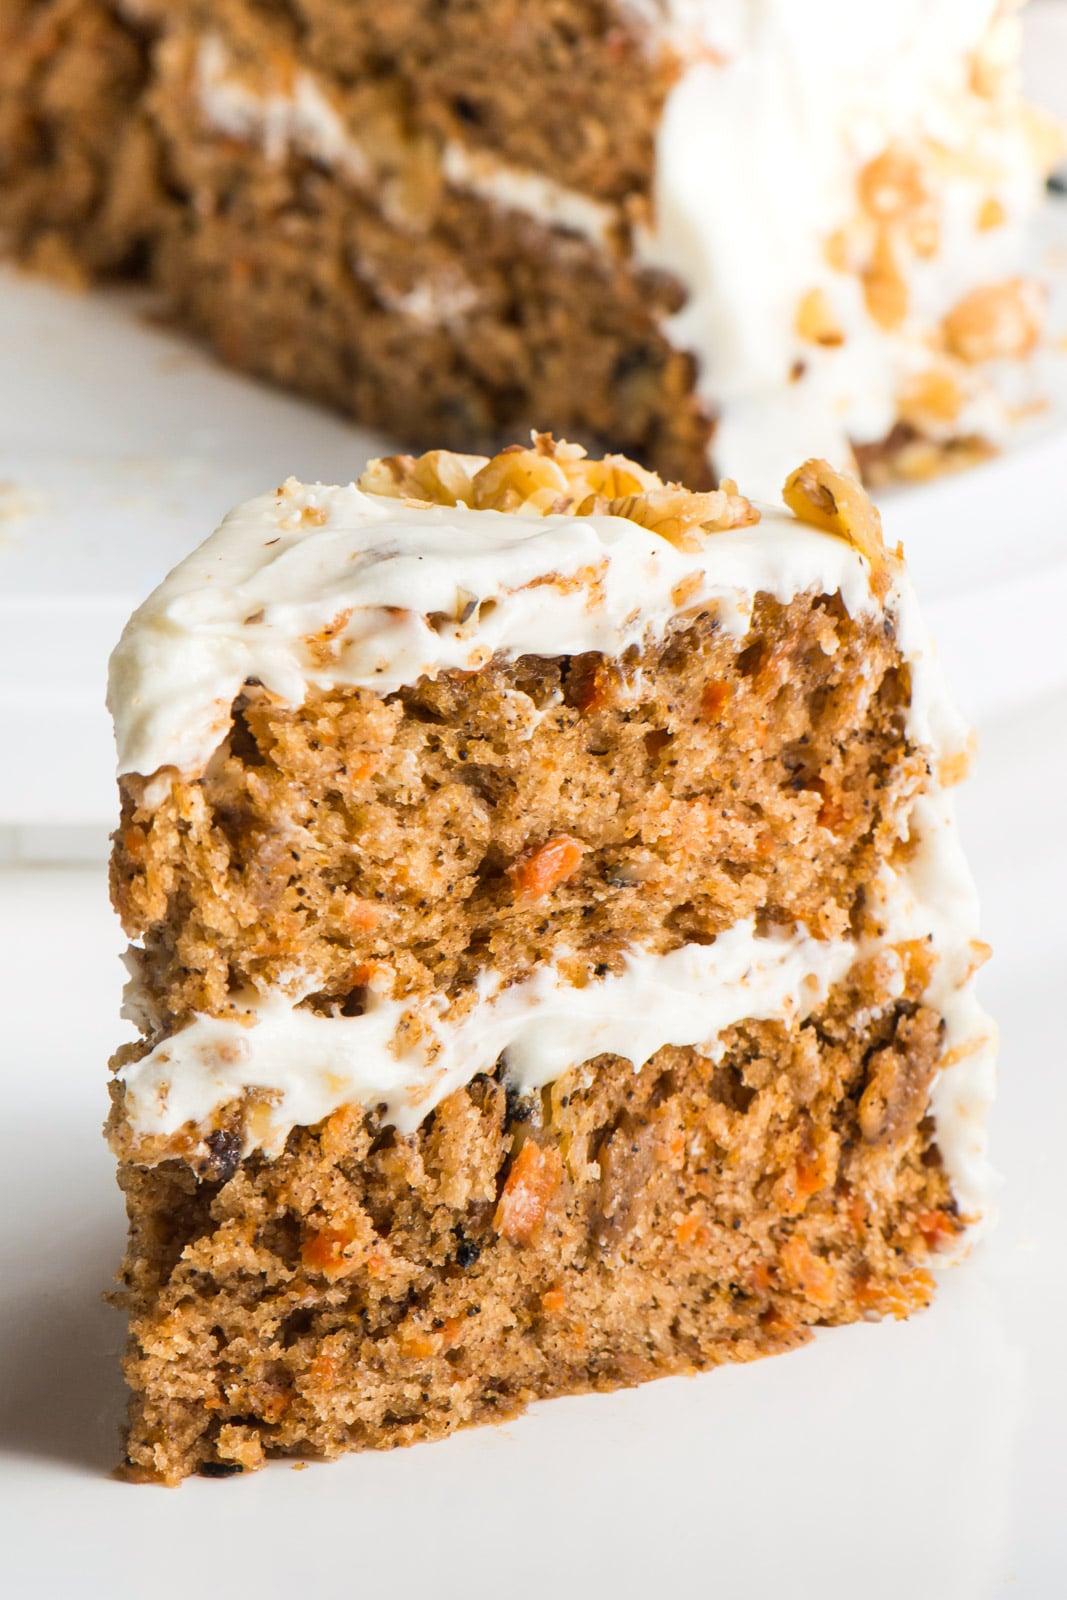
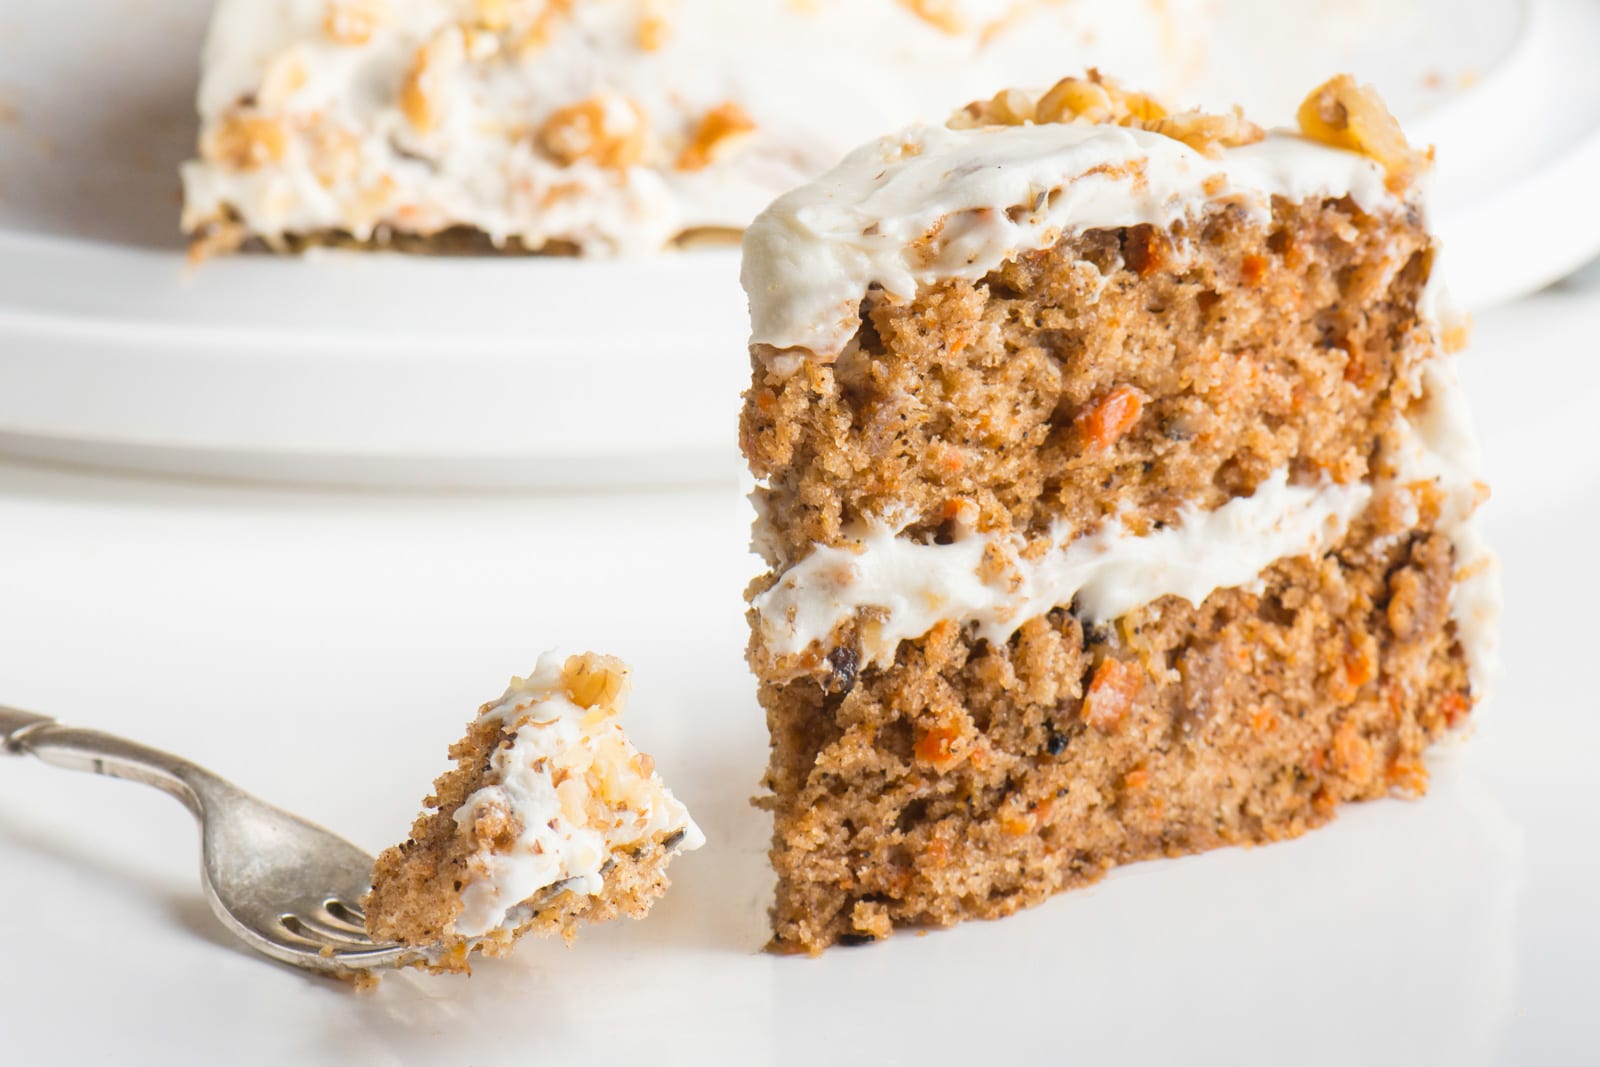
We’re big fans of carrot cake in our house—it’s often our go-to for birthdays! And who can blame us? This incredibly moist vegan carrot cake is infused with warm spices and topped with tangy cream cheese frosting, making it the perfect treat for any occasion!
Let’s get into more details about this cake’s ingredients, including substitution ideas.
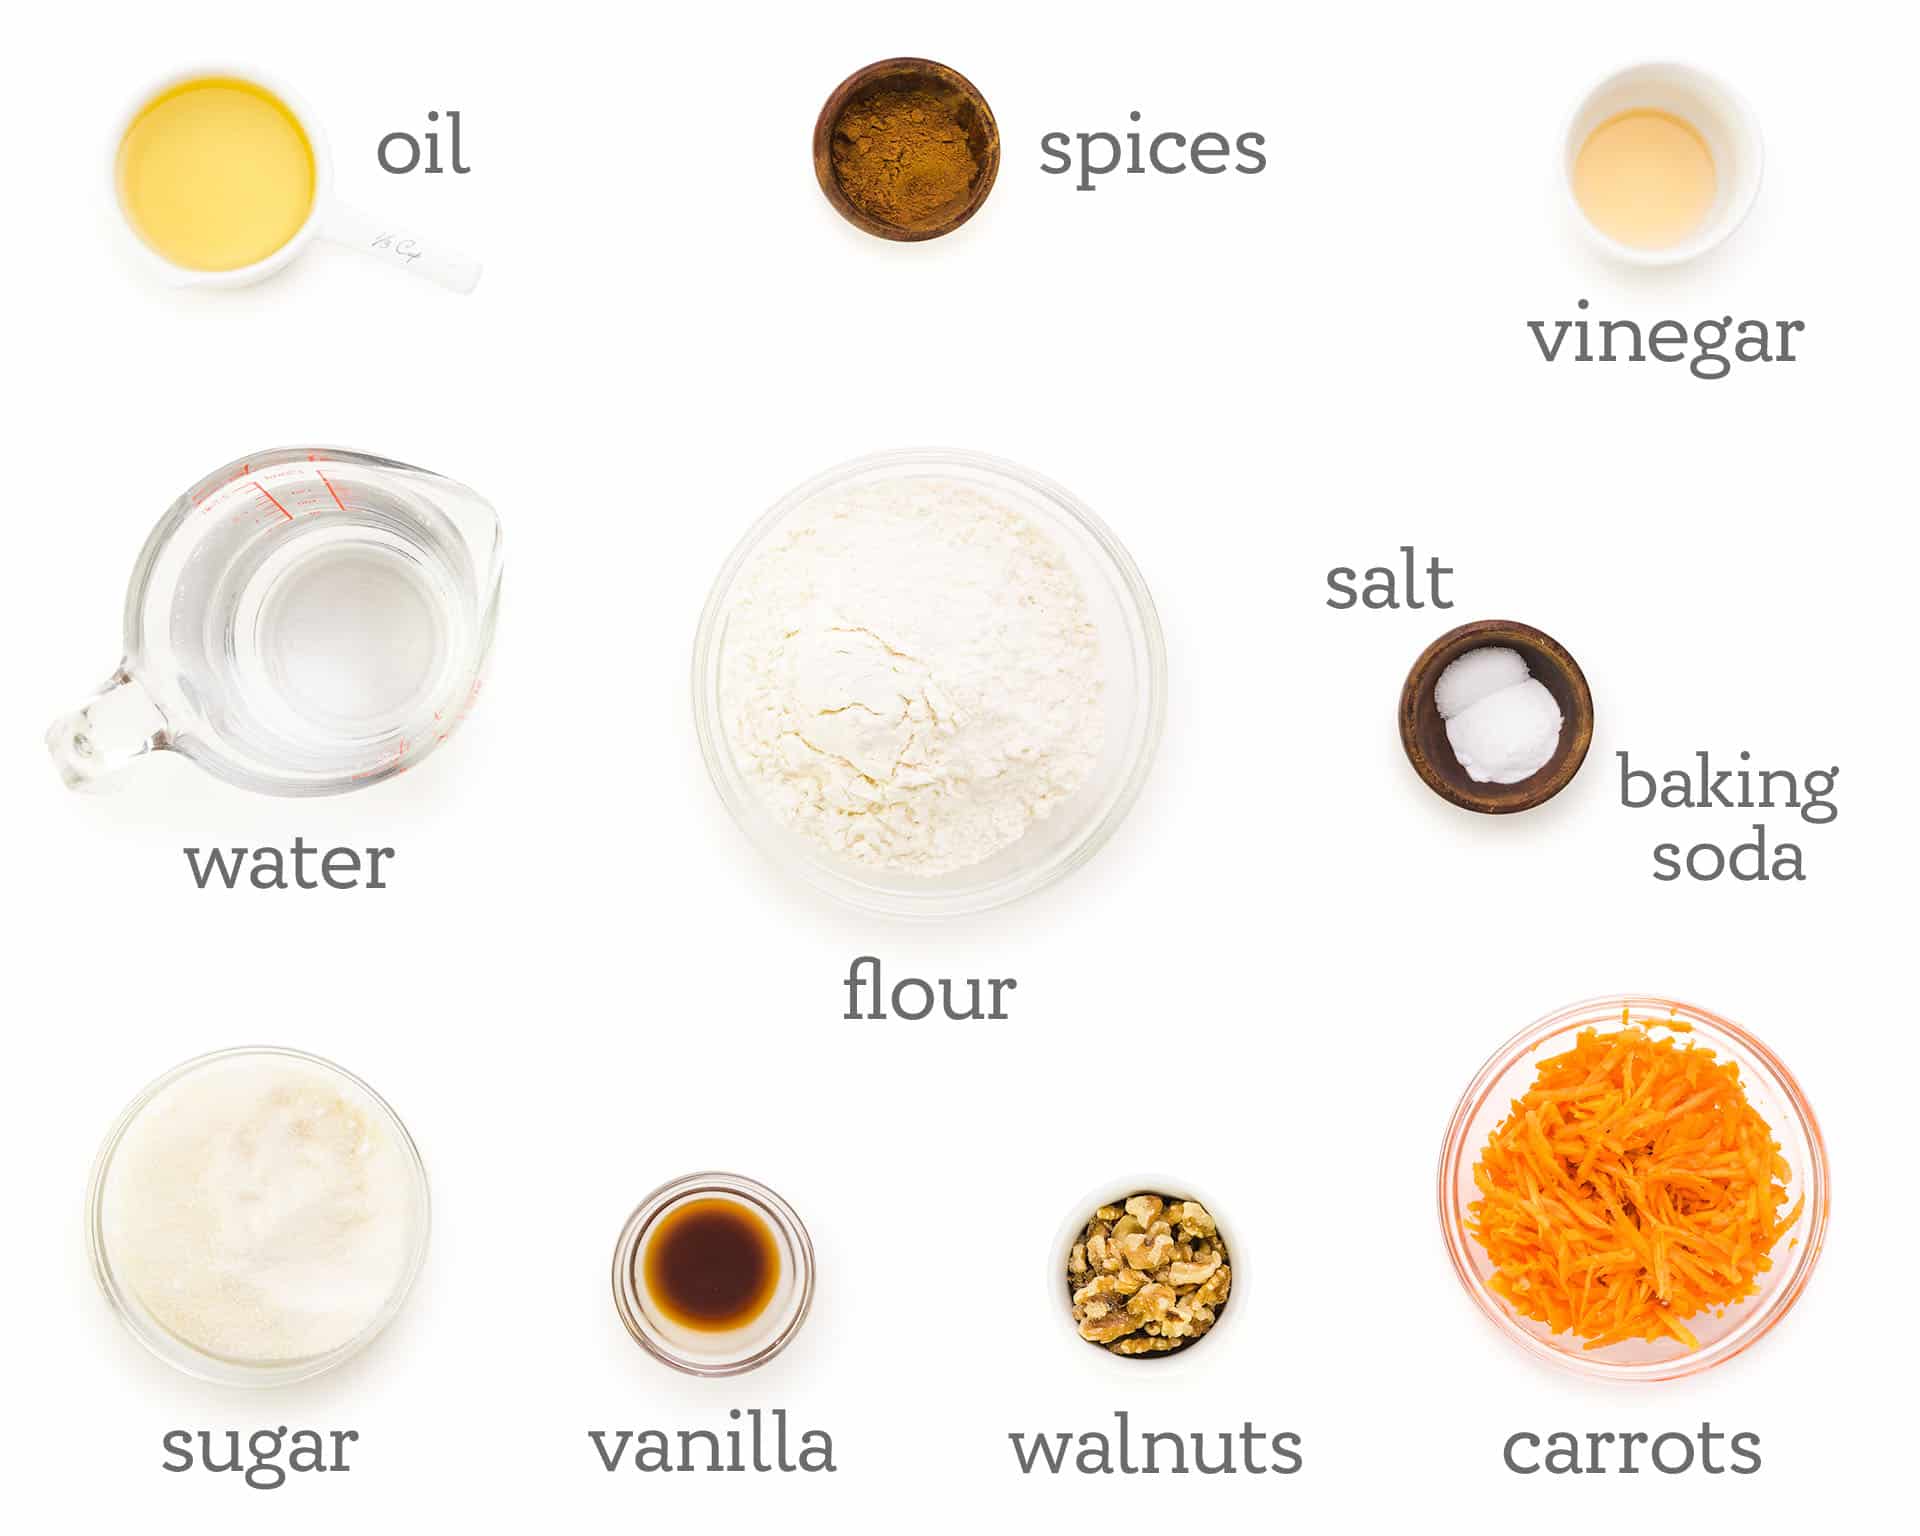
Ingredients & Substitutions
Here are the ingredients you’ll need for this recipe, including substitution ideas:
- Flour Options: Use all-purpose flour for the classic taste, or swap with whole wheat pastry flour for a healthier twist. For a gluten-free version, opt for high-quality gluten-free baking flour.
- Sugar Substitutes: Granulated sugar is standard, but you can mix it up with a blend of brown and granulated sugar for added depth. Adjust to taste.
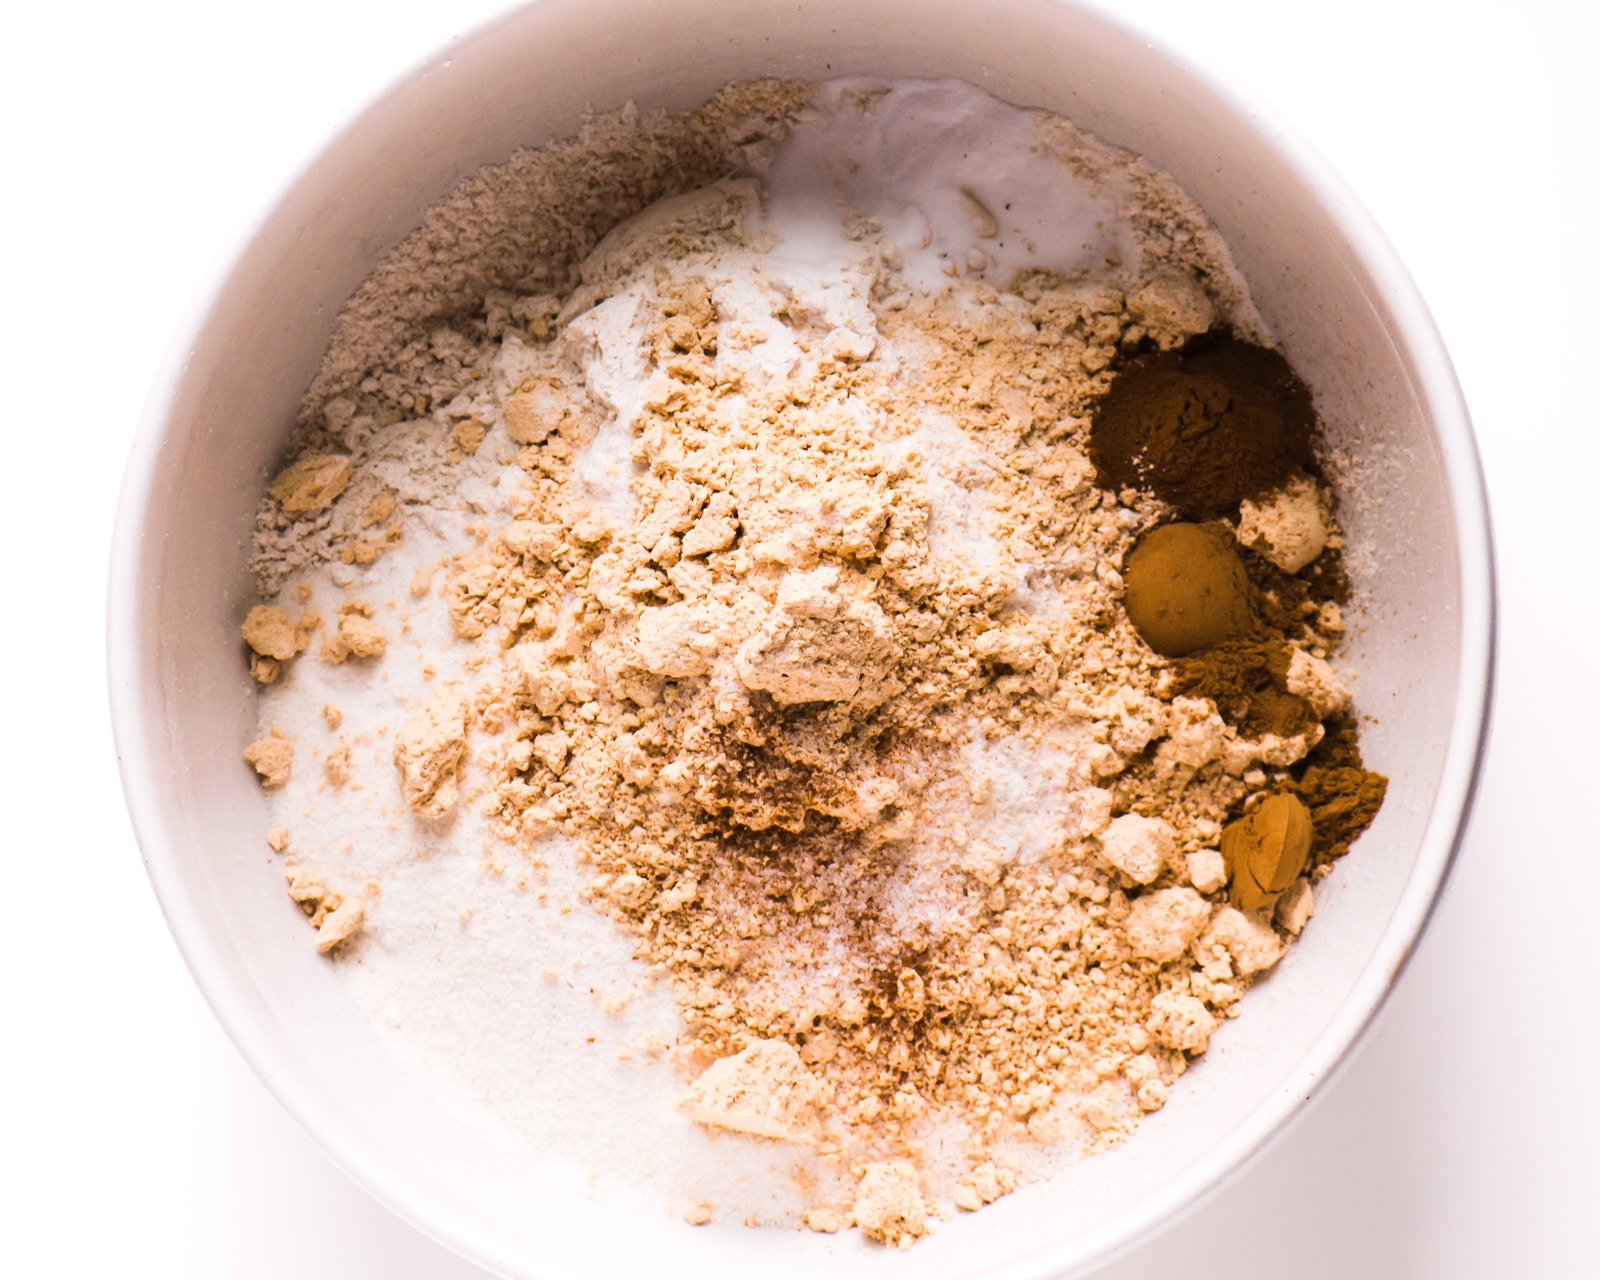
- Spice Blend: Combine ground cinnamon and pumpkin pie spice blend for a warm, flavorful kick.
- Nut Varieties: Add chopped walnuts for a delightful crunch, or switch to pecans for a different twist. Leave them out entirely for a nut-free option.
- Oil Choices: Vegetable oil adds moisture and richness. Choose any vegetable oil like canola or olive oil.
- Flavor Enhancers: Apple cider vinegar, salt, and vanilla work together to enhance the cake’s flavor. Substitute with white vinegar or lemon juice if needed. Opt for high-quality pure vanilla extract for the best flavor.
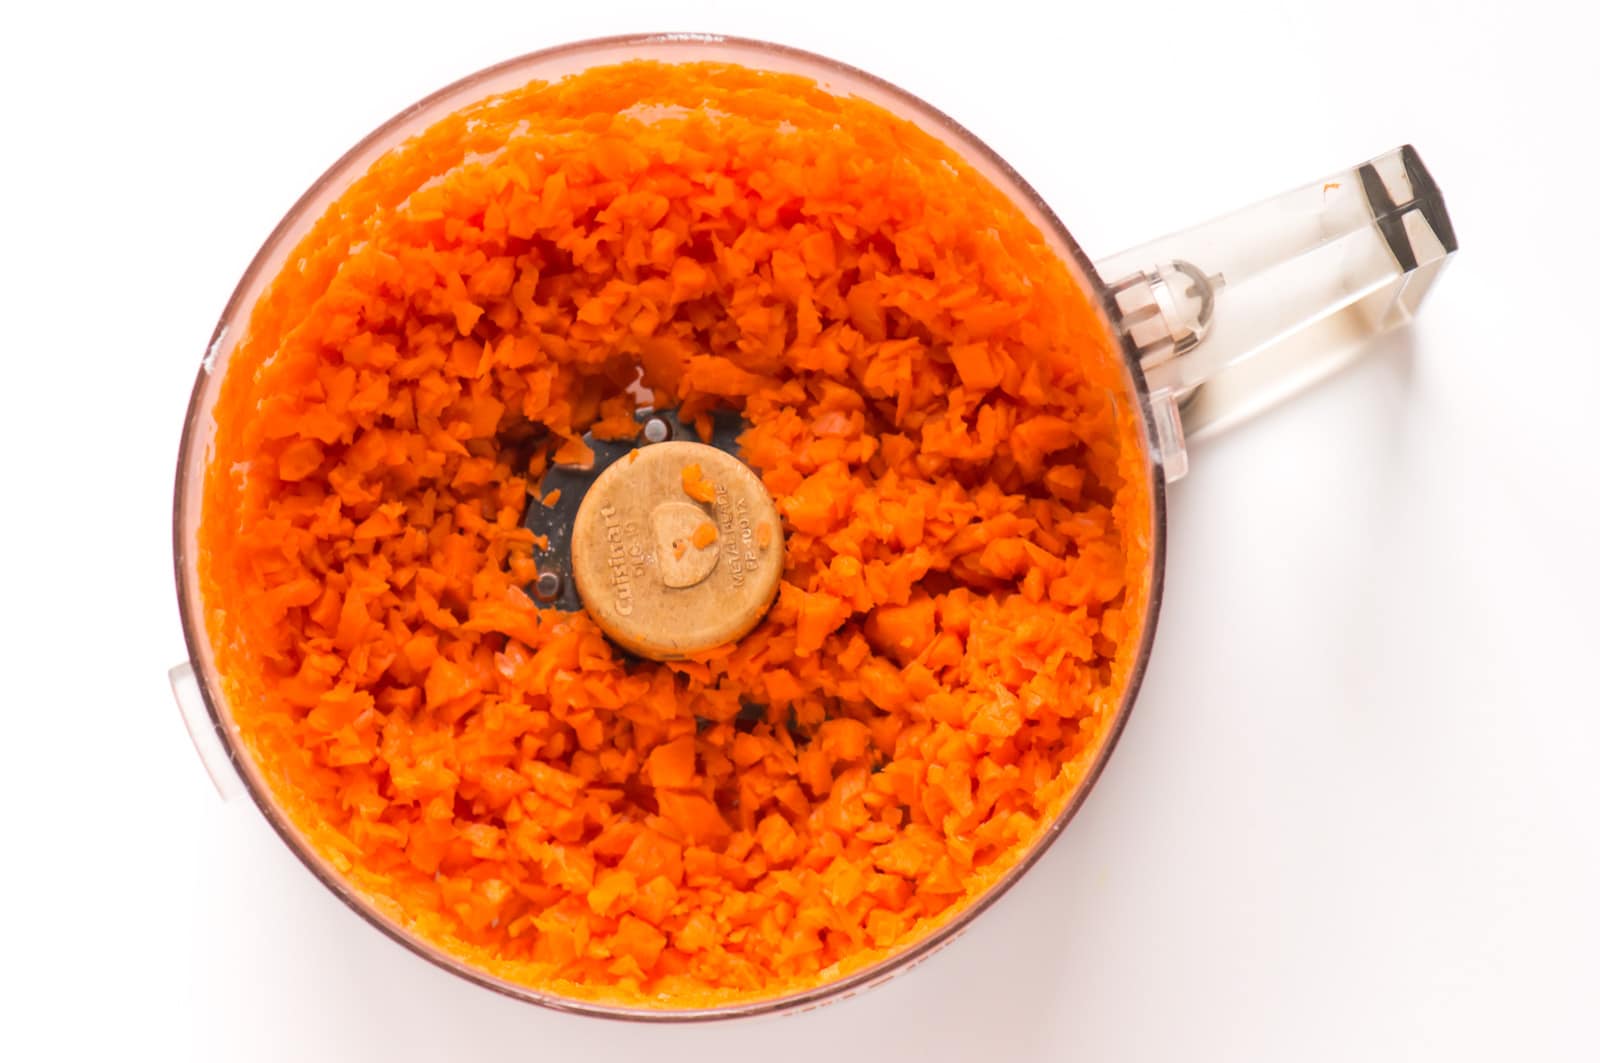
- Carrot Selection: Fresh raw carrots are preferred. Look for ones with green tops for freshness, but it’s optional.
To toast or not to toast walnuts? I love this response on why to toast walnuts before baking. So that means toasting unlocks their full nutty richness.
In a hurry? Try this Vegan Carrot Cake Boxed Mix Hack!
Reader Reviews
★★★★★
Pam C
I’ve made this vegan carrot cake recipe many times over the past few years for my vegan family members and friends and it has always been a favorite! Not just for the vegans but everybody loves this carrot cake. I’ve shared the recipe quite a few times.
How to Make Vegan Carrot Cake
This vegan carrot cake comes together with surprising ease – no mixer required! Baking is more than the end result, it’s the satisfaction of creating something delicious. And your kitchen will fill with the aroma of warm spices as the walnuts toast.
- Mix dry ingredients: flour, baking powder, baking soda, salt, cinnamon, nutmeg, and ginger in a large bowl.
- Combine wet ingredients: Mix together grated carrots, applesauce, sugar, vegetable oil, non-dairy milk, and vanilla.
- Optional Nuts: Fold in chopped walnuts or pecans, if desired.
- Bake: Pour batter into the prepared pan(s), and bake until done.
- Cool: Let the cake cool, then add frosting.
- Enjoy: Slice and enjoy your delicious vegan carrot cake!
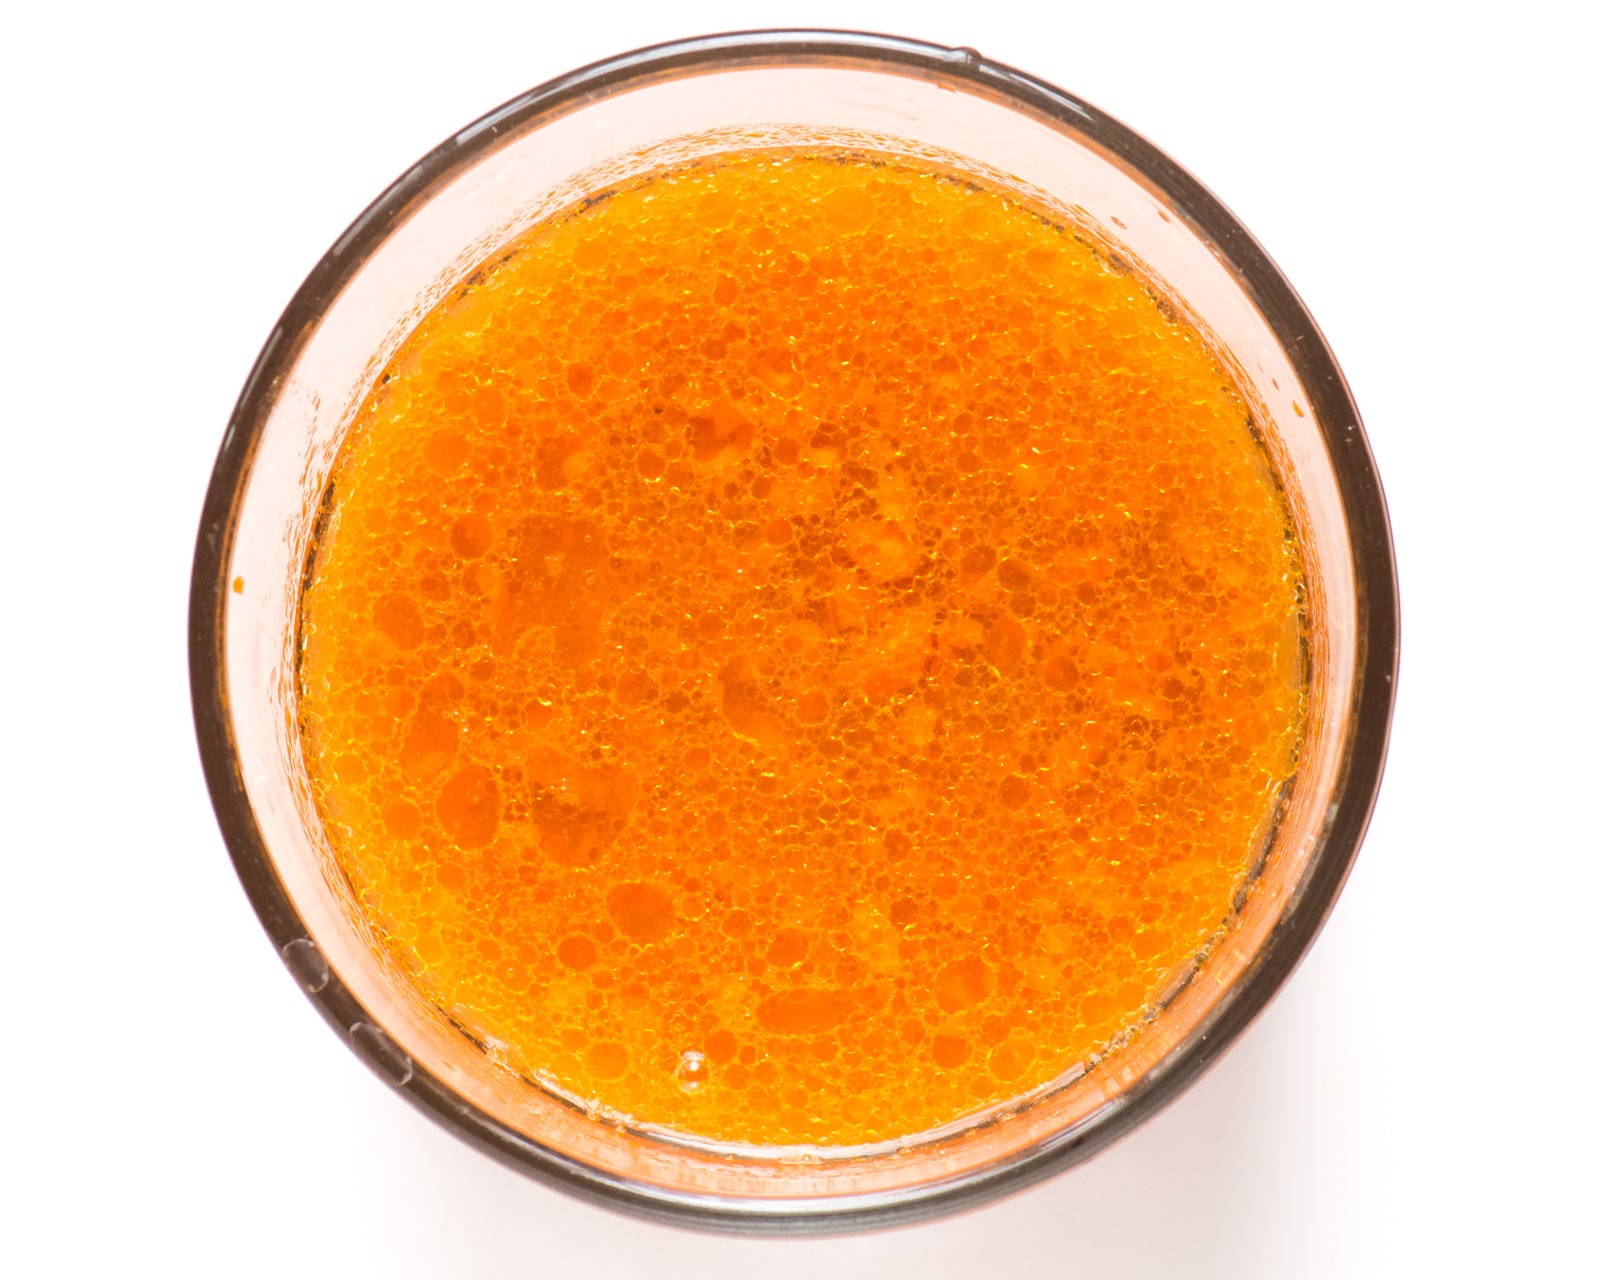
Is my batter right? Expect a batter thick and speckled with vibrant orange flecks.
For the full step-by-step guide, see the recipe card below – let’s get baking!
Secrets to Tender Carrot Cake
Here are my favorite tips to make your carrot cake moist:
- Carrots are naturally moist — using the right quantity means extra tenderness in every bite.
- Use freshly grated carrots — Store-bought shredded carrots can be dry and have a powdery texture.
- Grate the carrots finely — this releases their juices better, keeping the cake moist for days.
- Use oil instead of butter — Vegetable oil adds moisture to cakes without making them greasy.
Want even more moistness? Try my Apple-licious Healthy Carrot Cake recipe – it swaps some oil for applesauce.
What Makes This Recipe Shine?
- Pumpkin pie spices…for the PERFECT spiced cake flavor!
- Toasting walnuts…for MAXIMUM nutty richness!
- Finely-chopped carrots…for the BEST flavor and texture in every bite!
New to Vegan Baking?
The idea of making cookies, cakes, or muffins without eggs or dairy can seem like a hill too tall to climb. But with the simple tips in my Guide to Vegan Baking, you’ll be baking like a vegan pro in no time!
Storage Tips
This extra-moist carrot cake keeps beautifully! Unfrosted layers can be stored at room temp for a day, or in the fridge for up to a week. See my complete guide to learn more about how long your carrot cake will last.
Need longer storage? This cake freezes like a dream! For tips, detailed timelines, and thawing advice, learn all about how you can freeze carrot cake in my handy guide.
More Carrot Desserts
If you love this cake and want to try different variations, try these carrot-themed desserts:


Subscribe and get a free Easy Vegan Recipes eBook
Plus our latest vegan recipes, delivered right to your inbox!
Vegan Carrot Cake
Equipment
Ingredients
- 1 ½ cups walnuts
- 3 cups all-purpose flour
- 2 cup granulated sugar
- 1 teaspoon salt
- 1 teaspoon ground cinnamon
- 1 teaspoon pumpkin pie spice
- 2 teaspoon baking soda
- 2 cups chopped carrots
- ⅔ cup vegetable oil
- 2 cup cold water
- 2 tablespoons apple cider vinegar
- 2 teaspoons vanilla
Easy Vegan Cream Cheese Frosting
- ½ cup vegan butter
- 4 tablespoons vegan cream cheese (see note)
- 1 teaspoon lemon juice
- 3 cups powdered sugar
- Additional walnuts for garnish
Instructions
- Preheat oven to 350°F/175°C. Spray two round cake pans with vegetable spray. You can also place a piece of parchment paper at the bottom of the pans and spray the sides with vegetable oil.*
- Place walnuts on a baking pan and toast for 5 minutes. Be careful not to cook too long because they will burn. Remove from the oven and allow to cool before chopping.
- Combine in a large mixing bowl the flour, sugar, salt, cinnamon, pumpkin pie spice, and baking soda. Stir to combine. Stir half of the walnuts into the flour mixture. Set aside.

- Add the chopped carrots to a food processor and pulse several times to shred the carrots.

- Add the vegetable oil, water, vinegar, and vanilla to the food processor and pulse in quick bursts to combine.

- Pour the carrot mixture in with the flour mixture. Stir to combine, making sure there are no clumps of flour throughout the batter.
- Pour the batter into your prepared pans. Bake for 35 minutes until a toothpick inserted in the middle comes out clean.
- Allow the cake to cool for about 10 minutes before inverting onto a serving plate. Allow the cakes to cool completely.
For the Vegan Cream Cheese Frosting:
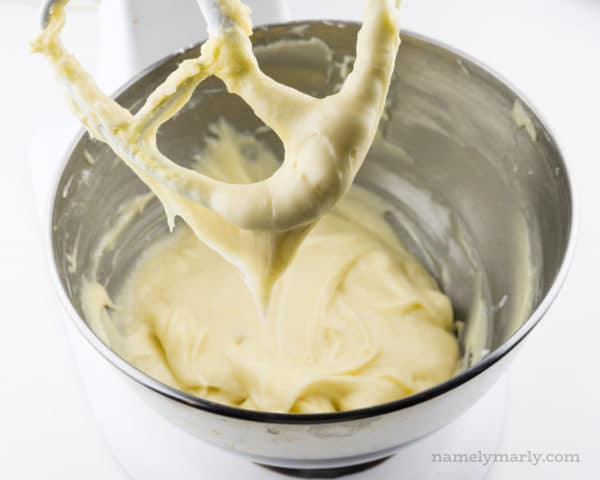
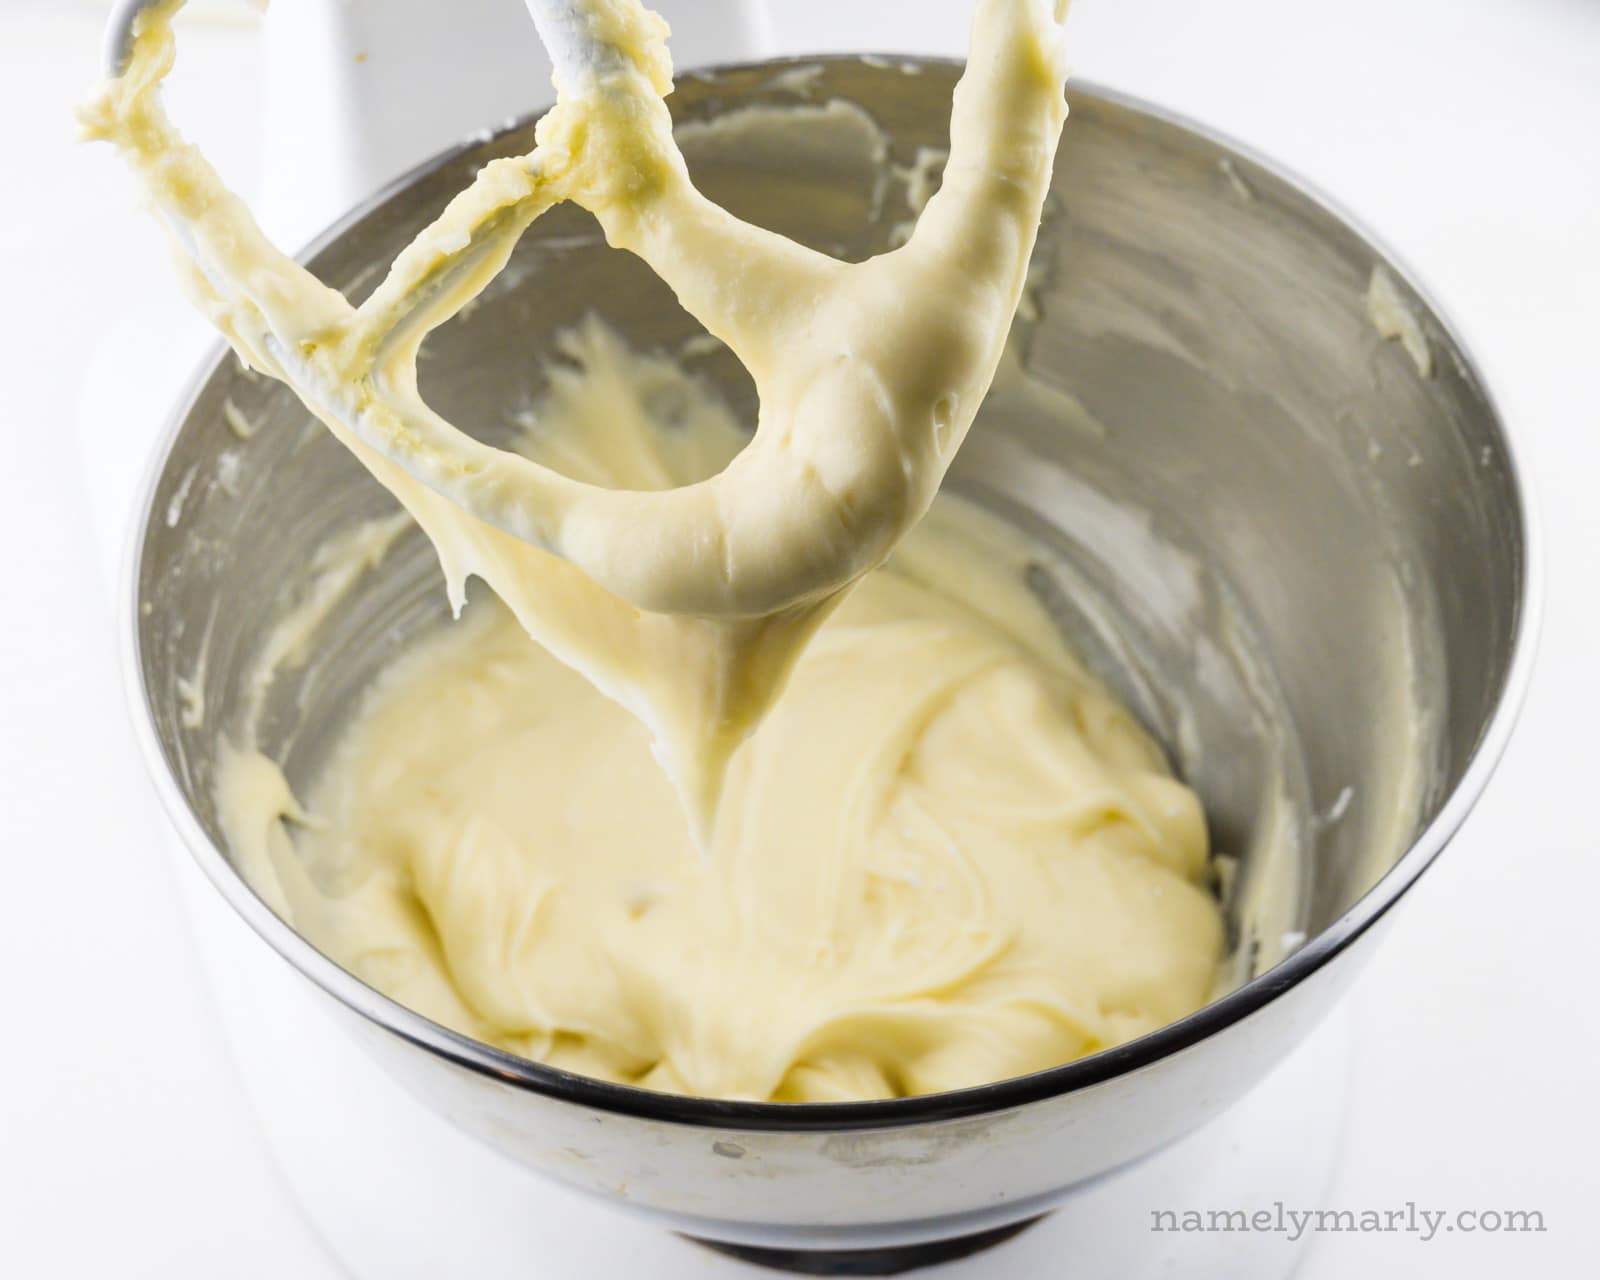
- In the meantime, prepare the frosting by combining the vegan cream cheese and vegan butter in a mixing bowl. Mix until light and fluffy. Add the powdered sugar ½ cup at a time. Then add the lemon juice and beat until you get a spreadable consistency. You can add a tablespoon of plant-based milk if it's too thick.
- Ice the top of one of the cakes. Top with additional chopped, toasted walnuts. Place the second cake on top. Cover the top cake and sides with frosting. Garnish with chopped walnuts.
Video
Notes
Make it Healthier
To make this cake healthier, consider these tips:- Reduce sugar by up to 50% and add raisins for natural sweetness.
- Substitute whole wheat pastry flour or use half whole wheat flour.
- Replace half of the oil with applesauce or an applesauce substitute.
- Opt for whipped coconut cream instead of frosting for a lighter topping.
- For a gluten-free option, use gluten-free baking flour.
Baking Options
- Vegan Carrot Cake Muffins — Same batter, shorter bake time (around 20 minutes). Or try this dedicated vegan carrot muffin recipe.
- Loaf Cake — Enjoy it unfrosted for a snack bread, or frost it for a special dessert. Bake the batter in a loaf pan and cook it longer, 40 to 50 minutes.
- Carrot Cake Cupcakes — distribute the batter into muffin pan compartments and bake for 20 to 25 minutes.
- Carrot Cake Sheet Cake — Pour the batter into a greased 9×13 inch pan and bake for 35 to 40 minutes, until a toothpick inserted in the center comes out clean.
Nutrition
Beyond Cream Cheese: Tasty Topping Ideas
Forget boring cream cheese! This carrot cake deserves a topping as special as it is. Go decadent with Vegan Buttercream, try a modern Naked Cake, or explore the surprisingly delicious world of Dairy-Free Ermine Frosting.
Need even more inspiration? My Carrot Cake Toppings Guide has all the creative twists, plus more about my top-secret Vegan Cream Cheese Frosting.
Flavor Variations
Whether you’re looking for more moisture (applesauce) or a twist of flavor (pineapple or lemon zest), these flavor variations can mix things up in your cake-making adventures:
- Extra Moistness Boost: Want to add extra moisture and a touch of sweetness? Reduce the vegetable oil by 1/3 cup and include 1/3 cup unsweetened applesauce with the wet ingredients.
- Tropical Twist: For a tropical twist, reduce the vegetable oil by 1/3 cup and add 1/2 cup crushed pineapple to the batter. Drain the crushed pineapple well before adding it.
- Citrus Zing: For a bright, citrusy flavor, add 1 to 2 teaspoons of lemon zest to the batter before baking.
- Other Favorite Add-ins: Add 1/2 cup dried fruit, such as raisins and/or 1/4 cup coconut shreds.
Got a favorite flavor combo? Share it in the comments below!
Frequently-Asked Questions
Can carrot cake be made vegan?
The average store-bought carrot cake is not vegan. That’s because they’re made with dairy and eggs. This easy recipe proves you don’t need eggs or dairy for a delicious carrot cake
Are carrots really in carrot cake?
Yes! This recipe uses plenty of fresh carrots. They add sweetness, moisture, and that classic carrot cake flavor.
How does vegan carrot cake rise without eggs?
Leavening agents like baking soda react with the vinegar and spices, giving this cake a perfect rise and fluffy texture.
More Ways to Enjoy This Carrot Cake Batter
If you want more options besides a layer cake, I think this guide will come in handy:
- Vegan Carrot Cake Muffins — Same batter, shorter bake time (around 20 minutes). Or try this dedicated vegan carrot muffin recipe.
- Make Vegan Carrot Loaf Cake — Enjoy it unfrosted for a snack bread, or frost it for a special dessert. To make it, bake it in a loaf pan and cook it longer, 40 to 50 minutes.
- Vegan Carrot Cake Cupcakes — distribute the batter into muffin pan compartments and bake for 20 to 25 minutes.
- Make Carrot Cake Sheet Cake — Perfect for parties! Try adding a sprinkle of gingersnap crumbles on top. To make it, pour the batter into a greased 9×13 inch pan and bake for around 40 minutes.
This post was originally published in 2017 and was updated to include new photos, new text, and an updated recipe in 2020.
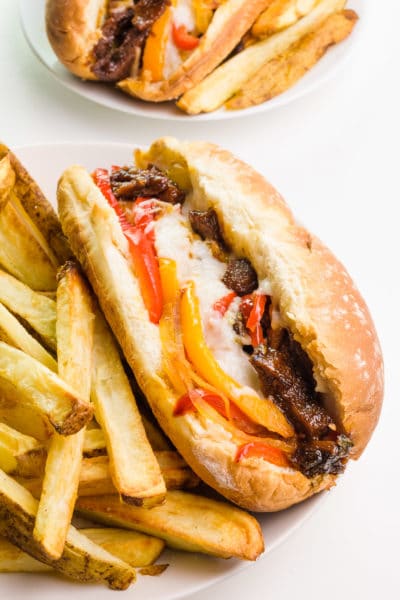
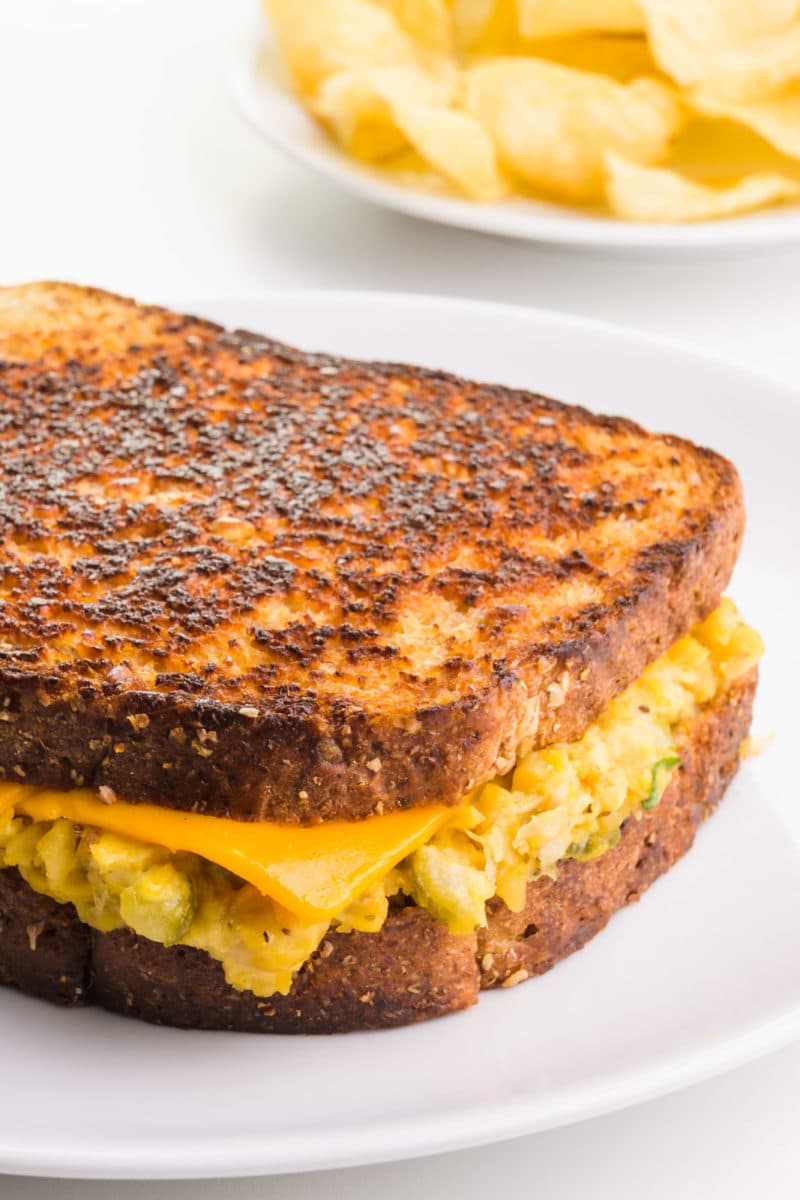
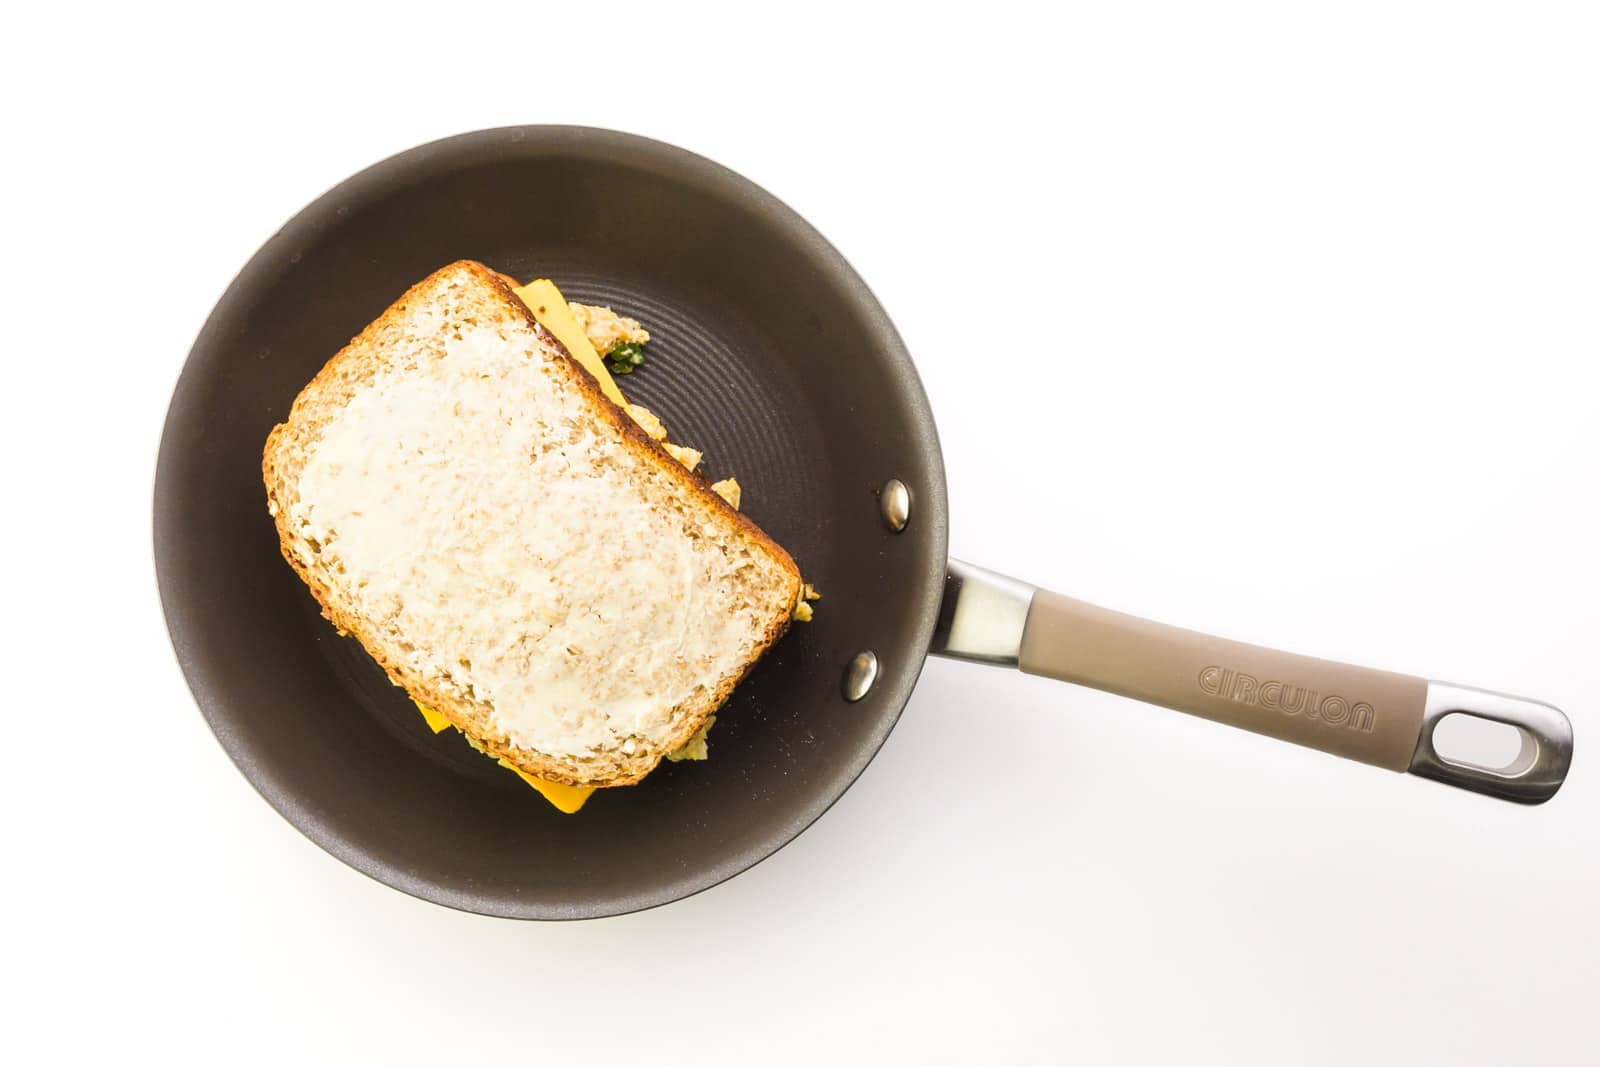
Satisfy your cravings with our cheesy vegan tuna melt recipe! With only a handful of ingredients, you’ll create a mouthwatering sandwich that’s perfect for any occasion.
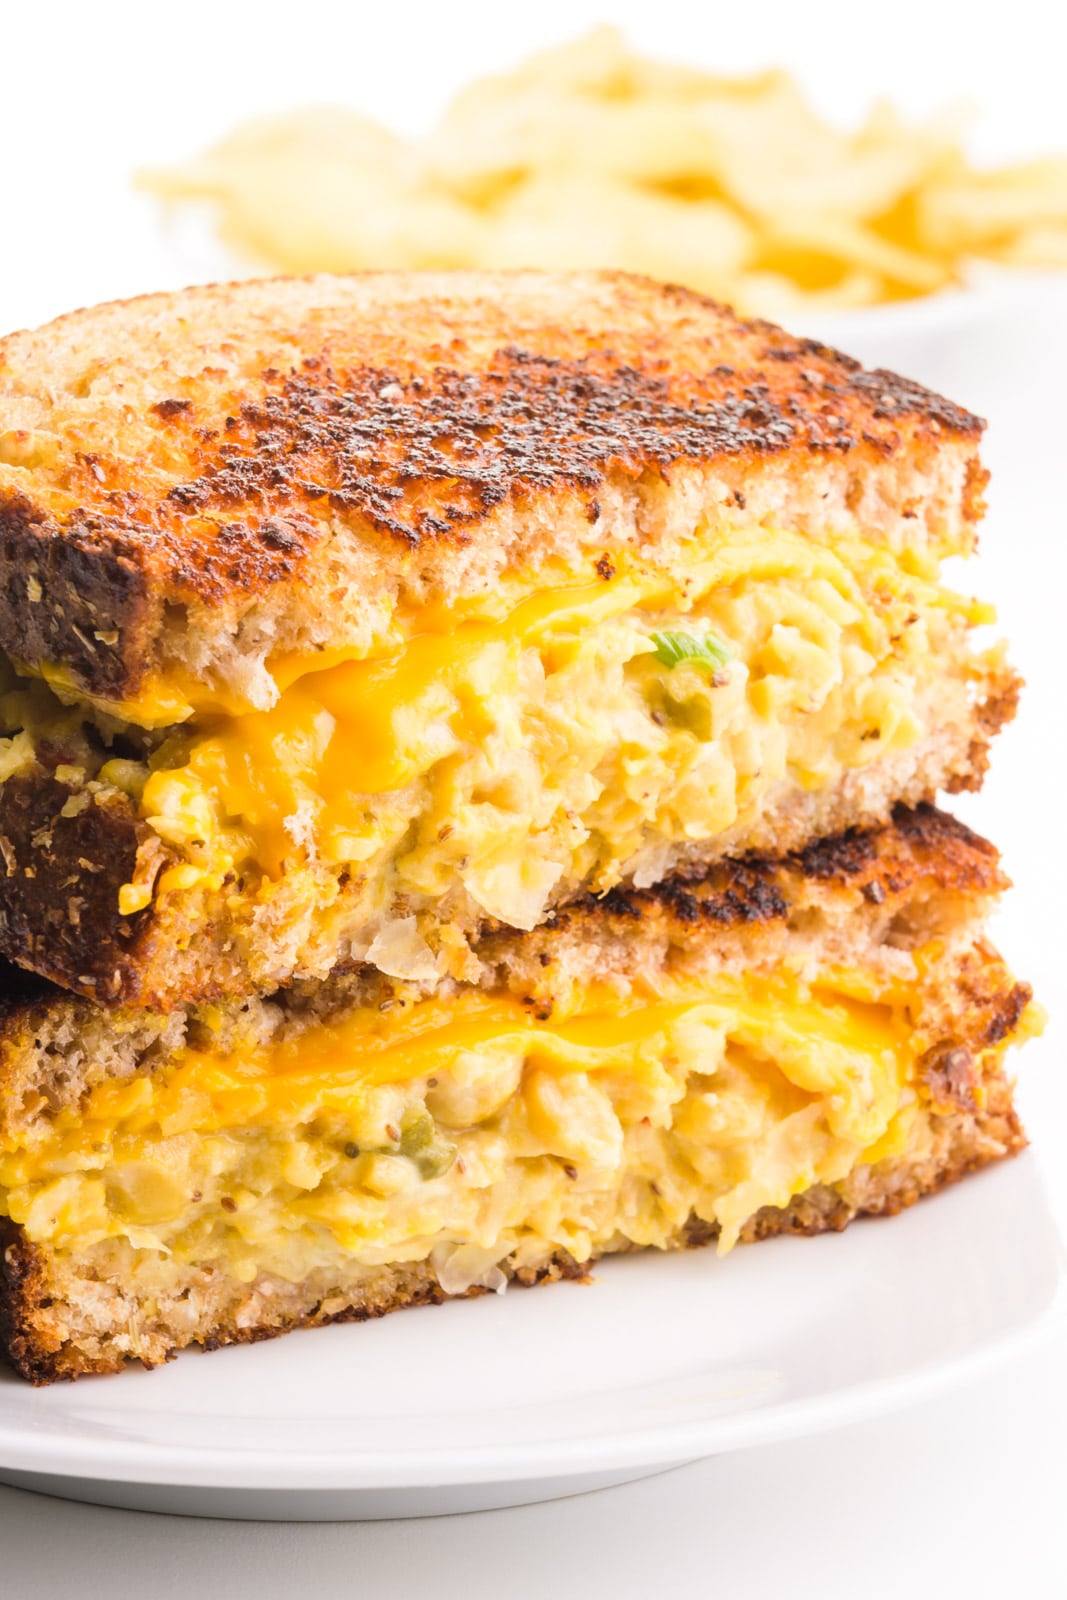
I adore this recipe because it makes me feel indulgent without any guilt. The combination of creamy chickpea salad, melty cheese, and buttery toast hits all the right spots for a comforting meal.
Ingredients & Substitutions
You can find the full printable recipe, including ingredient quantities, below. But first, here are some explanations of ingredients and steps to help you make this recipe perfect every time.
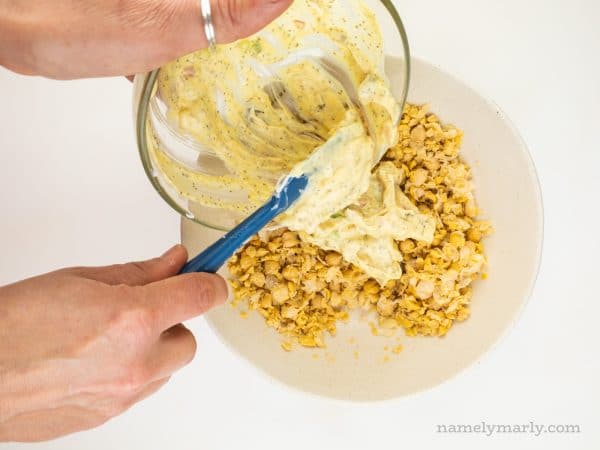
- Vegan Tuna Salad: Make your own using mashed chickpeas, vegan mayo, and seasonings. Follow my recipe for vegan tuna salad for an easy guide. You can use cooked jackfruit in place of chickpeas.
- Bread: Opt for whole grain or sourdough bread for added nutrition. Find it in the bakery section of your grocery store.
- Vegan Cheddar Cheese: Look for dairy-free cheese slices in the refrigerated or specialty foods aisle.
- Vegan Butter: Choose a plant-based butter spread, available in the dairy or natural foods section.
Buying Guide: If you’re new to vegan cooking, check out your local health food store or online retailers for specialty ingredients like vegan cheese and butter.
What Makes This Recipe Shine?
- Artisanal Bread Brilliance: Opt for thickly-sliced artisanal bread to achieve the ultimate gooey cheese-to-bread ratio while toasting.
- Heat Mastery: Maintain medium to low heat for slow, even toasting, ensuring every bite is a melty delight.
- Buttery Perfection: Use velvety softened vegan butter to coat every inch of the bread evenly before grilling, guaranteeing a crispy, golden crust.
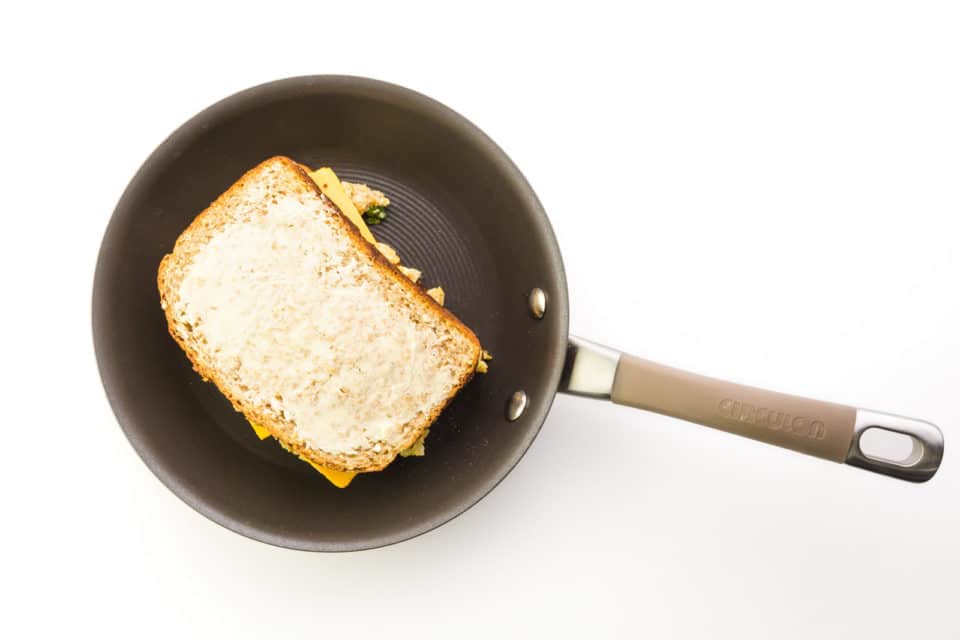
Making Vegan Tuna Melt
See the recipe card below for the full list of ingredients and step-by-step instructions. But first, let’s chat about what to expect when whipping up this tasty sandwich.
Once your butter is perfectly softened, it should spread across the bread effortlessly, creating a dreamy base for that golden, crispy crust we all love.
Keep a close eye on the timer to avoid any burnt mishaps! Use your spatula to sneak a peek under the bread and ensure it’s reaching that perfect hue.
Be prepared for a quick flip—sometimes that second side cooks up even faster! And for an extra indulgent touch, consider popping a lid on the pan to coax the vegan cheese into its full gooey glory. Curious about the magic of melting vegan cheese? Dive in for more
Marly’s Tips
- For an even crispier crust and slightly herbal flavor, try brushing the bread with olive oil instead of softened vegan butter.
- For extra flavor, add sliced tomatoes or avocado to your sandwich before grilling.
- Pressing the sandwiches with a spatula while cooking helps them cook evenly and ensures the cheese melts perfectly.
Serving Suggestions
Serve these tasty sandwiches with any of the following on the side:
- These Vegan Cauliflower Tots or Sweet Potato Tots are perfect as a side dish for any sandwich!
- Serve with a side of crispy potato chips or a fresh green salad.
- Pair with your favorite dipping sauce such as vegan ranch dip or combine sriracha with plant-based mayo to make a spicy sriracha mayo sauce.
Storage Tips
Store leftover sandwiches in an airtight container in the refrigerator for up to 2 days. To freeze, wrap each sandwich tightly in plastic wrap and store it in a freezer bag for up to 1 month. Thaw in the refrigerator before reheating to serve.
More Vegan Sandwiches
If you love this vegan chickpea tuna melt, you’ll be ready for more vegan sandwiches! Try these delicious recipes:

That’s it for this vegan tuna melt. Enjoy!
Subscribe and get a free Easy Vegan Recipes eBook
Plus our latest vegan recipes, delivered right to your inbox!

Chickpea Tuna Melt
Ingredients
- ½ batch vegan tuna salad
- 4 slices bread
- 4 slices vegan cheddar cheese (see note)
- 2 tablespoons vegan butter , softened
Instructions
- Prepare the chickpea tuna salad recipe as directed.
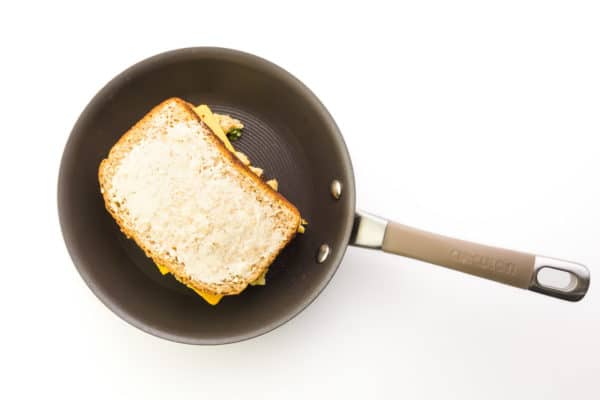
- Butter one side of four slices of bread.
- Spread a generous portion of chickpea tuna salad on two slices of bread. Top with 2 cheese slices. Place a bread slice on top, buttered side up.
- Place a skillet over medium heat. Place the sandwiches on the heated skillet and cook for 2 to 3 minutes, until golden brown. Then use a spatula and carefully turn each sandwich, cooking on the other side for another 2 to 3 minutes, until golden brown and the cheese is melting.
- If the cheese doesn't melt entirely, you can place it in the microwave and heat it for 30 seconds to a minute.
- Transfer sandwiches to plates and serve immediately.

Nutrition
This post was originally published in 2013 and was updated to include new photos, new text, and an updated recipe in 2021.
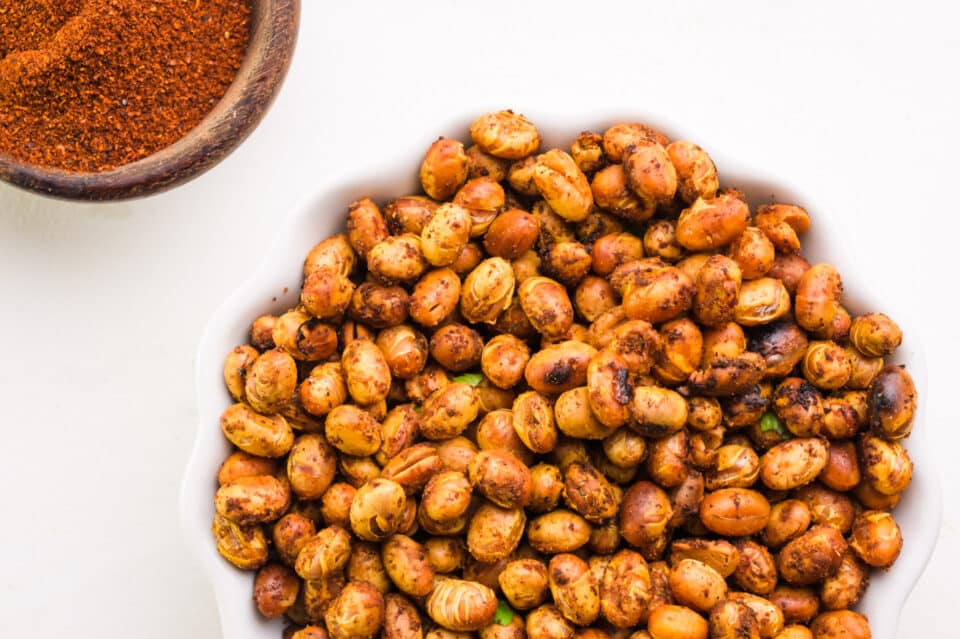
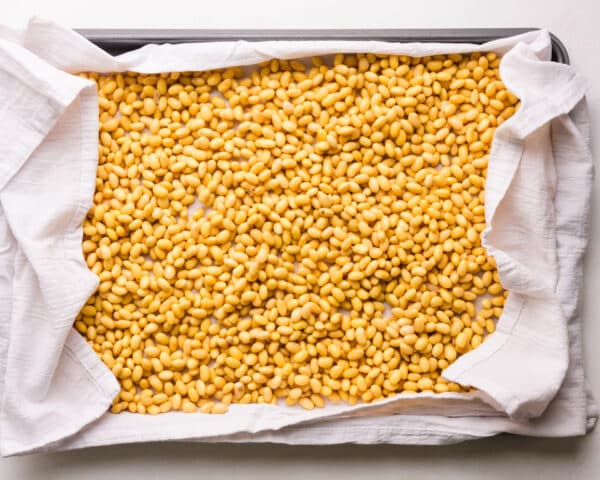
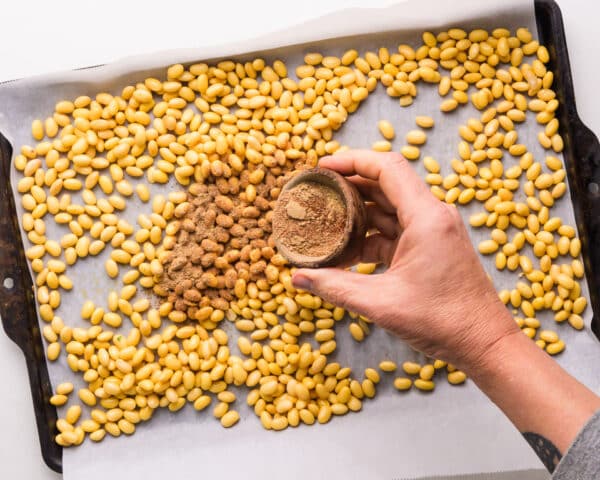
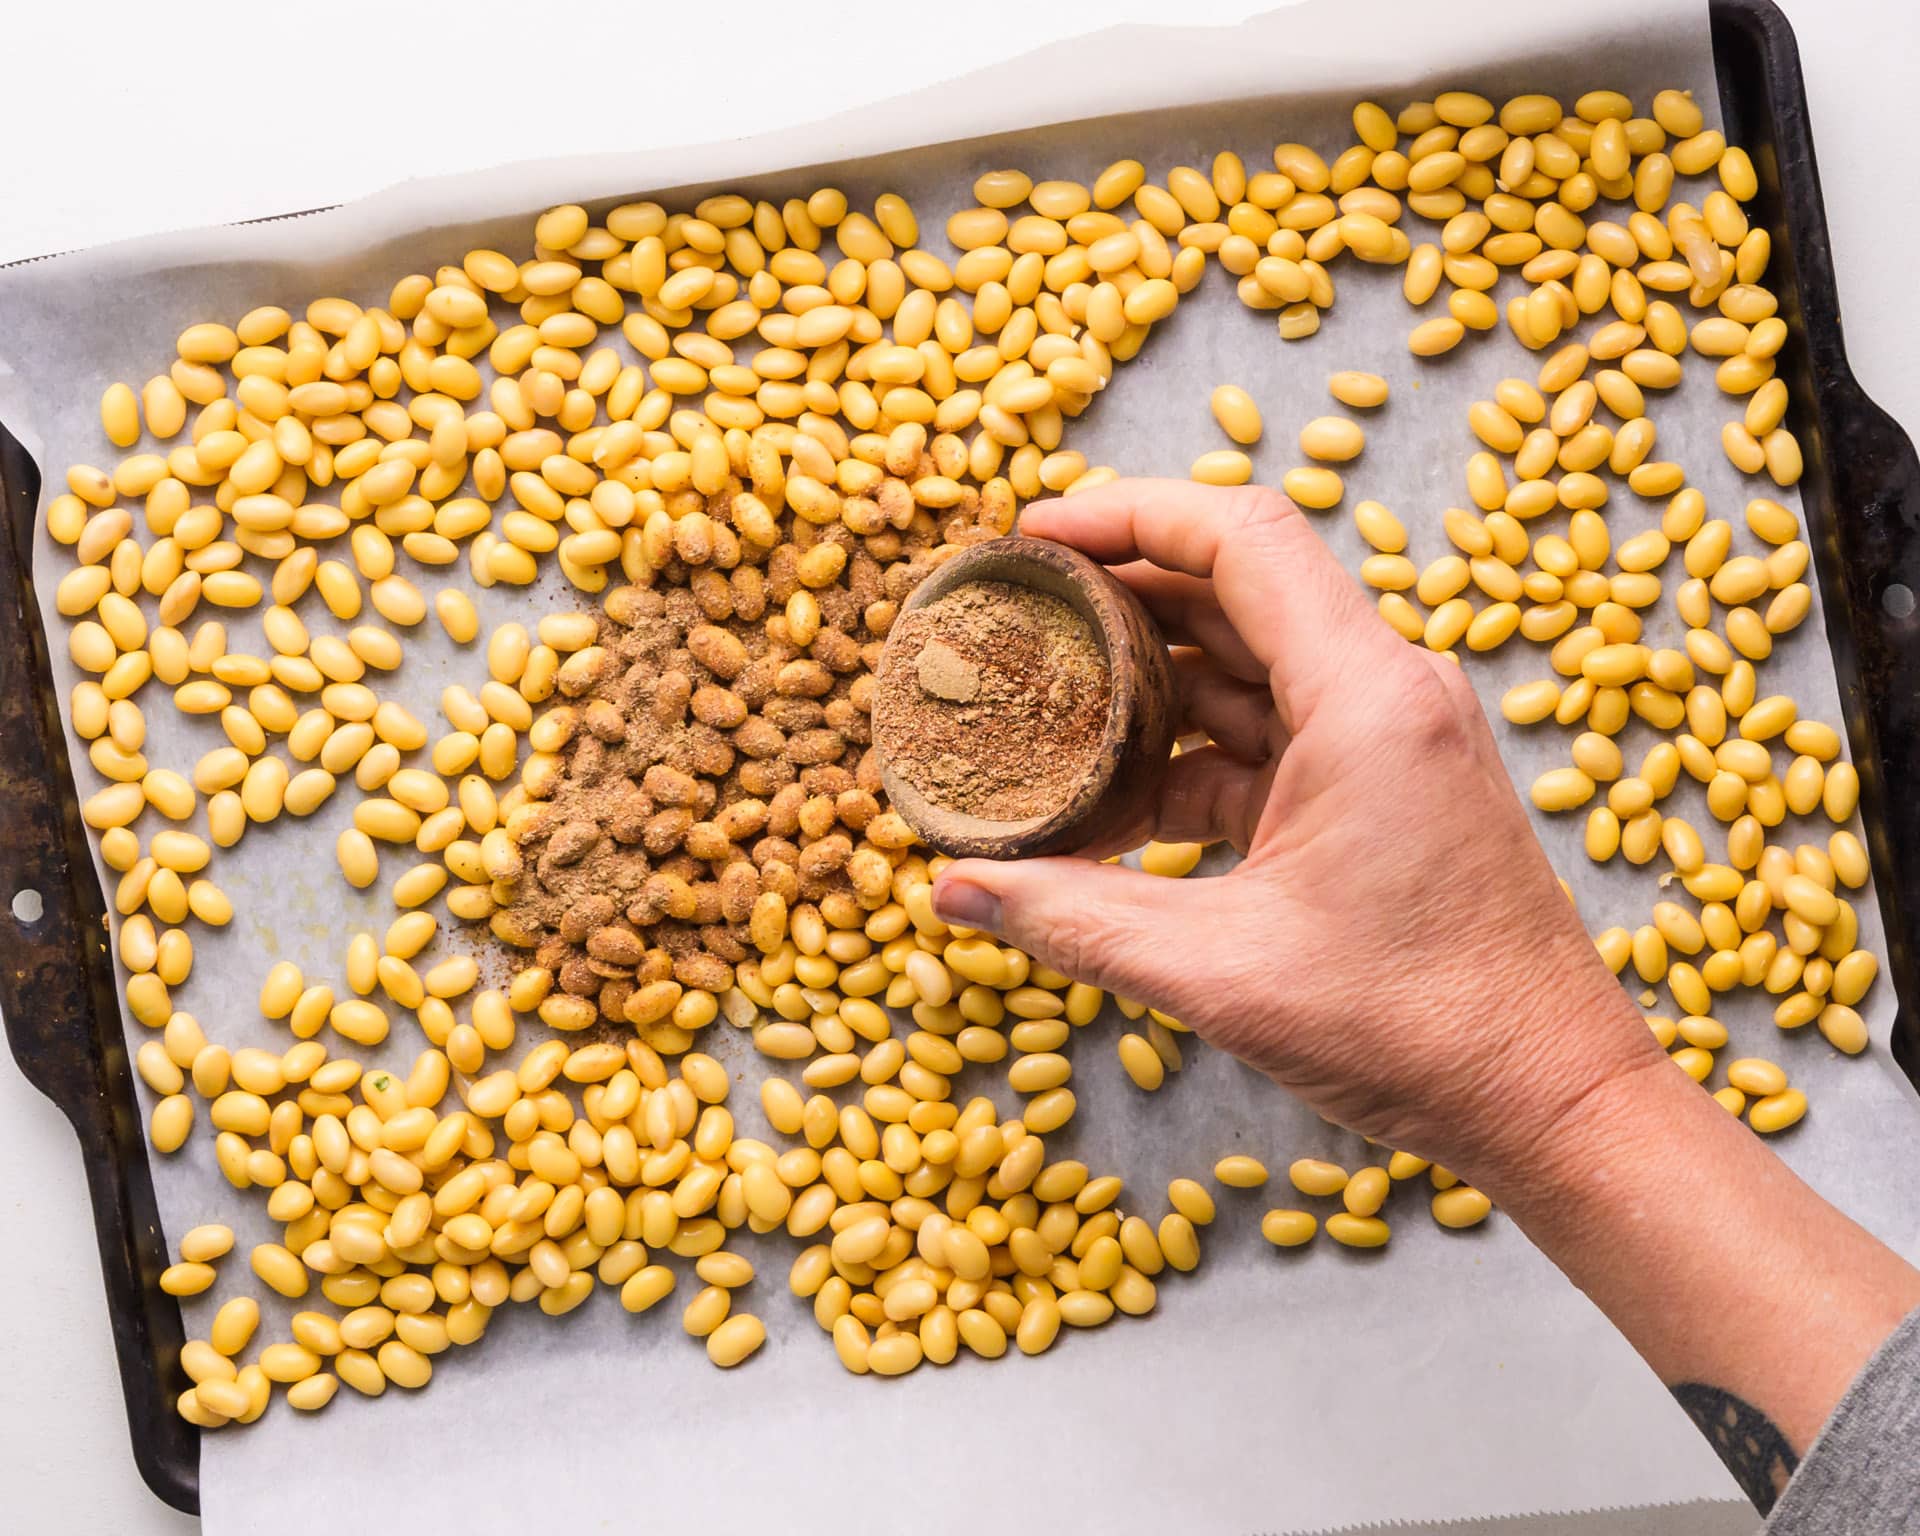
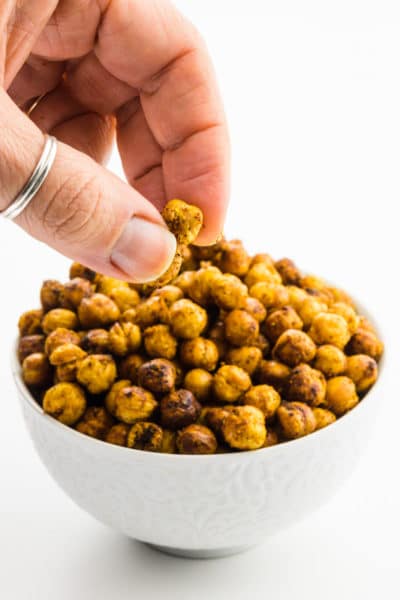
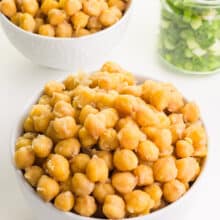
Looking for a delicious and nutritious snack? Look no further than these Crunchy Roasted Soybeans! With just a handful of ingredients and simple steps, you can enjoy a protein-packed treat that’s perfect for any time of day.
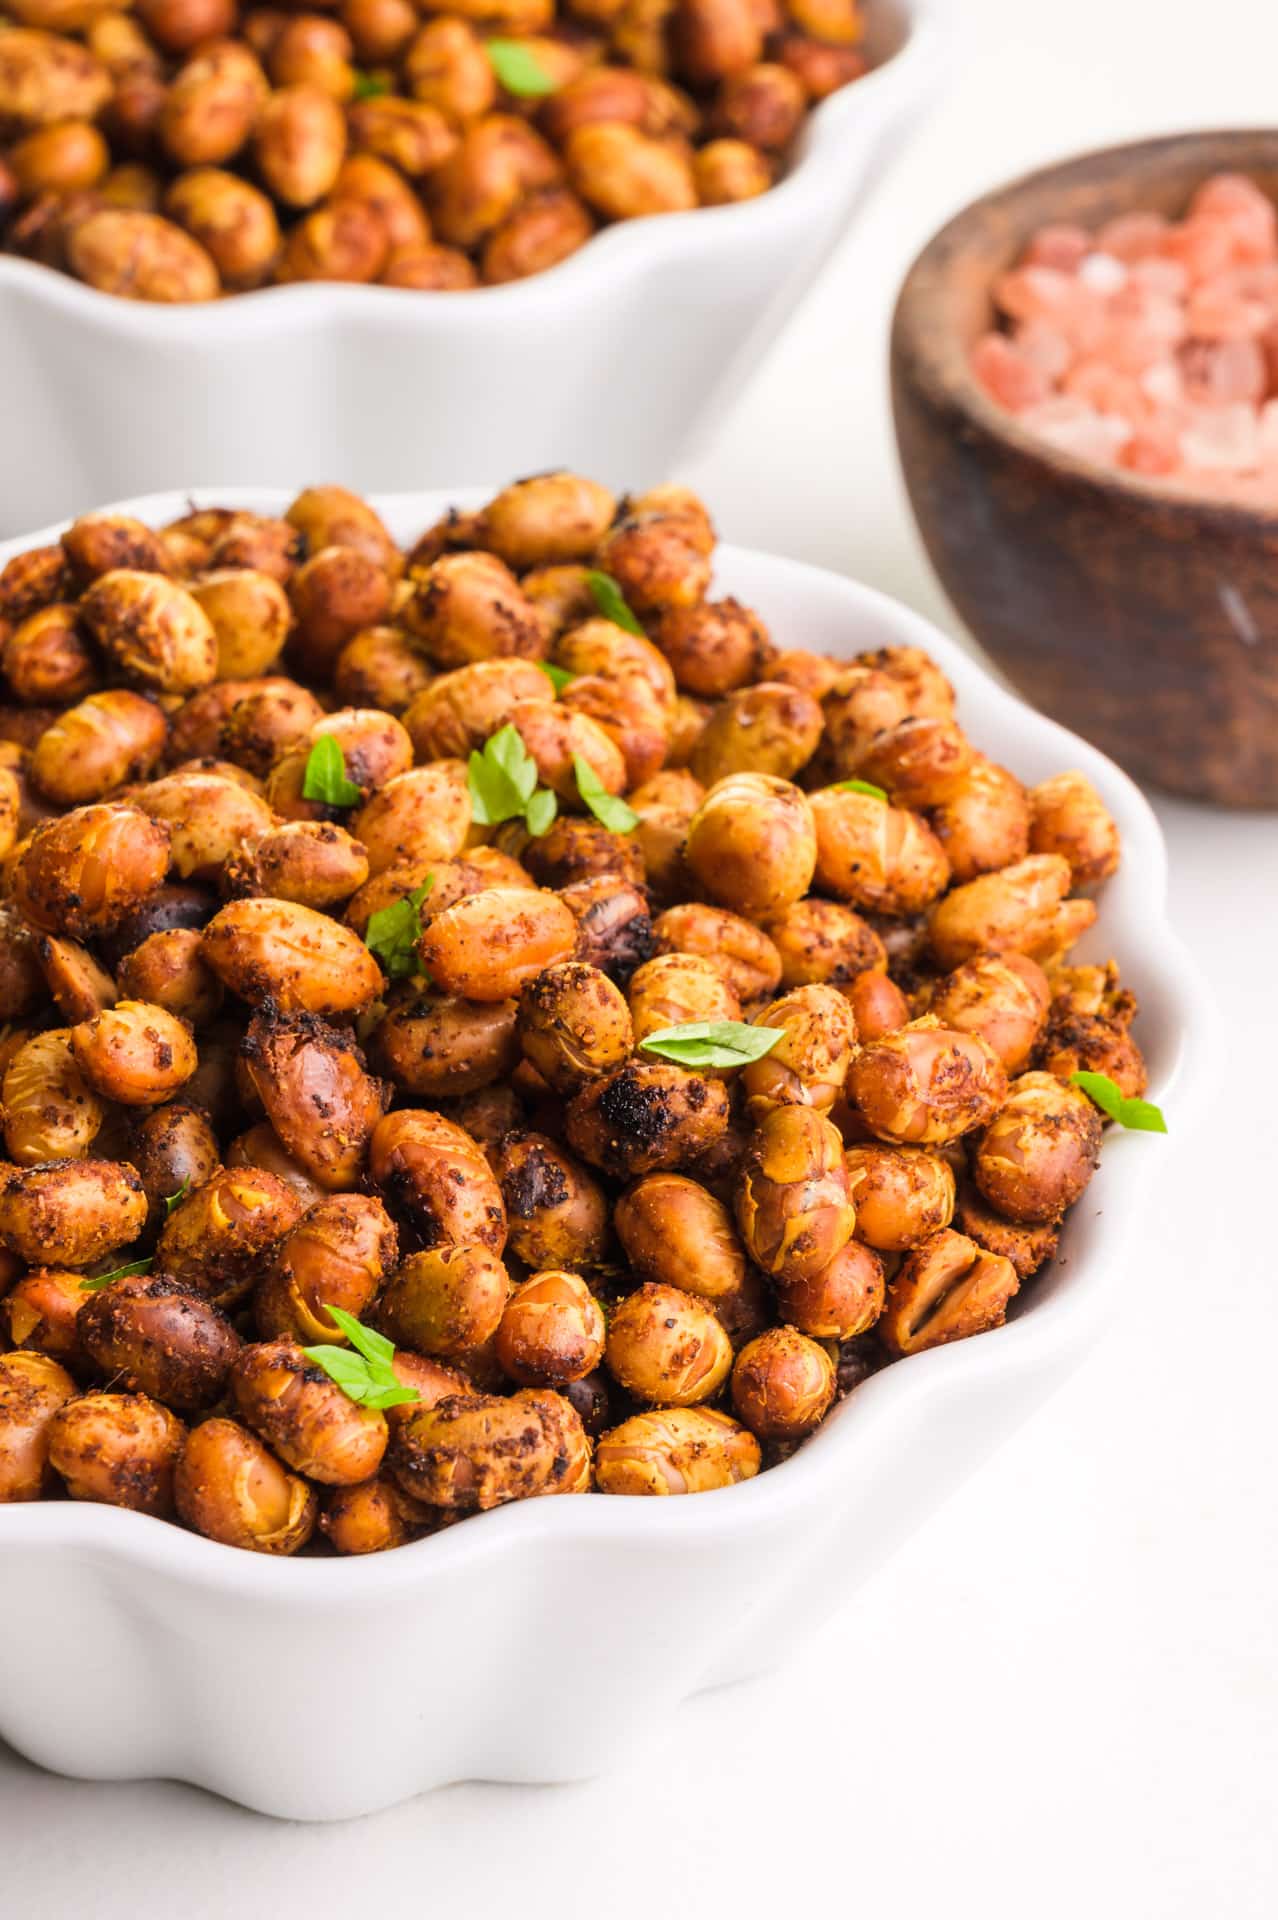
I love these roasted soybeans because they’re not only crunchy and flavorful, they also provide a satisfying dose of plant-based protein. Whether I’m enjoying them as a snack on the go or sprinkling them on top of a salad for added crunch, they never disappoint!
Ingredients
You can find the full printable recipe, including ingredient quantities, below. But first, here are some explanations of ingredients and steps to help you make this recipe perfect every time.
- Soybeans: Opt for dry soybeans for this recipe. I bought mine online, but you can sometimes find them in the bulk section of grocery stores or health food stores.
- Olive Oil: Choose a high-quality extra virgin olive oil for the best flavor.
- Salt: Look for fine sea salt for easy incorporation into the recipe.
- Pepper: Freshly cracked black pepper is recommended for optimal flavor.
What Makes This Recipe Shine?
- Crunchy Delight: These roasted soybeans offer a satisfying crunch with every bite, making them a favorite snack for any occasion.
- Protein-Packed: Packed with plant-based protein, these soybeans are a nutritious and filling option for fueling your day.
- Versatile Snack: Whether enjoyed straight from the oven or sprinkled on top of your favorite dishes, these roasted soybeans add a delicious crunch to any meal.
Marly’s Tips
- For extra flavor, try experimenting with different seasoning blends such as garlic powder, vegan ranch seasoning, or taco seasoning.
- Make sure to spread the seasoned soybeans out evenly on the baking pan or air fryer basket for even cooking.
Serving Suggestions
Serve this with your favorite side dishes such as:
- Sprinkle roasted soybeans on top of salads or soups for added crunch.
- Serve alongside dips like hummus or guacamole for a tasty snack.
- Incorporate into trail mix or granola for a protein boost.
Storage Tips
Storage & Freezing Instructions: Store leftover roasted soybeans in an airtight container at room temperature for up to one week. They can also be frozen for longer storage.

Vegan Snacks
If you love this recipe for roasted soybeans, here are more vegan snack favorites to try:

Subscribe and get a free Easy Vegan Recipes eBook
Plus our latest vegan recipes, delivered right to your inbox!
Crunchy Roasted Soybeans
Ingredients
- 2 cups dry soybeans
- 1 teaspoon olive oil
- ½ teaspoon sea salt
- ¼ teaspoon freshly cracked pepper
- Optional Toppings: Mrs. Dash Southwest Chipotle Seasoning or your choice of seasonings (see notes)
Instructions
- Add soybeans to a bowl with water, covering them with at least 3 inches of water. Cover and refrigerate so the beans can soak overnight (9 to 12 hours total).
- Drain the beans in a strainer, shaking o remove excess water. Spread the beans out on a paper towel and pat dry. You can also just let them sit out for a few minutes to air dry.
- Transfer dried soybeans to a pan lined with parchment paper. Drizzle with olive oil and toss to coat.

- Sprinkle with salt and any other favorite spices.
- OVEN METHOD: Preheat your oven to 400°F/200°C. Line a baking pan with parchment paper.
- Pour seasoned beans on the prepared pan, spreading them out into a single layer. Place the pan in the oven and bake for 25 to 35 minutes, until they're crispy on the outside.
- AIR FRYER METHOD: Preheat air fryer to 375°F/190°C. Add seasoned beans to the air fryer basket and cook for up to 10 minutes, flipping the beans a couple of times.
- Remove the chickpeas from the oven and allow them to cool slightly before adding salt and pepper to taste.


Notes
More Seasoning Flavoring Options
You can vary the flavor of your seasoning toppings, including these:- Combine 1/2 teaspoon garlic powder and 1/2 teaspoon of sea salt
- Add some vegan ranch seasoning powder
- A teaspoon of this simple taco seasoning would be delicious, too.
Nutrition
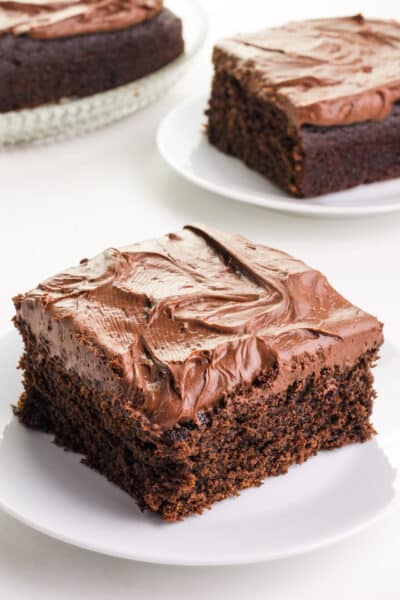
Our Vegan Chocolate Zucchini Cake recipe is a game-changer, delivering moist, chocolatey goodness in every bite. It’s a guilt-free treat to satisfy your sweet tooth and sneak in some veggies, too! Be sure to add some whipped vegan chocolate ganache frosting on top.
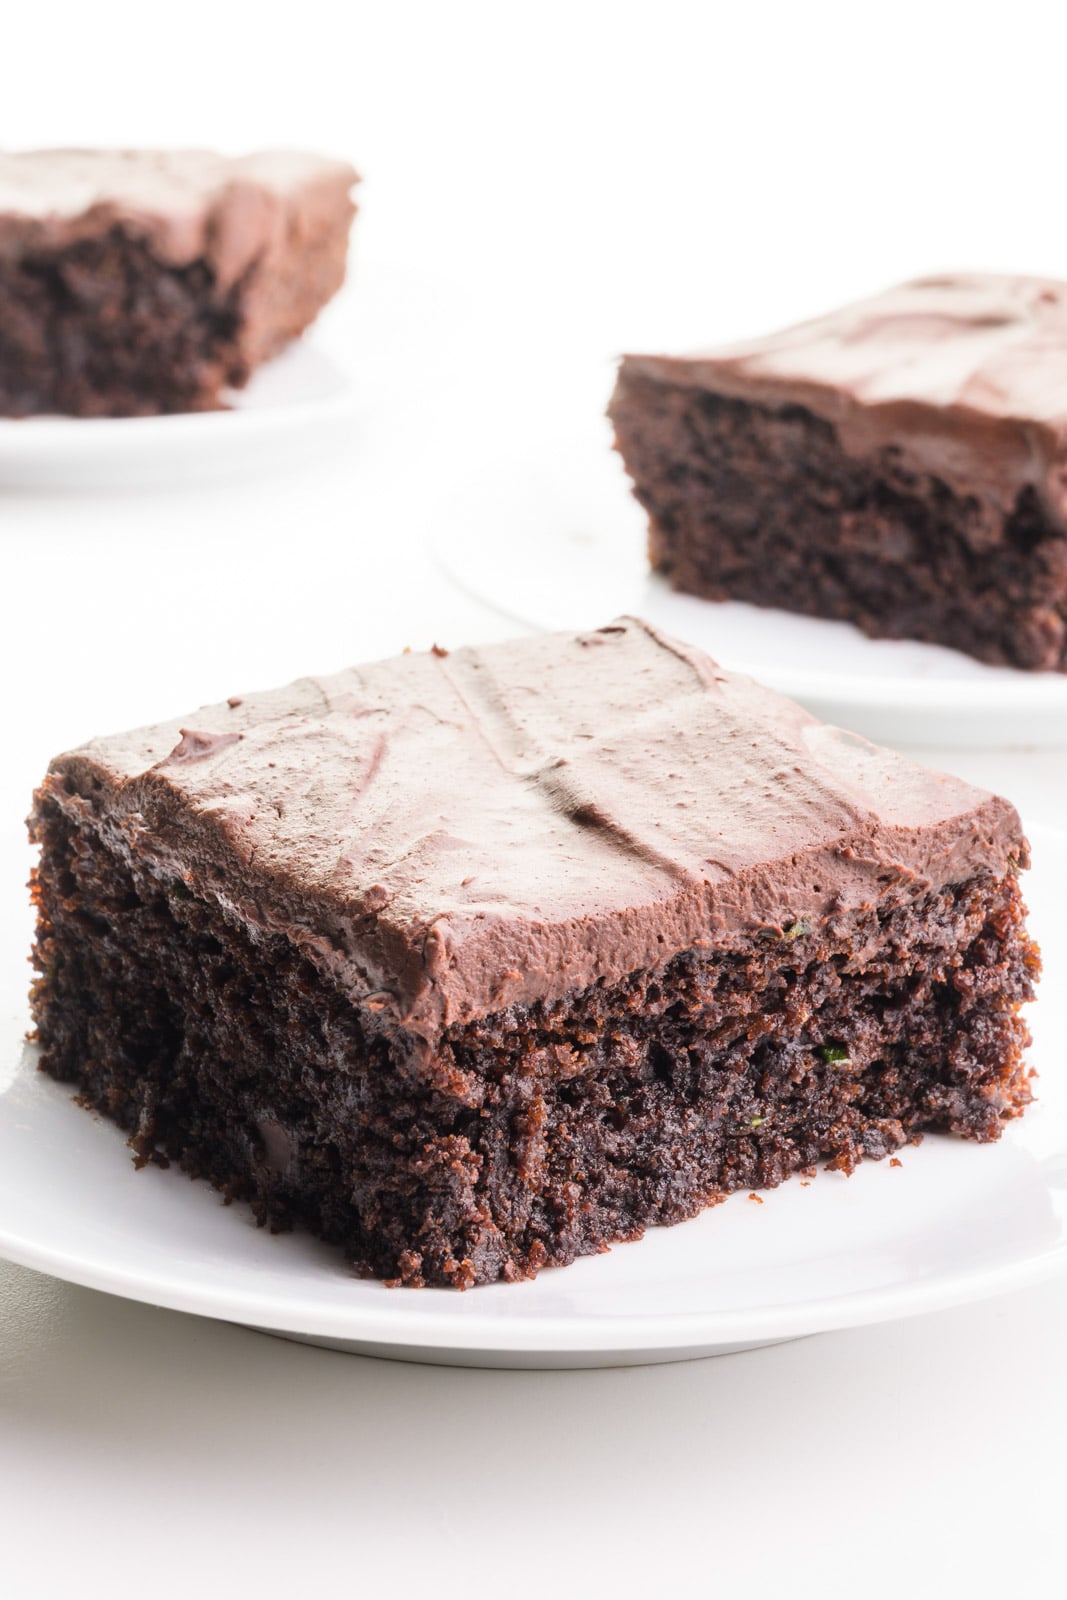
It might sound unconventional, but trust me, the addition of zucchini to this cake is pure genius. It adds moisture and texture without compromising on flavor. Plus, it’s a guilt-free indulgence you can enjoy anytime!
Ingredients & Substitutions
You can find the full printable recipe, including ingredient quantities, below. But first, here are some explanations of ingredients and steps to help you make this recipe perfect every time.
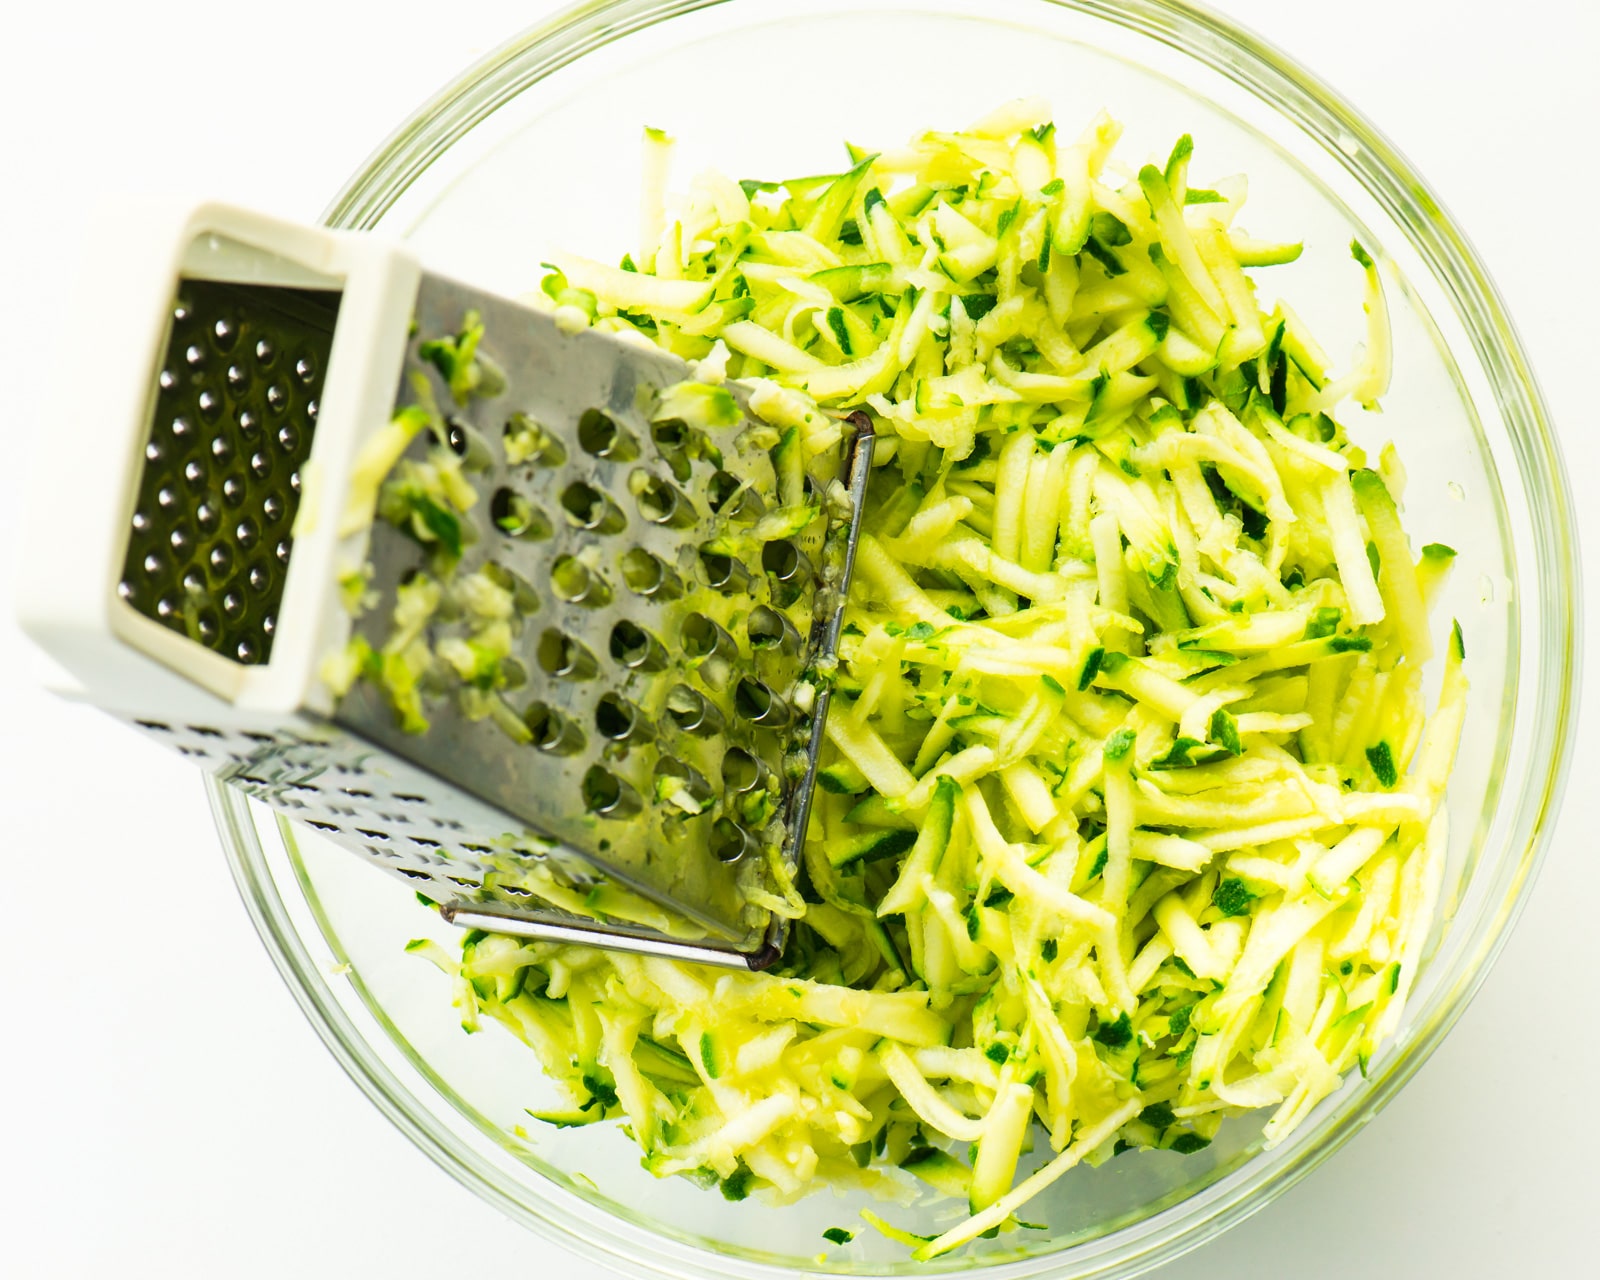
- Zucchini: Look for firm, medium-sized zucchini. Substitute with grated carrots for a similar texture.
- All-Purpose Flour: Opt for unbleached all-purpose flour for the best results. Want your cake gluten-free? Substitute a baking-quality gluten-free flour.
- Granulated Sugar: Choose organic granulated sugar for a more natural option. Use coconut sugar as a substitute.
- Yogurt: Use plain, unsweetened vegan yogurt. You can substitute dairy-free sour cream.
- Vegetable Oil: Use a neutral-flavored oil like canola or sunflower oil. Use applesauce as a healthier alternative.
- Dairy-Free Chocolate Chips: Look for vegan chocolate chips that are free from dairy products and suitable for baking.
Buying Guide: When purchasing zucchini, look for ones that are firm and free from blemishes. Organic options are available at most grocery stores, typically located in the produce section.
What Makes This Recipe Shine?
- Zucchinis are shredded and treated with salt, coaxing them to drain off excess water
- Adding vegan sour cream keeps this cake extra moist and tender
- Instant coffee is a secret ingredient for enhancing the chocolate flavor in this cake.
How to Make Chocolate Zucchini Cake
The full recipe card below describes the actual process of making this cake. But I wanted to prepare you for the delightful baking adventure you can expect when making our Vegan Chocolate Zucchini Cake recipe!
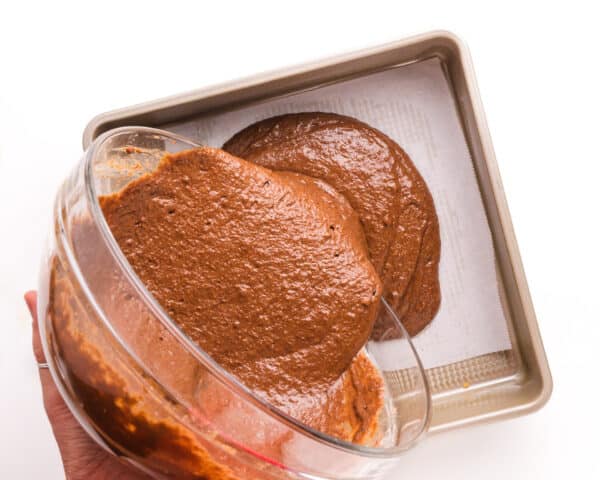
- Making the batter: As you combine the ingredients, expect a thick batter, punctuated by chocolate chips and shredded zucchini.
- Preparing to bake: Use a spatula to evenly spread the batter in the baking pan, ensuring a consistent texture throughout.
- Baking the cake: Anticipate the delightful aroma of chocolate wafting through your kitchen as the cake bakes to perfection.
- Serving and enjoying: Once cooled, topping it with whipped ganache frosting is a simple yet satisfying finishing touch. Get ready to indulge in a moist and chocolatey dessert that’s both easy to make and utterly delicious!
Reader Reviews
★★★★★
Joann
I knew this was going to be good as soon as I started mixing the sauce! Really yummy
Frosting Options
When it comes to topping off this scrumptious cake, a sprinkling of powdered sugar works just fine.
However, topping it with a luscious, creamy frosting adds an extra layer of moisture and flavor that takes this cake to the next level. Here are some favorite options:
- Vegan Chocolate Frosting: Rich, creamy, and decadently chocolatey, this frosting perfectly complements the flavors of the cake.
- Vegan Cream Cheese Frosting: Tangy and smooth, this frosting adds a delightful contrast to the sweetness of the cake.
- Whipped Chocolate Ganache: Dive into the light, fluffy, and irresistibly indulgent ganache frosting, a dreamy addition to your chocolate zucchini cake.
- Chocolate Avocado Frosting: Opt for a healthier twist with this rich frosting made with avocados!
For my cake, I opted for a whipped vegan ganache frosting. It’s easy to make and adds loads of flavor to every bite.
Frequently-Asked Questions
Do you peel zucchini for cake?
There’s no need to peel zucchini for cake. Simply wash, grate, and incorporate it into your batter for added moisture and texture.
Why do we put zucchini in cake?
We add zucchini to cakes and baked goods for its unique ability to enhance texture while contributing moisture and subtle flavor notes. It’s also helpful for adding nutritional value to the recipe.
Storage Tips
Store the cake in an airtight container in the refrigerator for up to 5 days. For longer storage, wrap individual slices in plastic wrap and freeze for up to 3 months.
Vegan Chocolate Cakes
If you love this chocolate zucchini cake recipe, you should know you have lots of delicious options! Here are some of our favorite chocolate cakes:

That’s it for the vegan chocolate zucchini cake. Enjoy!
Subscribe and get a free Easy Vegan Recipes eBook
Plus our latest vegan recipes, delivered right to your inbox!
Vegan Chocolate Zucchini Cake
Equipment
Ingredients
For the Chocolate Zucchini Cake
- 2 ½ cups coarsely shredded zucchini
- 1 ¾ cups all-purpose flour
- 1 ¼ cup granulated sugar
- 1 tablespoon cornstarch
- ½ cup cocoa powder
- 2 teaspoons baking powder
- 1 teaspoon baking soda
- ½ teaspoon salt
- ½ teaspoon instant coffee
- 1 cup vegetable oil
- ¾ cup coconut yogurt
- 1 tablespoon apple cider vinegar
- 2 teaspoons vanilla
- 1 cup dairy-free chocolate chips
Whipped Chocolate Ganache Frosting
- 8 oz bar semi-sweet chocolate (substitute 1 ¼ cups chocolate chips)
- 1 cup coconut milk
Instructions
- Preheat the oven to 350°F/175°C and prepare a 9×13 baking pan by coating it with cooking spray.
For the Zucchini Cake
- Cut off the root ends of the zucchini and use a shredder to shred. Place it on a kitchen towel and sprinkle it with a pinch of salt. Let the shredded zucchini sit for 15 minutes. The salt will cause it to drain its liquids.

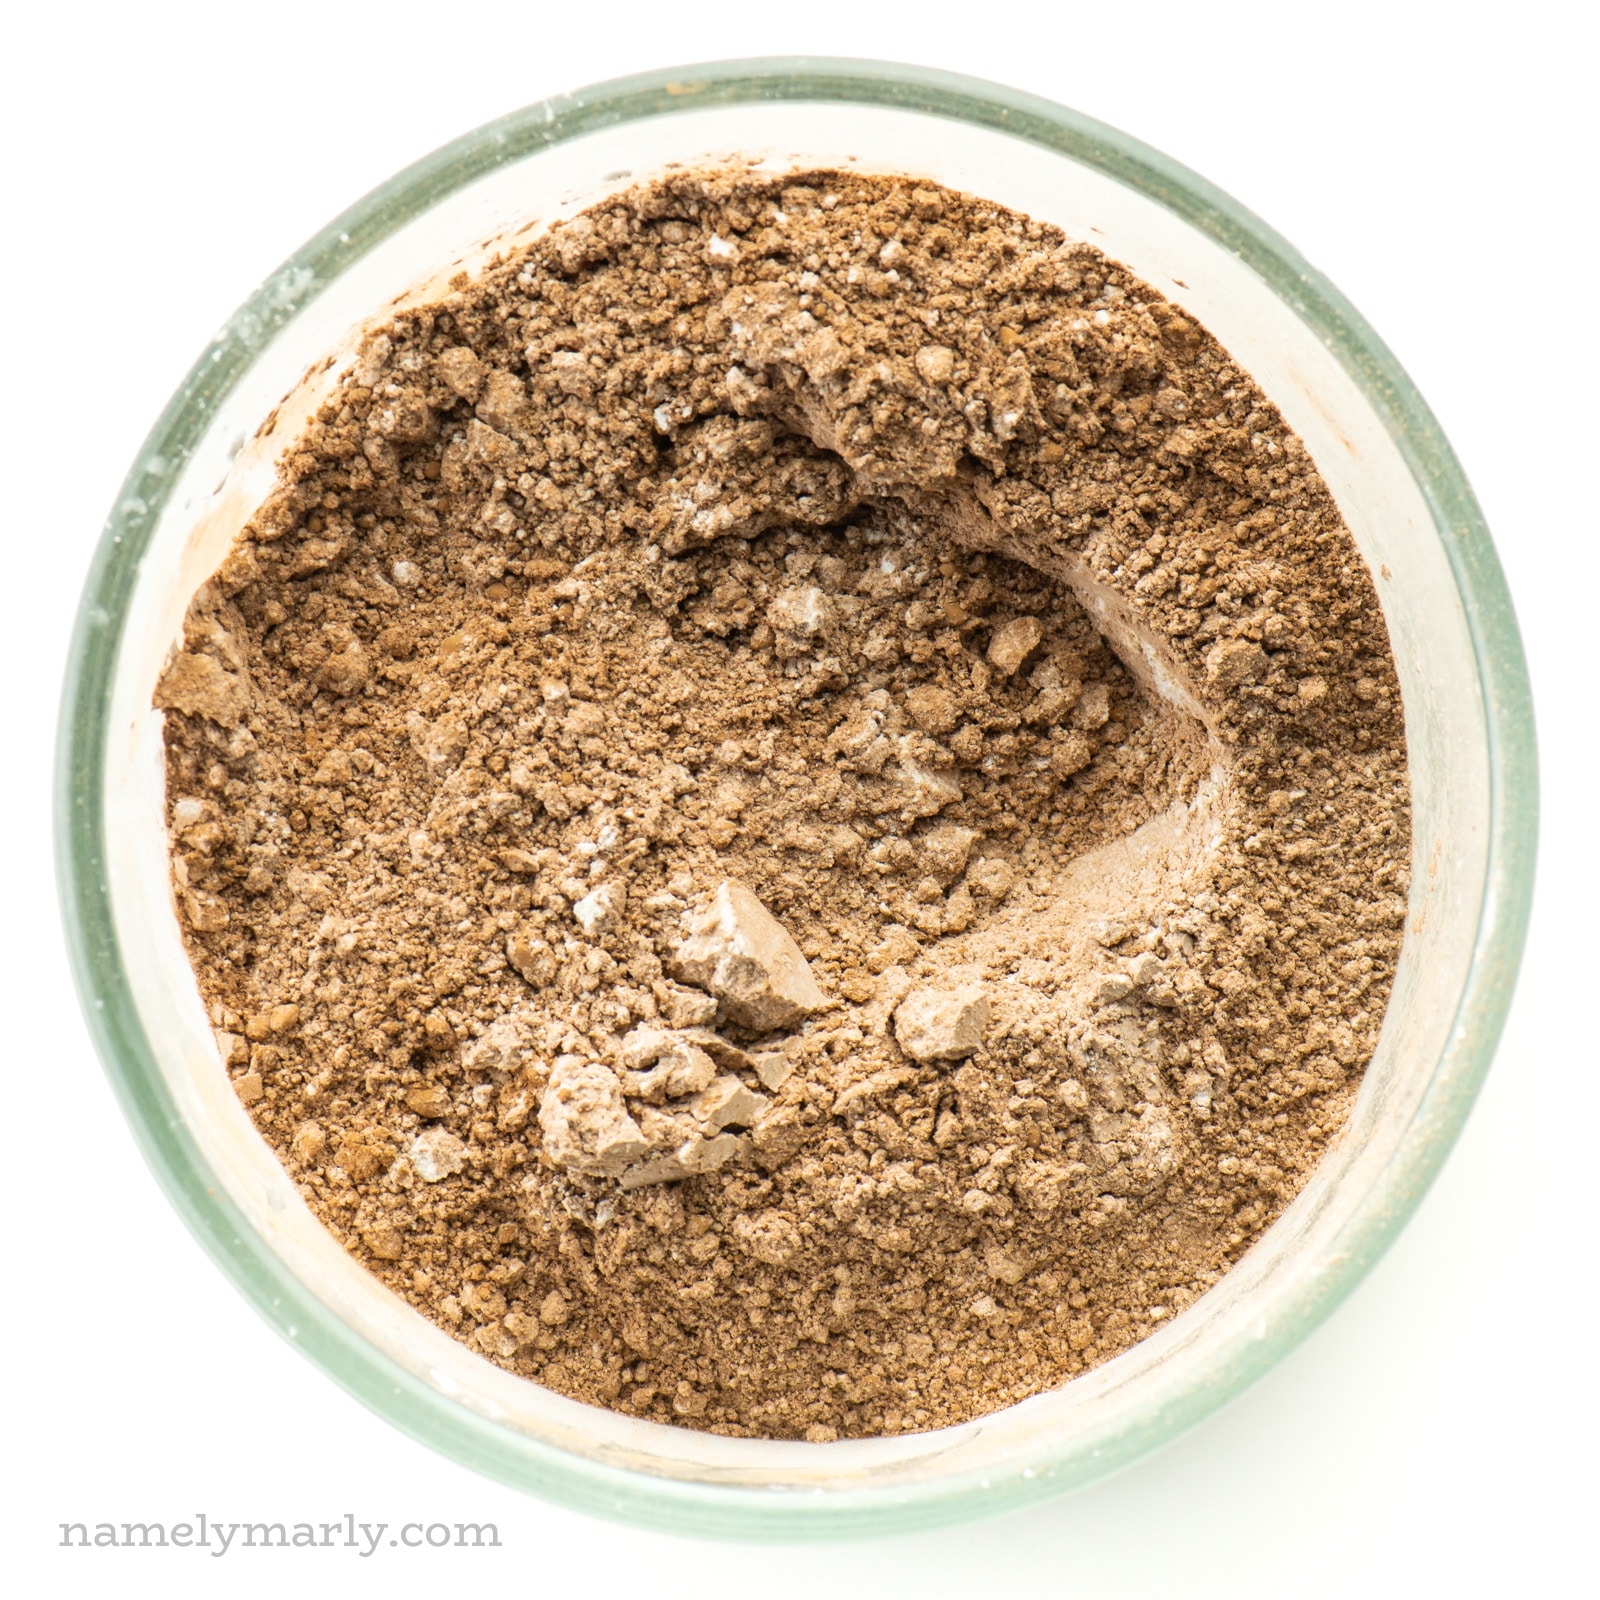
- In a large bowl, combine the flour, sugar, starch, cocoa, baking powder, soda, coffee, and salt. Stir together.
- In a separate bowl, stir together the oil, yogurt, vinegar, and vanilla.
- Press the zucchini to remove excess lquids and use a paper towel to dry it off.
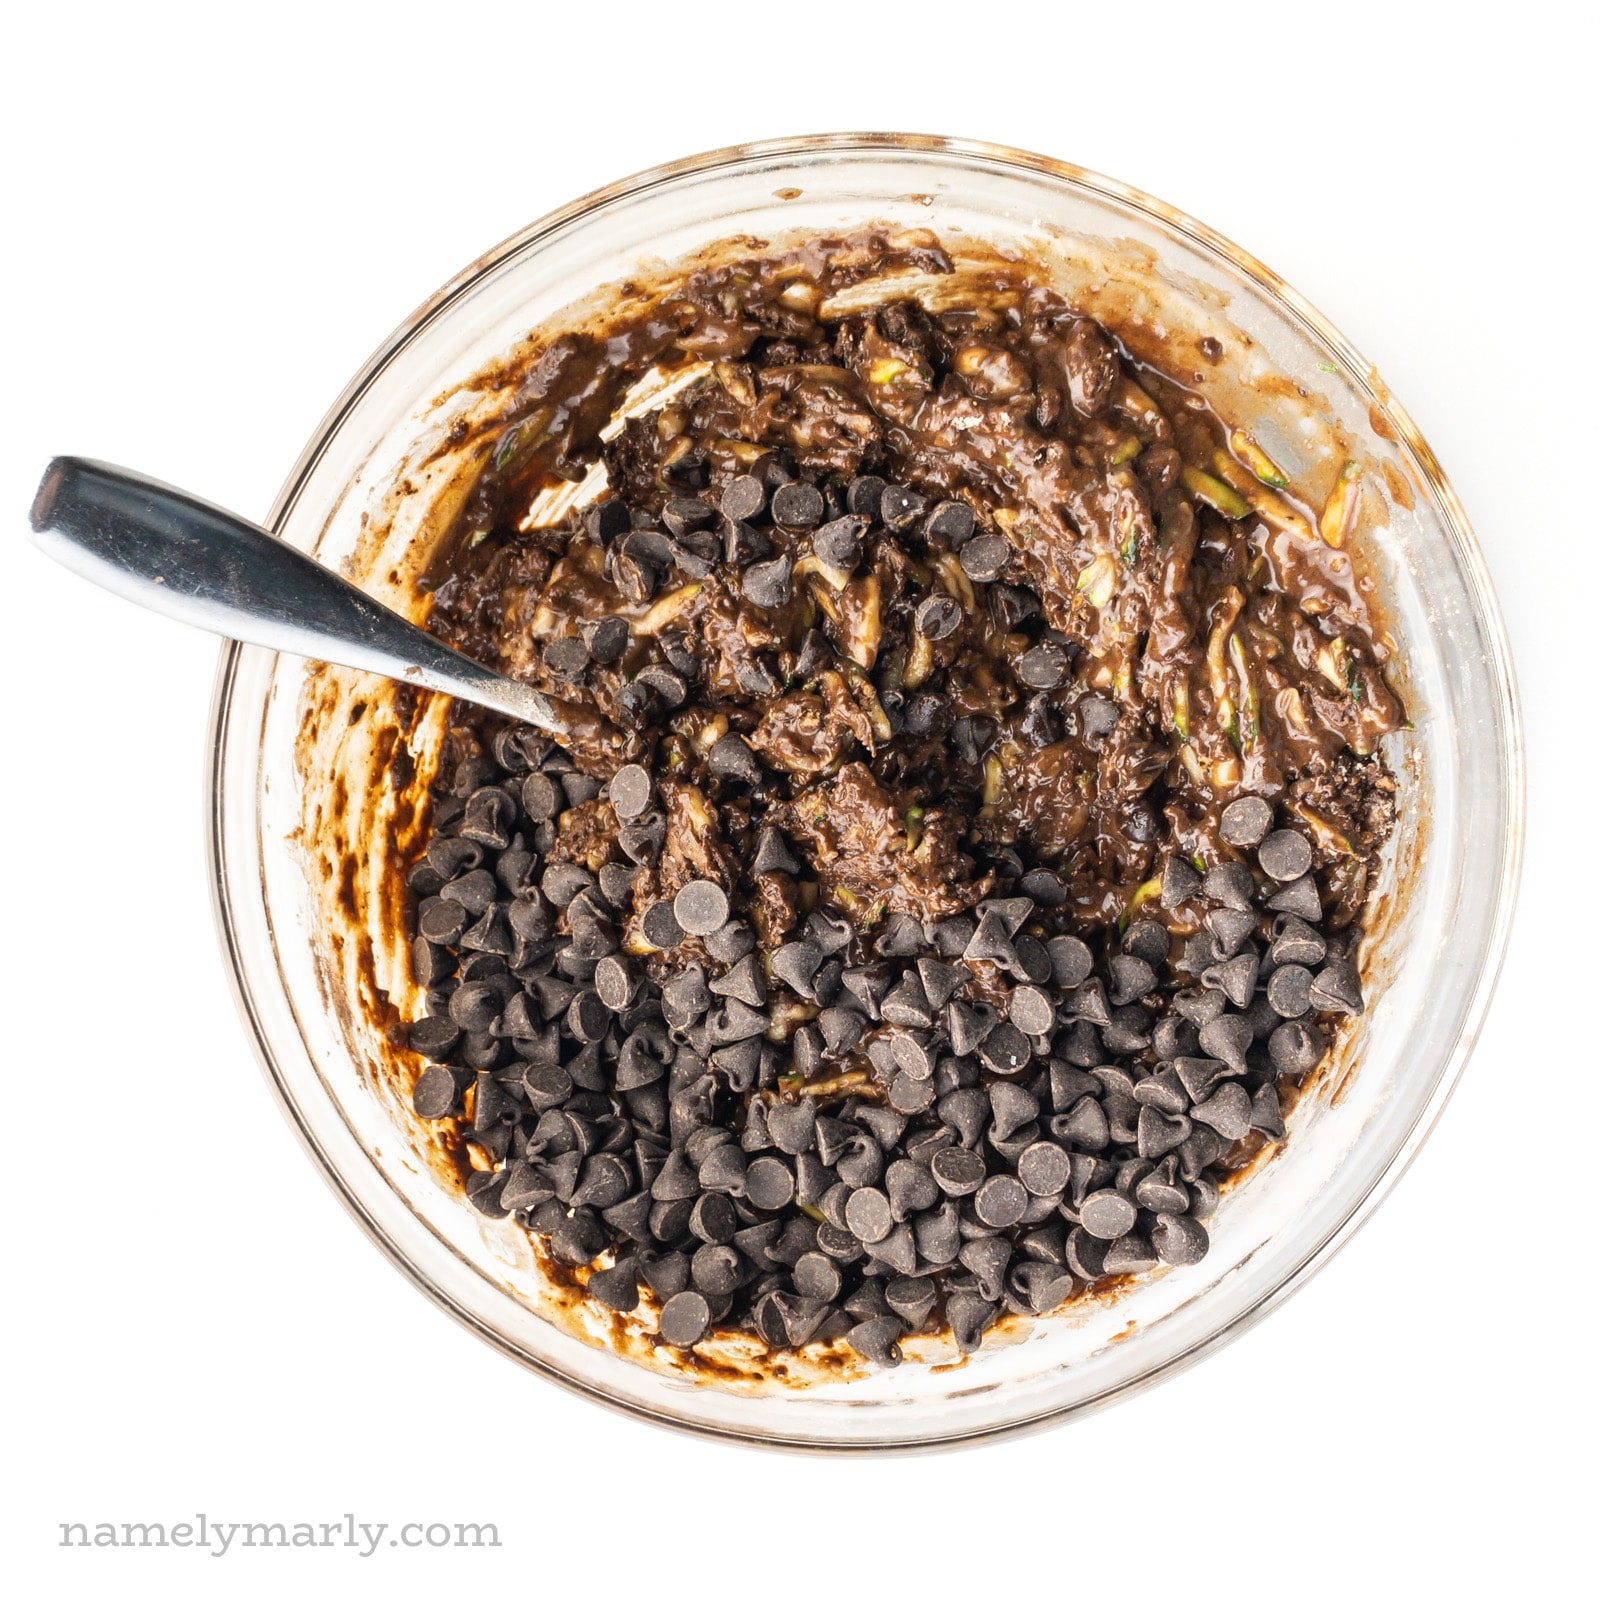
- Pour the yogurt mixture in with the flour mixture and stir to combine. Add the chocolate chips and zucchini and stir until just combined.

- Use a spatula to spread the batter evenly across the prepared pan. Bake for 35 to 40 minutes. Insert a tester in the middle of the cake. When it comes out clean, the cake is done. Remove from oven and set aside to cool completely before frosting.

For the Whipped Ganache Frosting
- If using a chocolate bar, chop it into chunks and place them in a bowl. Pour the milk into a pyrex measuring cup and microwave until hot (but not boiling), about 1 minute. Pour the hot milk over the chocolate and stir it gently to make sure the chocolate is coated. Place a plate and set it aside for up to 5 minutes to allow the chocolate to melt.
- Once the chocolate melts, stir it all together. Transfer the bowl to the fridge for 30 minutes or so until the chocolate is firm but still malleable. Scoop it into a mixing bowl and mix on medium speed for 1 to 2 minutes until light and fluffy.
- When the cake has cooled, spread with whipped ganache frosting.
- To store cake, cover and keep refrigerated. It will keep up to 5 days in the fridge.

Nutrition
This post was originally published in 2012 and was updated to include new photos, new text, and an updated recipe in 2021.
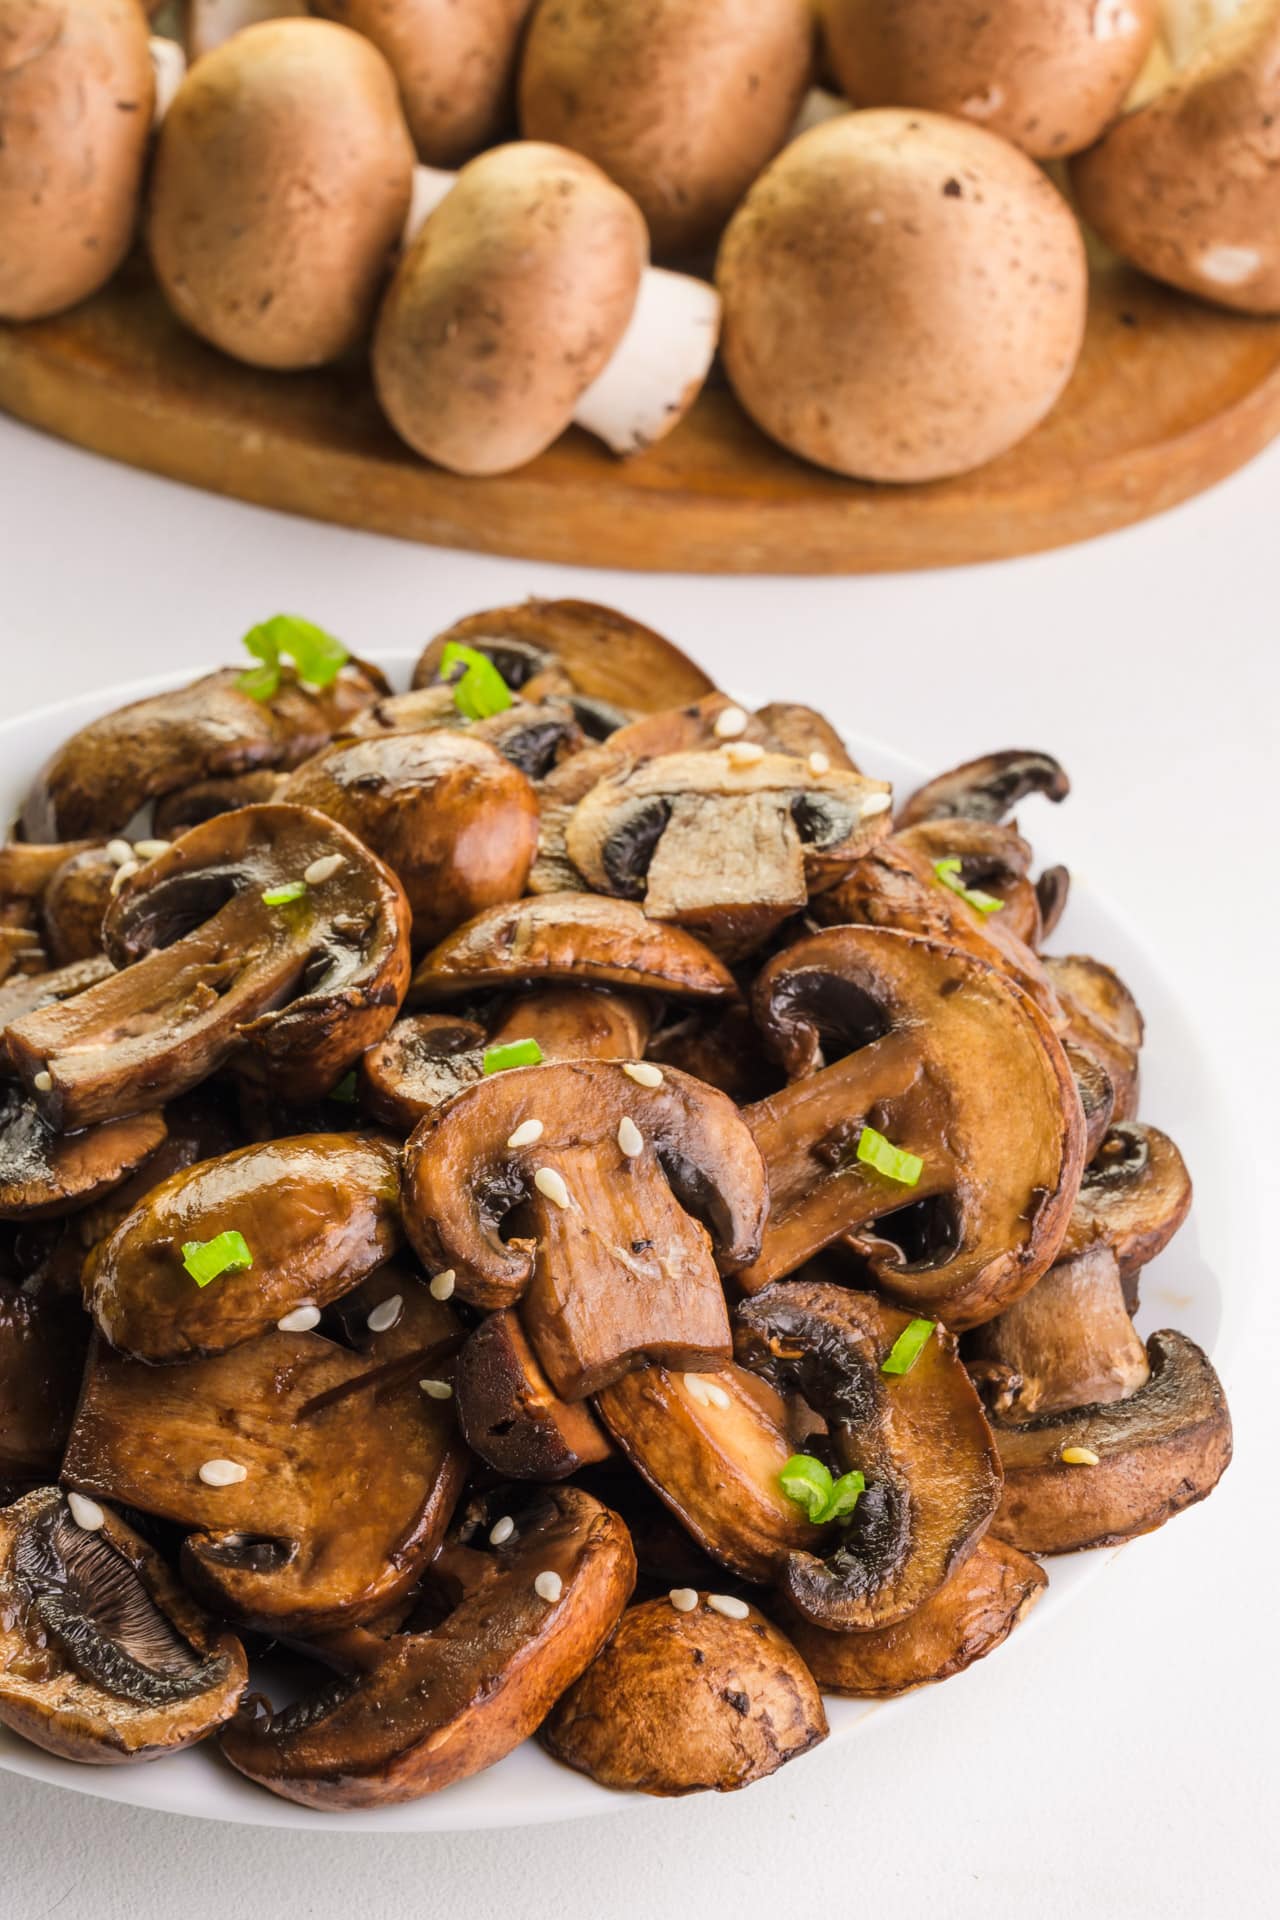
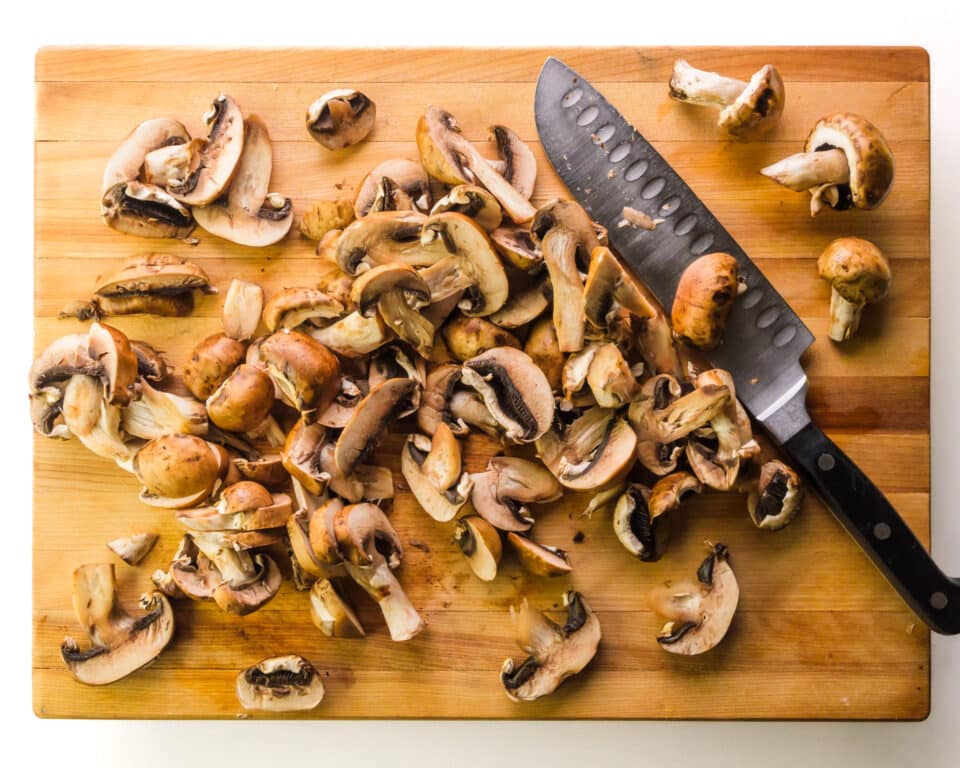
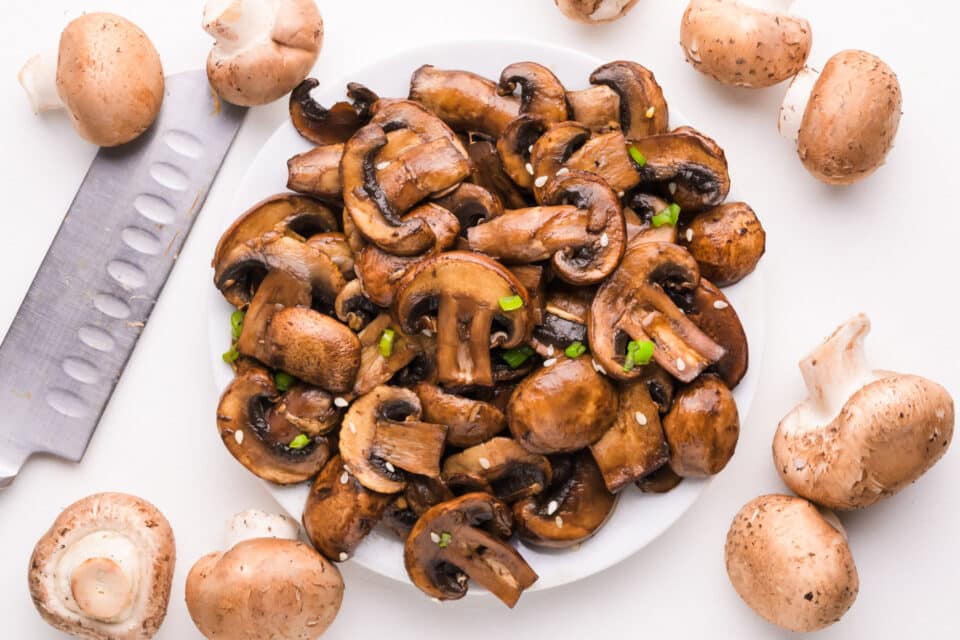
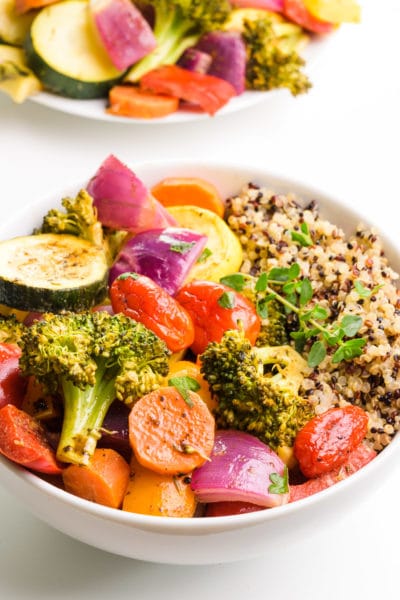
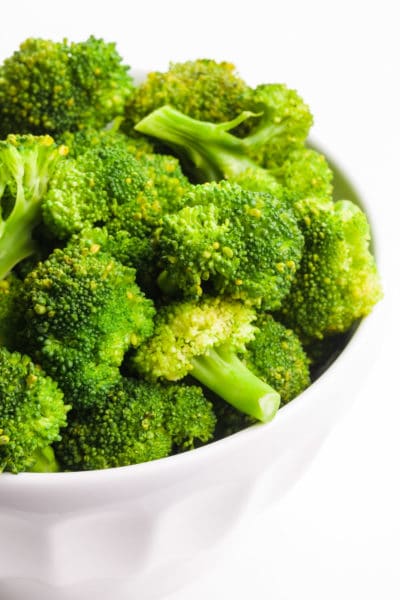
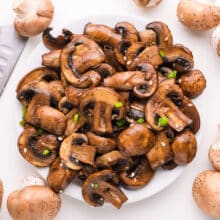
In need of a quick and delightful appetizer or side dish? Look no further than these perfectly tender sautéed mushrooms! With just a few simple ingredients and minimal effort, you can whip up a flavorful dish that’s sure to impress.
Mushrooms are my secret weapon for adding depth and flavor to my plant-based meals. Despite my husband’s aversion, I love incorporating these nutrient-packed fungi into my recipes.
Besides, with Dr. Joel Fuhrman’s stamp of approval on mushrooms, I’m eager to sneak them into my daily eats whenever possible!
Ingredients & Substitutions
You can find the full printable recipe, including ingredient quantities, below. But first, here are some explanations of ingredients and steps to help you make this recipe perfect every time.
- Mushrooms: Look for firm, unblemished mushrooms in the produce section. You can use portobello or cremini mushrooms.
- Olive Oil: Extra virgin olive oil is the best choice for its robust flavor, but any cooking oil will work in a pinch.
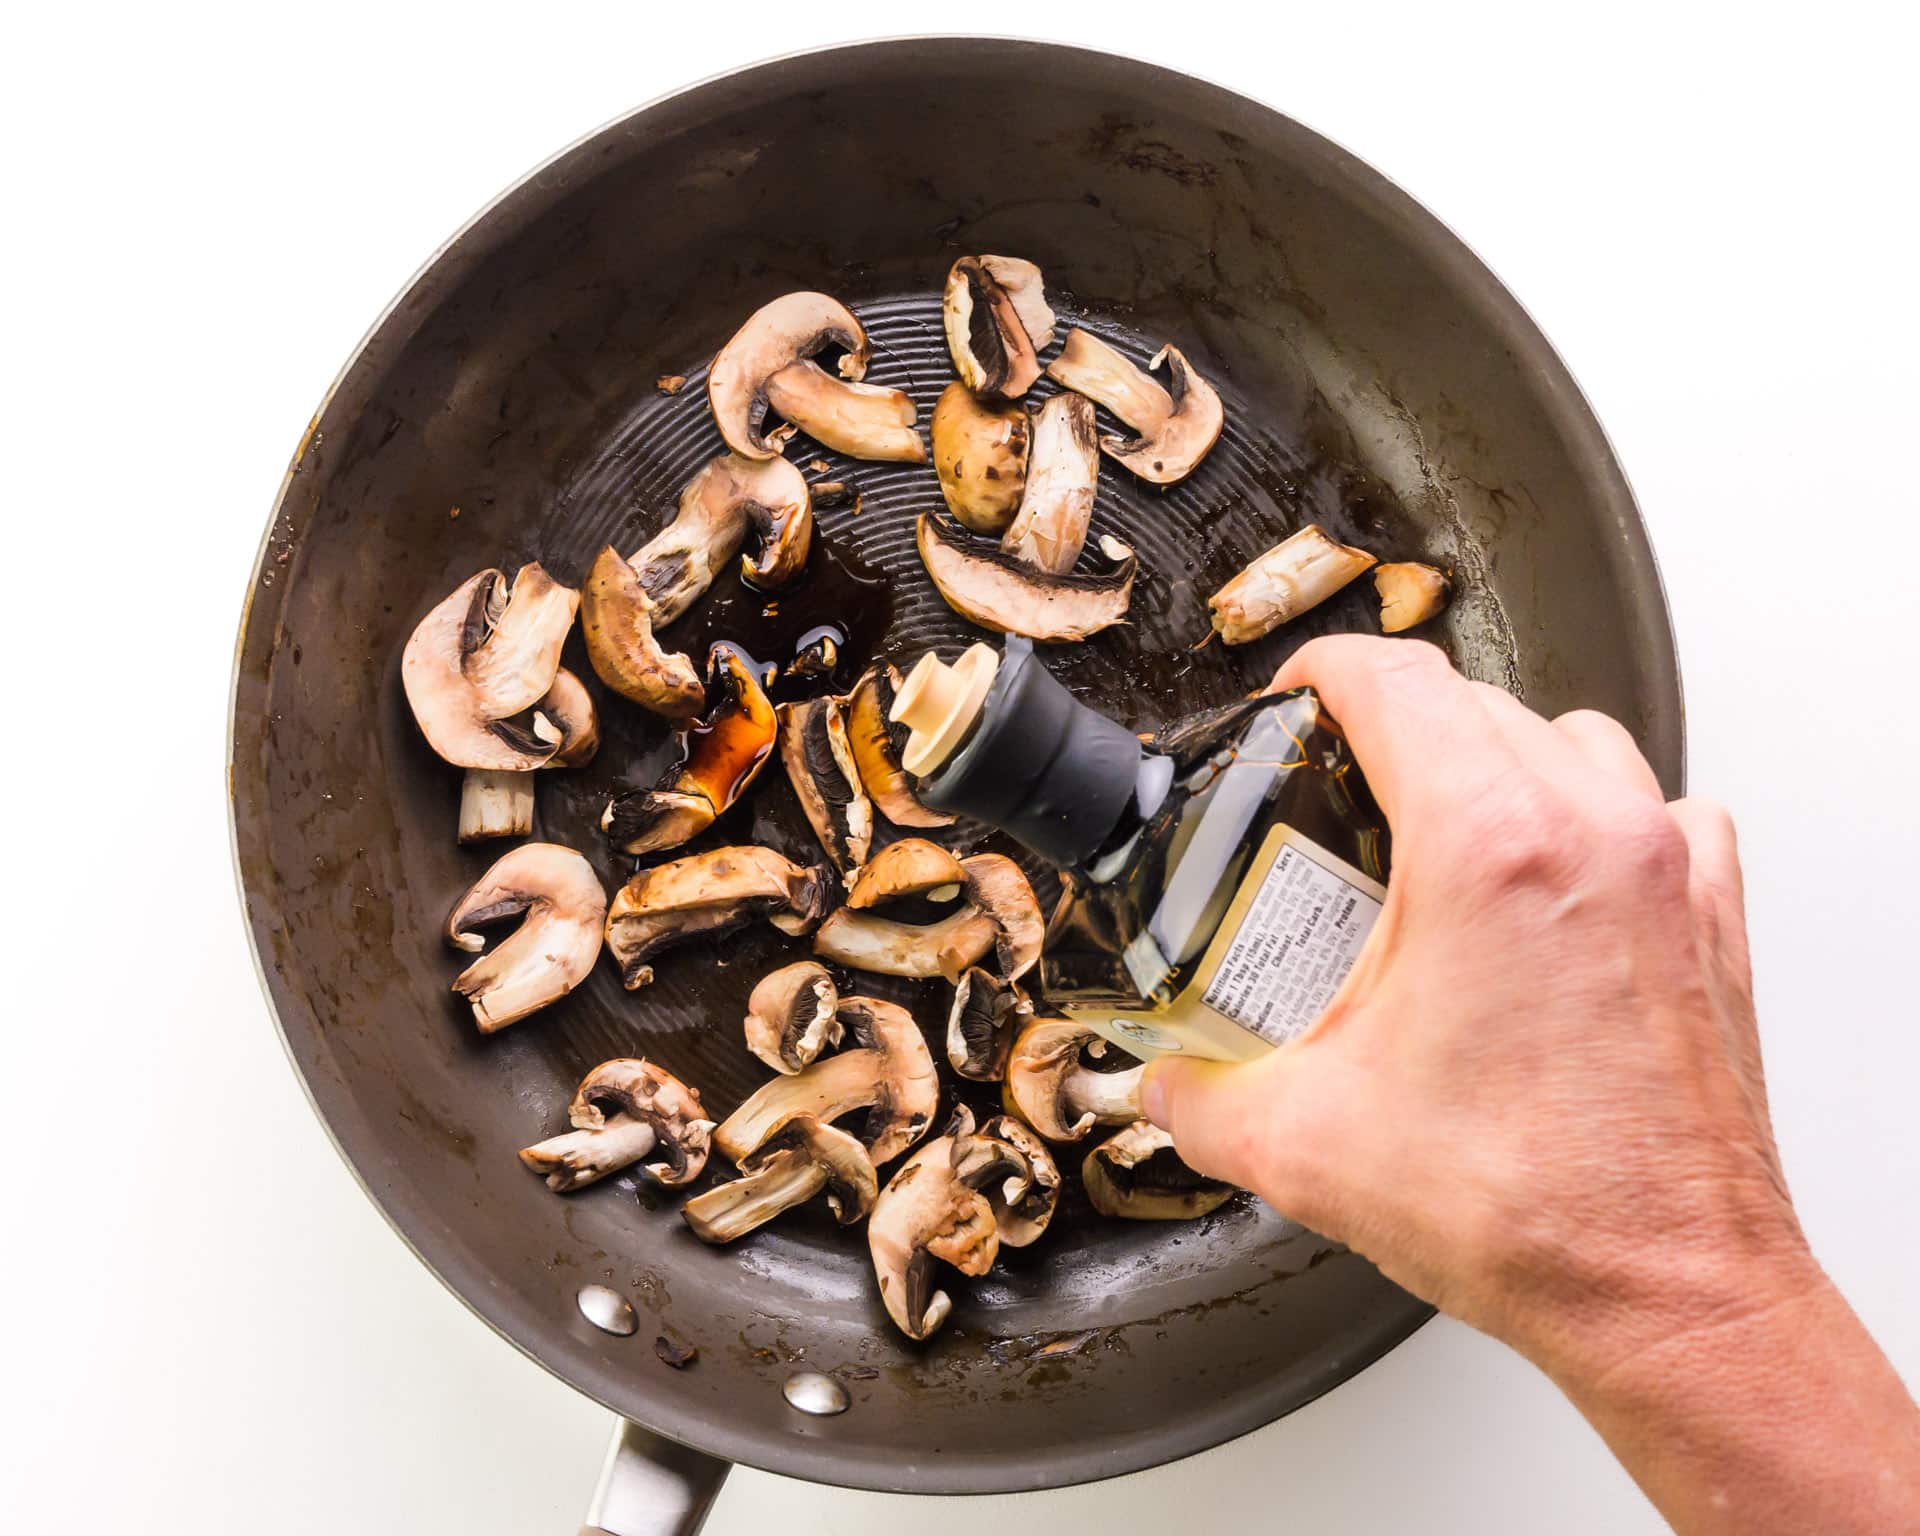
- Balsamic Vinegar: Opt for high-quality balsamic vinegar for the best flavor. You can use red wine vinegar as a substitute.
Buying Guide: When selecting Portobello mushrooms, choose ones that are firm with a smooth surface and deep color. Avoid any with dark spots or signs of moisture, as these may indicate spoilage.
Trivia
Do button mushrooms, cremini, and portobellos share a magical yet somehow secret relationship? Are they really different varieties or do they somehow share a stronger connection? Find the answer below.
What Makes This Recipe Shine?
- Flavorful Delight: These sautéed mushrooms boast a burst of savory goodness in every bite!
- Effortlessly Easy: With minimal prep and cooking time, this recipe is a breeze to whip up on busy weeknights.
- Versatile Wonder: Whether served as a side dish, topping, or standalone appetizer, these mushrooms are a crowd-pleasing favorite!
Marly’s Tips
- For extra flavor, add minced garlic, salt, and pepper to taste.
- Don’t overcrowd the skillet to ensure even cooking and browning of the mushrooms.
- To freeze cooked mushrooms, allow them to cool completely before transferring to an airtight container or freezer bag. They can be stored for up to 3 months.
Serving Suggestions
Pair sautéed mushrooms with any of the following:
- Cooked mushrooms with crusty bread makes a simple yet satisfying appetizer.
- Serve over creamy polenta or mashed potatoes for a hearty vegetarian meal.
- Top salads, pizzas, or pasta dishes with these flavorful mushrooms for an added burst of umami goodness.
Storage Tips
Store leftover sautéed mushrooms in an airtight container in the refrigerator for up to 3 days. To freeze, allow them to cool completely before transferring to a freezer-safe container or bag. Thaw in the refrigerator before reheating.
Trivia Answer
Prepare to be amazed! Despite their distinct names and appearances, button mushrooms, cremini, and portobello mushrooms are all the same mushroom species at different stages of growth. It’s like unlocking a hidden culinary secret!
More Plant-Based Sides
If you love this recipe for sautéed mushrooms, you may be ready to try even more tasty vegan side dishes. Here are some of our favorites:

Subscribe and get a free Easy Vegan Recipes eBook
Plus our latest vegan recipes, delivered right to your inbox!
Healthy Sautéed Mushrooms
Ingredients
- 2 lbs Portobello mushrooms (cut big ones in half)
- 1 teaspoon olive oil
- 1 tablespoon balsamic vinegar
- 1 tablespoon chopped fresh parsley
- Optional add-ins: minced garlic, salt and pepper to taste.
Instructions
- Wash mushrooms thoroughly. and cut into equal slices.

- Heat skillet over medium heat. Add sliced mushrooms. Drizzle with olive oil and vinegar and cook until tender.

- Serve mushrooms with chopped fresh parsley.
- To freeze mushrooms, let them come to room temperature and then transfer to a freezer-safe bag or container. You can flash freeze them first by lining them up on a tray (not touching), then freeze for 30 minutes. Once mostly frozen, transfer them to a freezer bag or container. Flash freezing prevents the mushrooms from sticking together.

Notes
How to Sauté Mushroom Tips:
- Ingredient Prep Tip: To ensure even cooking, try to slice the mushrooms into uniform thicknesses.
- Flavor Variations: Experiment with additional flavorings such as minced garlic, thyme, or rosemary for a different taste profile.
- Cooking Variation: For a deeper flavor, consider roasting the mushrooms in the oven instead of sautéing them on the stovetop.
- Storage Tip: Store any leftovers in an airtight container in the refrigerator for up to 3 days. Reheat gently in a skillet or microwave before serving.
Nutrition
Welcome to your go-to guide for cooking canned chickpeas like a pro! If you’ve ever been baffled by firm or gritty chickpeas straight out of the can, fret no more. In just a few simple steps, we’ll have you mastering the art of perfectly cooked chickpeas for any recipe.
Do Your Chickpeas Need Further Cooking?
If you’re adding canned chickpeas straight into a soup or stew, they’re fine. They’ll cook further with the other ingredients. The same is true when you’re making my air fryer falafel recipe. It’s actually perfect that the chickpeas are firm!
But what if you’re adding them to a salad or making a chickpea “tuna” salad?
Sometimes canned chickpeas are too firm, making them difficult to mash and resulting in a gritty texture. That’s when a little extra cooking comes in handy.
Key Ingredients
You can find the full printable recipe, including ingredient quantities, below. But first, here are some explanations of ingredients and steps to help you make this recipe perfect every time.
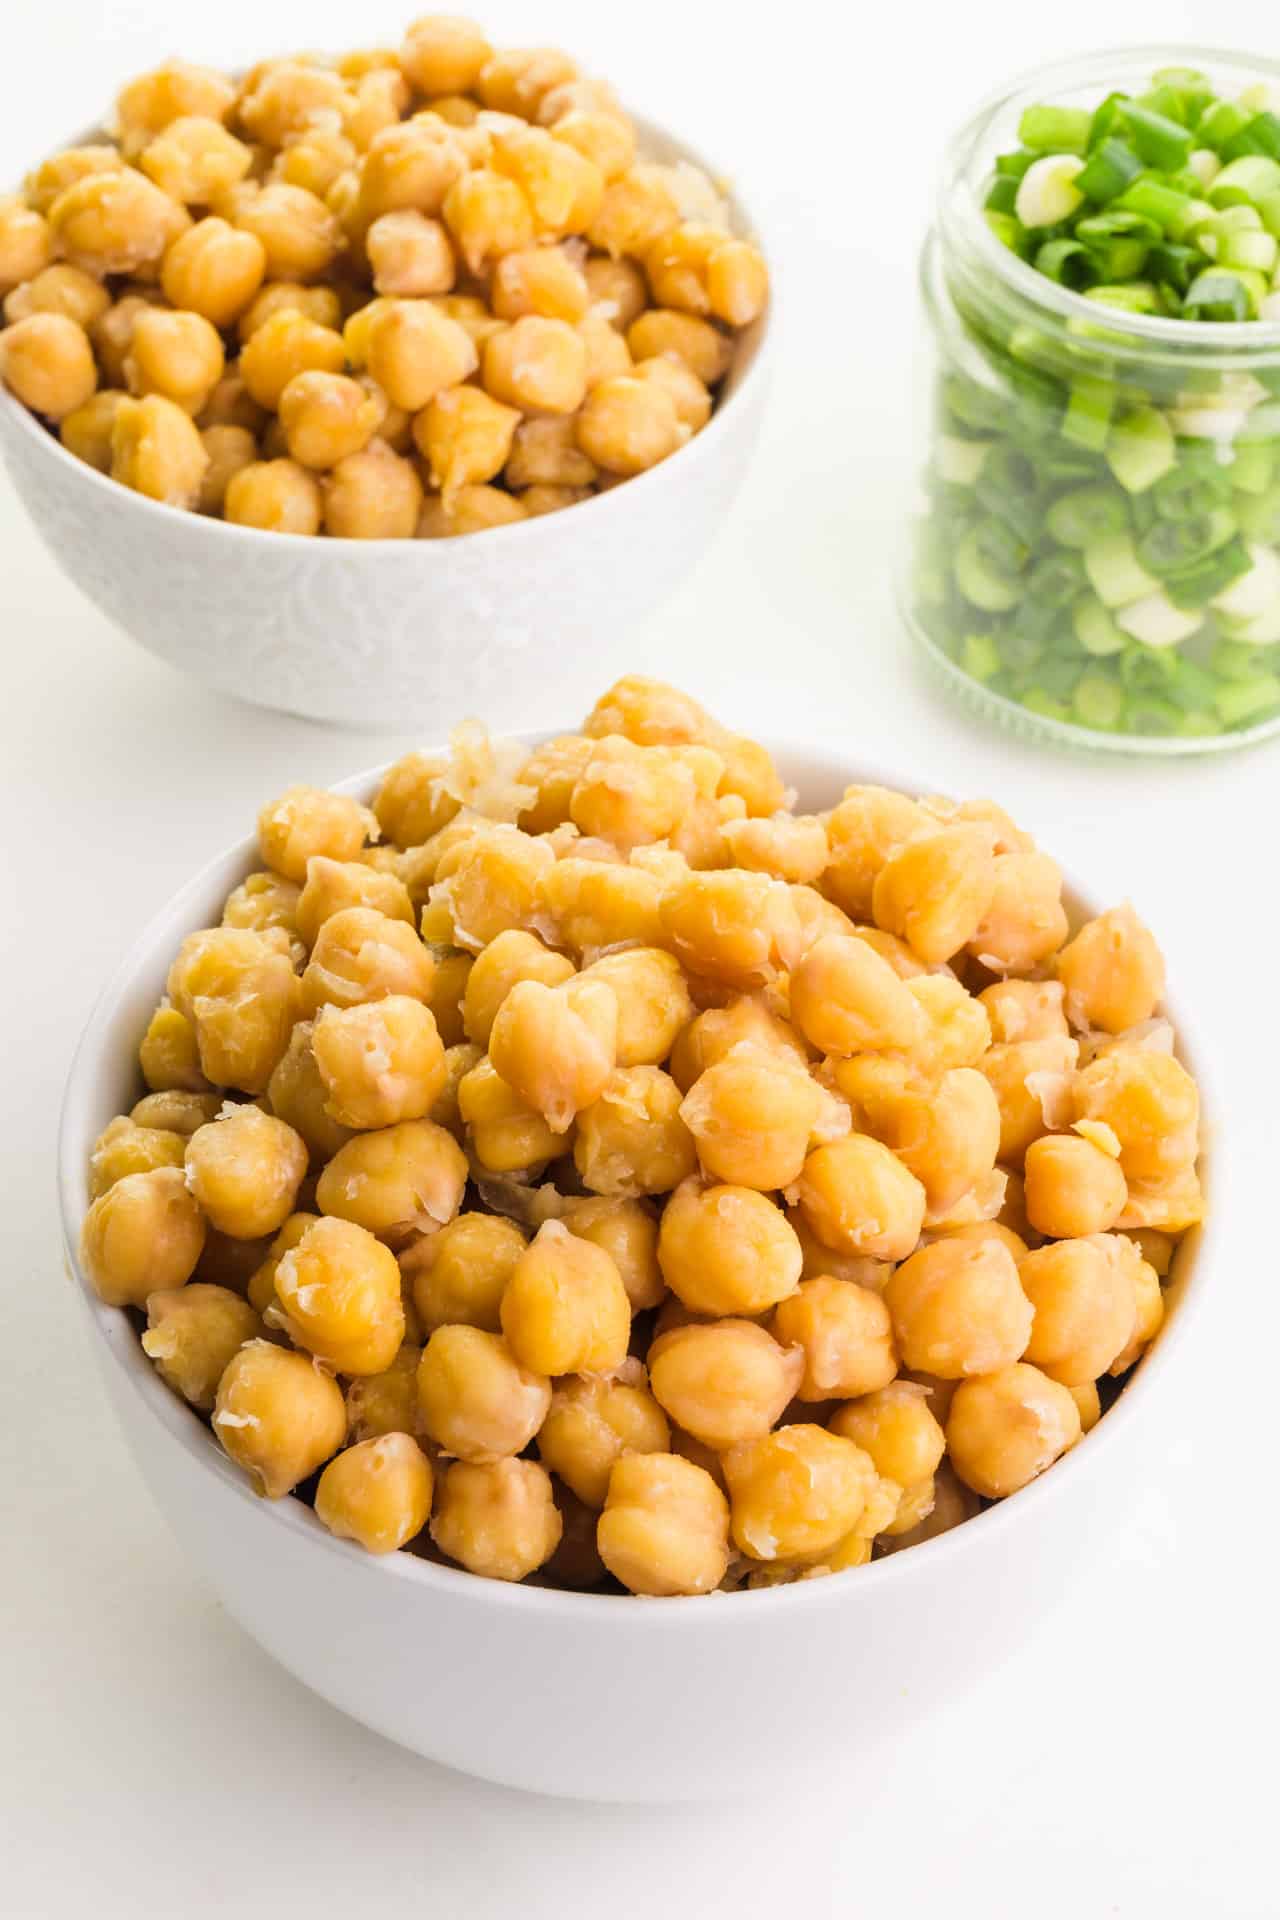
- Canned Chickpeas – Not all cans of chickpeas are created equal. Some, I’ve found, are perfectly soft right out of the can. Others are quite firm and unusable in some recipes. See below for what to do if your can of chickpeas is too firm.
Quick Check: Squish Test
To ensure your canned chickpeas are ready for any recipe, give them a quick squish between your fingers. If they’re super firm and hard to squish, they need some extra cooking.
Soft enough to squish? You’re good to go!
Simple Solution: Add chickpeas to boiling water to soften them.
Why boiling water? Adding chickpeas to boiling water (versus adding them to the water before it comes to a boil) prevents the legumes from becoming waterlogged and soggy, ensuring the ideal texture for using them in your recipe.
Storage Tips
Transfer cooked chickpeas to an airtight container and refrigerate for up to 4 days. You can freeze them for up to 2 months in a freezer-safe container. To thaw them, transfer to the fridge overnight.
More Chickpea Recipes
Here are more ways to use chickpeas in your favorite recipes:

Subscribe and get a free Easy Vegan Recipes eBook
Plus our latest vegan recipes, delivered right to your inbox!
Canned Chickpeas
Equipment
Instructions
- Add 1 ½ cups of water to a saucepan and bring to a boil.
- Add chickpeas boiling water and simmer over medium heat for 5 minutes.
Nutrition
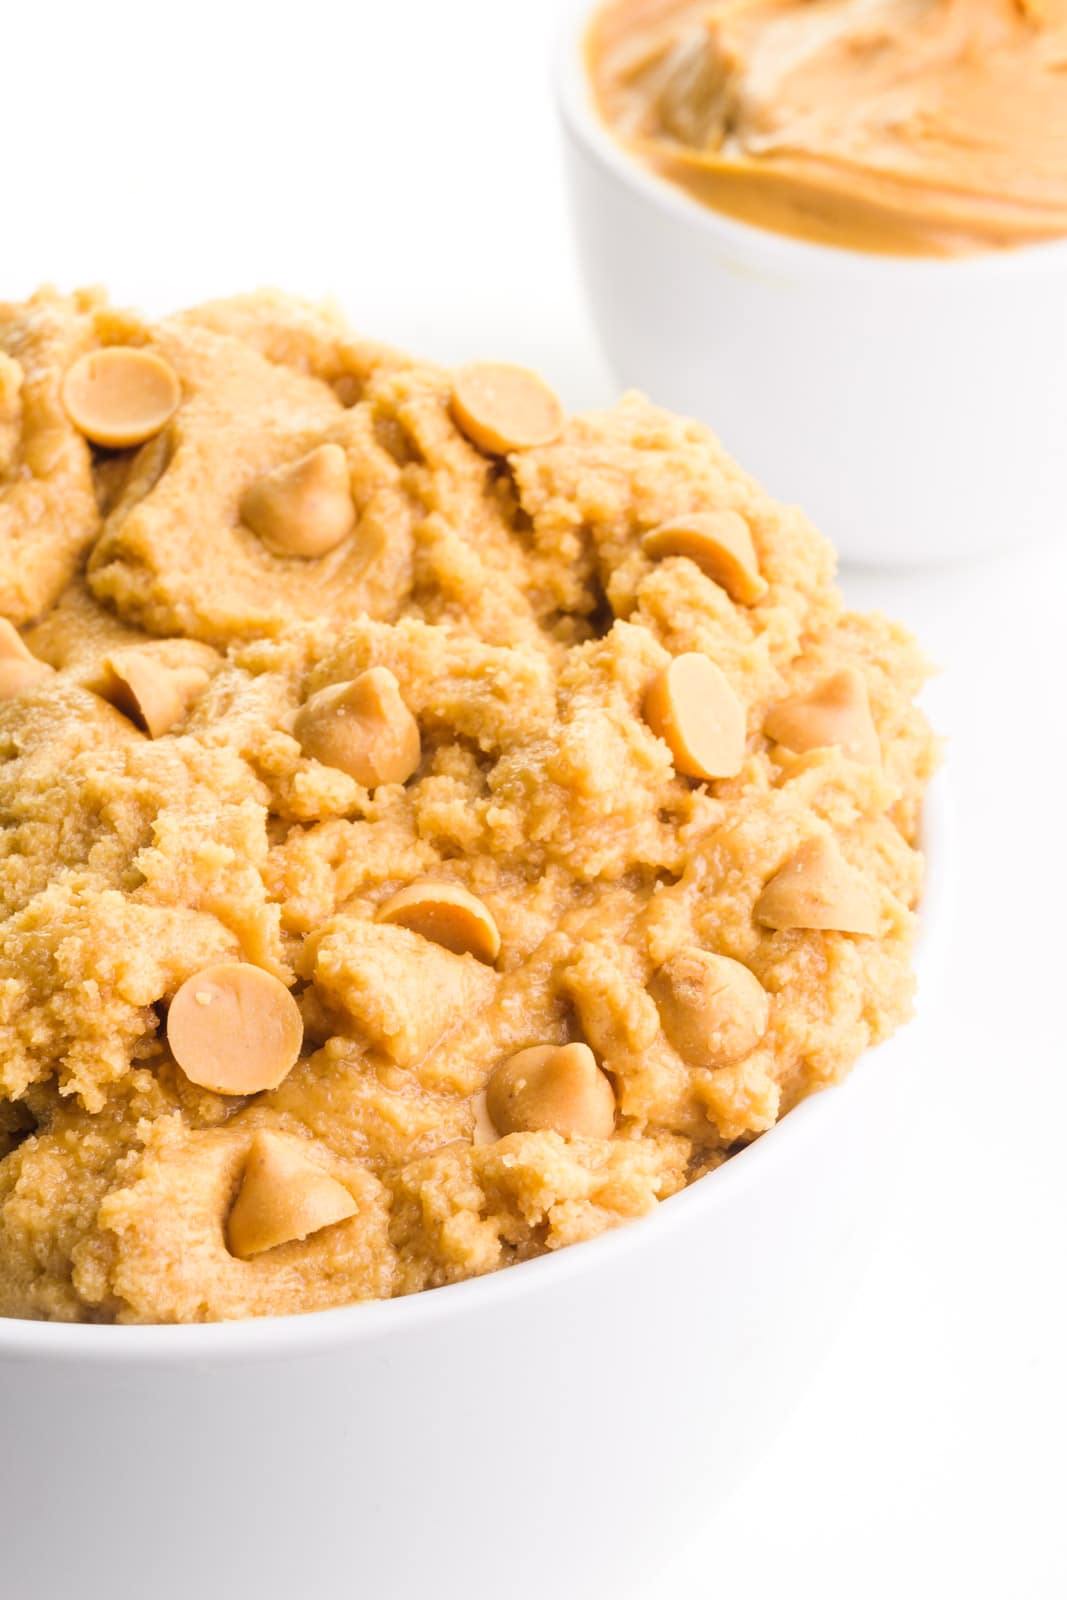
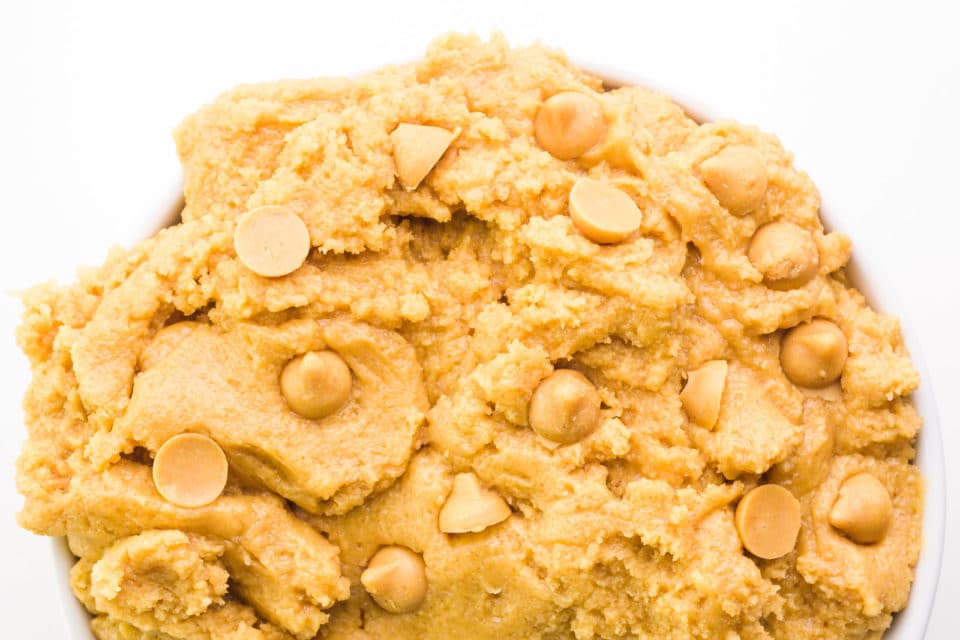
This edible peanut butter cookie dough recipe gives an excuse to eat the very best part of cookies—the dough. Raw cookie dough treats make for perfect movie nights, especially when served with popcorn!
Parties can be so much fun. I love having friends or family over, sharing laughs over the perfect music playing softly in the background.
And what I really love is knowing that my guests are experiencing delicious food. But one thing I know for sure — I don’t want to be so tired after fixing all the food that I can’t enjoy the party.
That’s where simple party food like edible peanut butter cookie dough come in! It’s so easy, it’s ready in minutes!
Ingredients & Substitutions
You can find the full printable recipe, including ingredient quantities, below. But first, here are some explanations of ingredients and steps to help you make this recipe perfect every time.
Here are the ingredients you’ll need for this recipe, including substitution ideas:
- Flour — Use all-purpose, whole wheat pastry flour (different than whole wheat flour), or even homemade oat flour.
- Peanut butter — Creamy peanut butter is the go-to favorite, but you can substitute crunchy.
- Vegan butter — Any store-bought dairy-free butter or margarine will work or you can even make your own vegan butter.
- Sugar — Just like any cookie, we’ll use a combination of granulated and brown sugar in this recipe.
- Plant-based Milk — Use your favorite plain or vanilla-flavored plant-based milk, like soy, almond, etc.
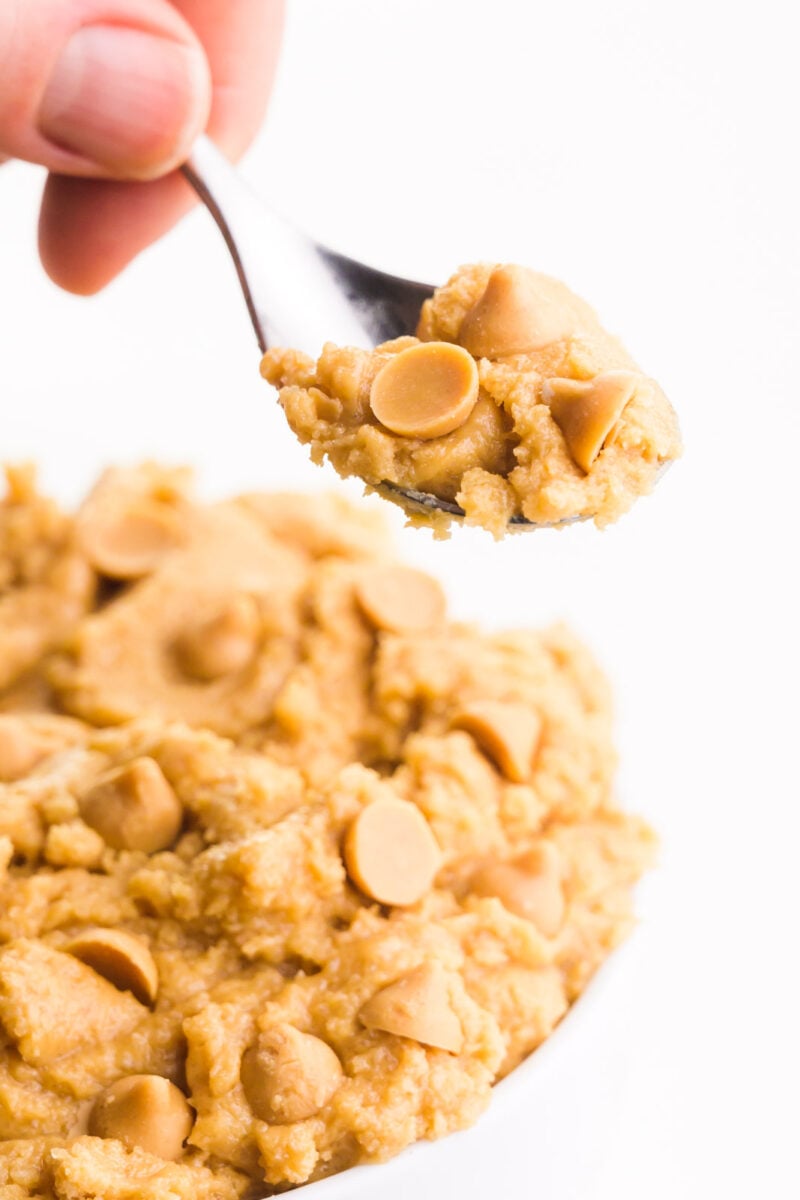
- Optional Add-ins — add some chopped nuts, dairy-free chocolate chips, vegan white chocolate chips, or chopped up vegan peanut butter cups.
What Makes This Recipe Shine?
- Cooking the raw flour until it reaches a temperature of 165°F kills contaminants that make it unsafe to it in its raw state.
- Creaming the fat with the sugars creates a light and fluffy cookie dough that’s addictively delicious.
- Eliminating the baking soda and baking powder means this cookie dough isn’t suitable for baking, but makes this raw dough perfect for snacking.
Serving Suggestions
There are many ways to serve this cookie dough, including the following:
- Cookie Dough Balls — Add chocolate chips and roll them into balls.
- By the Bowlful — Grab a couple of spoons and eat it straight from the bowl! Serve some vegan popcorn on the side to break up the sweetness.
- With Ice Cream — Add bits of this raw cookie dough to your favorite vegan ice cream or even some banana nice cream
- Dipped in Chocolate — Follow the tips for the Oreo Truffles to dip balls of this peanut butter dough in chocolate. Serve them chilled or even frozen!
- With Chocolate — Add 1/4 cup cocoa powder to make chocolate peanut butter cookie dough.
Storage Tips
Refrigerate cookie dough in balls or in a covered bowl for up to 7 days in the fridge or up to 2 months in the freezer.
Frequently Asked Questions
Is it safe to eat raw flour?
There are definite concerns about contamination from eating raw flour. To that end, you should always precook the flour before making a no-bake dish that includes raw flour.
Is it safe to eat raw cookie dough?
Most of us have taken a bite or two of raw cookie dough and not experienced any negative side effects. However, raw eggs and raw flour can have contaminants that make it unsafe to eat. Cooking without eggs and using heat-treated flour makes it safe to eat raw cookie dough.
Whatever you do, don’t bake this cookie dough. It’s not made for baking — for example, there’s no baking powder or baking soda!
Single-Serving Cookie Dough
Want a single serving of cookie dough? Combine these ingredients in a bowl:
- 1/4 cup heat-treated flour
- 1/3 cup peanut butter
- 2 tablespoons of vegan butter (softened
- 1/3 cup powdered sugar
- Add-ins like chocolate chips.
Stir this all together and grab your spoon!
Vegan Peanut Butter Recipes
If you love this easy cookie dough recipe, and you want more vegan peanut butter recipes, be sure to check these out:
Subscribe and get a free Easy Vegan Recipes eBook
Plus our latest vegan recipes, delivered right to your inbox!

Edible Peanut Butter Cookie Dough
Equipment
Ingredients
- 1 cup all-purpose flour
- ½ cup vegan butter, softened
- ¾ cup peanut butter
- ½ cup granulated sugar
- ½ cup brown sugar
- ¼ teaspoon salt
- 2 tablespoons soy milk
- 1 cup Optional Add-ins: dairy-free chocolate chips, chopped vegan peanut butter cups, chopped Nutter Butter cookies, vegan caramel, etc. (see note)
Instructions
- Heat the flour until it reaches 165°F/75°C. See notes for 2 ways to do this. Allow the flour to cool completely.
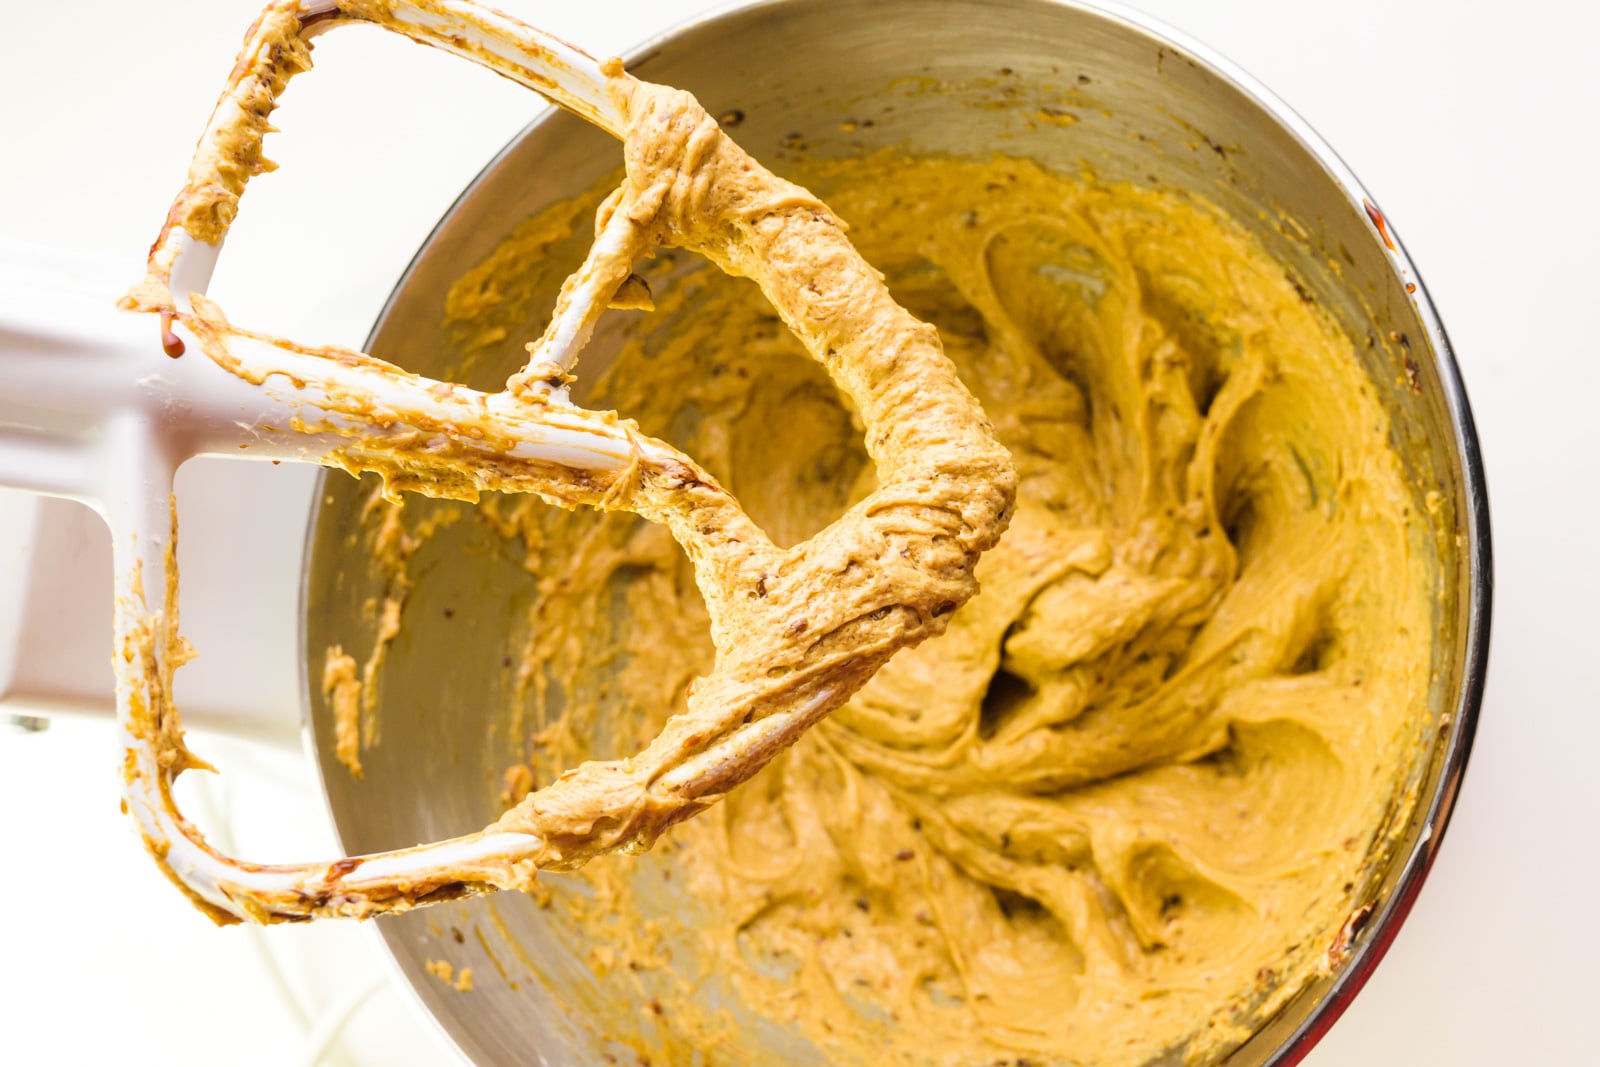
- Using a stand mixer with the paddle attachment or a handheld mixer, cream together the butter and peanut butter until light and fluffy, about 2 minutes. Add the sugars and continue mixing until creamy and smooth, another 2 to 3 minutes. Add soy milk and mix until combined.

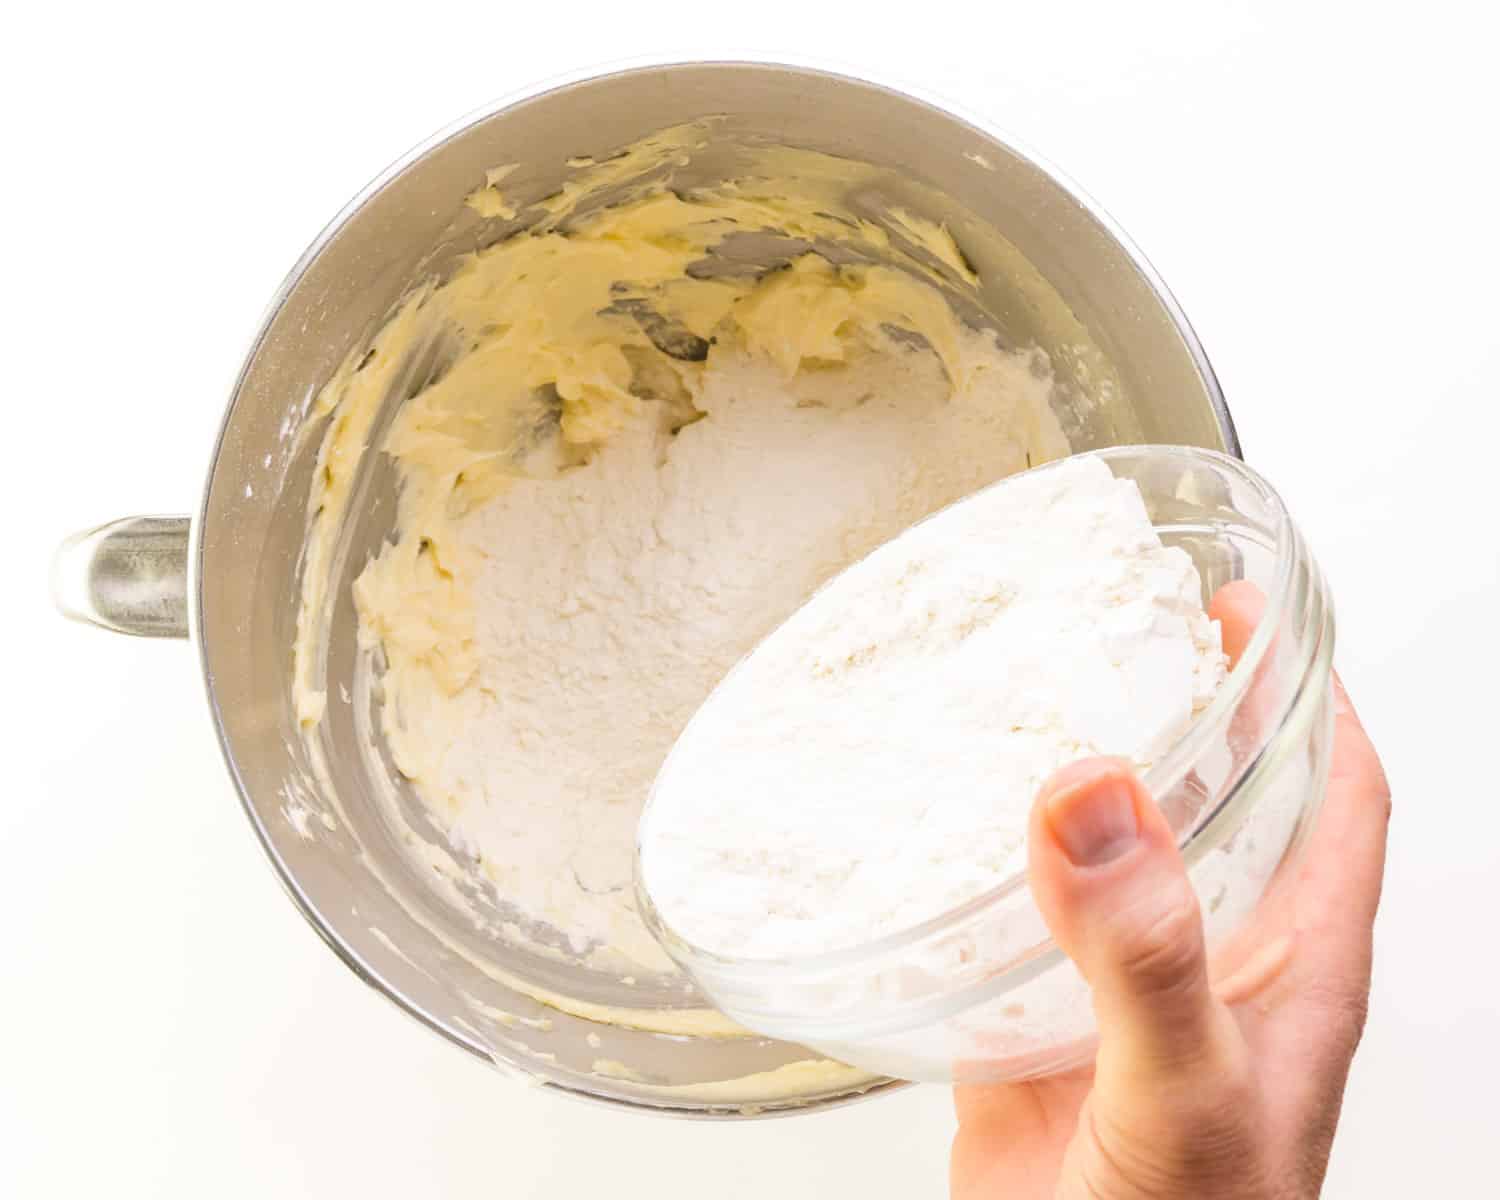
- Add the cooled flour and salt and beat until just combined.

- Assess the batter. If it's dry, add a teaspoon or two more soy milk. If it's too moist, add a tablespoon or two of heat-treated flour. If you don't have any more treated flour, substitute a tablespoon of ground flaxseed
- Stir in your add-ins and then transfer to a serving dish. Serve immediately or refrigerate in a covered bowl for up to 7 days in the fridge or up to 2 months in the freezer.
Notes
Nutrition
This post was originally published in 2012 and was updated to include new photos, new text, and an updated recipe in 2021.